



DIY Arduino Robotarm: Draadloos Besturen vanaf je Smartphone
In deze handleiding bouw je een Arduino Robotarm die draadloos bestuurd en geprogrammeerd wordt via een zelfgemaakte Android-app. Volledig proces: 3D-ontwerp en -print, elektronica aansluiten, Arduino programmeren, Android-app ontwikkelen.
Bekijk de video of lees de handleiding.
Overzicht
App sliders: handmatige controle per servo/as. "Save"-knop: posities/steps onthouden → robotarm herhaalt automatisch. Dezelfde knop: pauzeren, resetten/verwijderen voor nieuwe opname.
Arduino Robotarm 3D-model
Ontworpen in SolidWorks. 5 vrijheidsgraden.
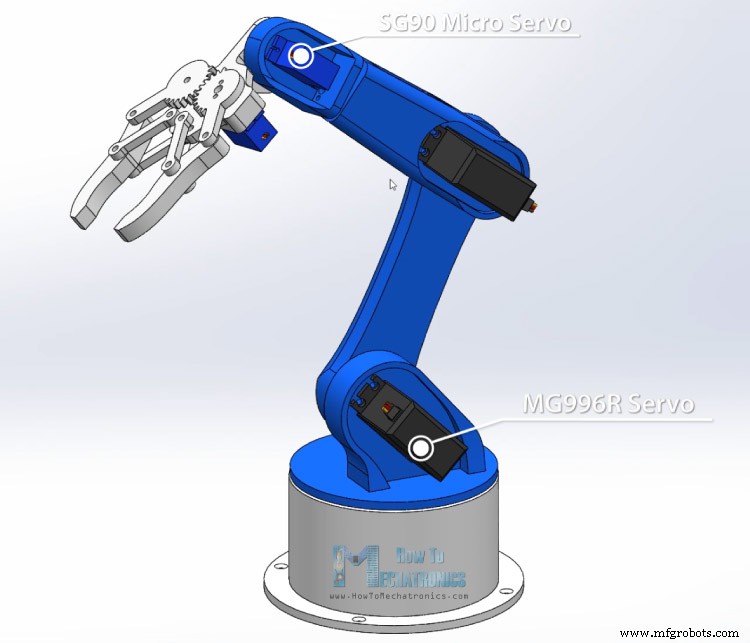
Eerste 3assen (taille, schouder, elleboog): MG996R servo's. Laatste 2assen (polsoor draai/kantel) + grijper: SG90 micro servo's.
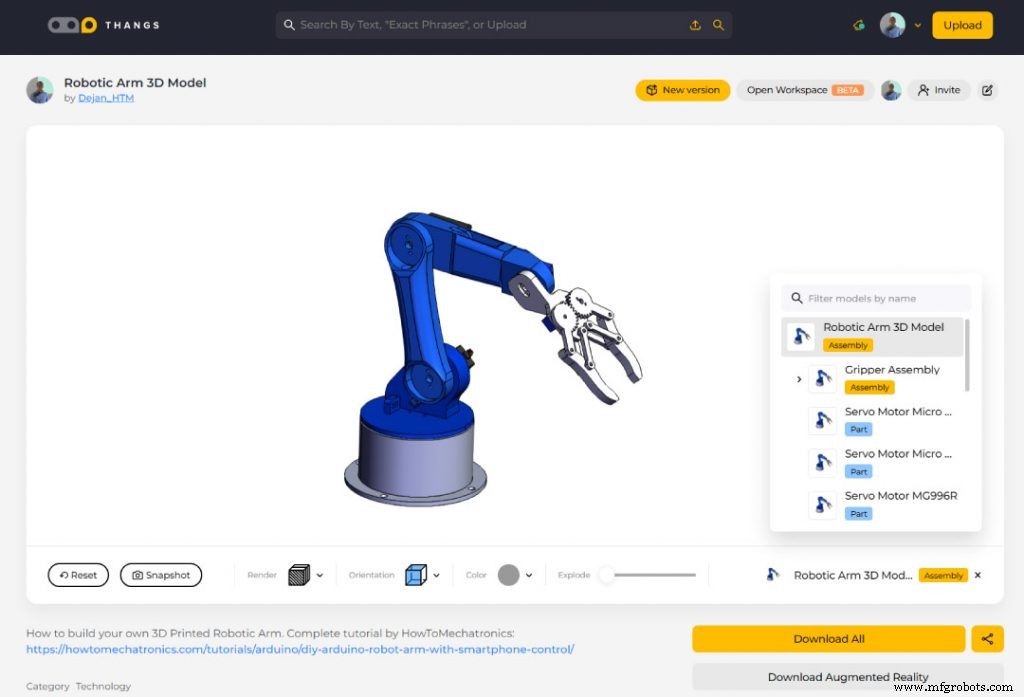
3D-model downloaden/bekijken op Thangs.

Arduino Robotarm STL Bestanden
1 bestand(en) 0.00 KB Download3D-printen van de Robotarm
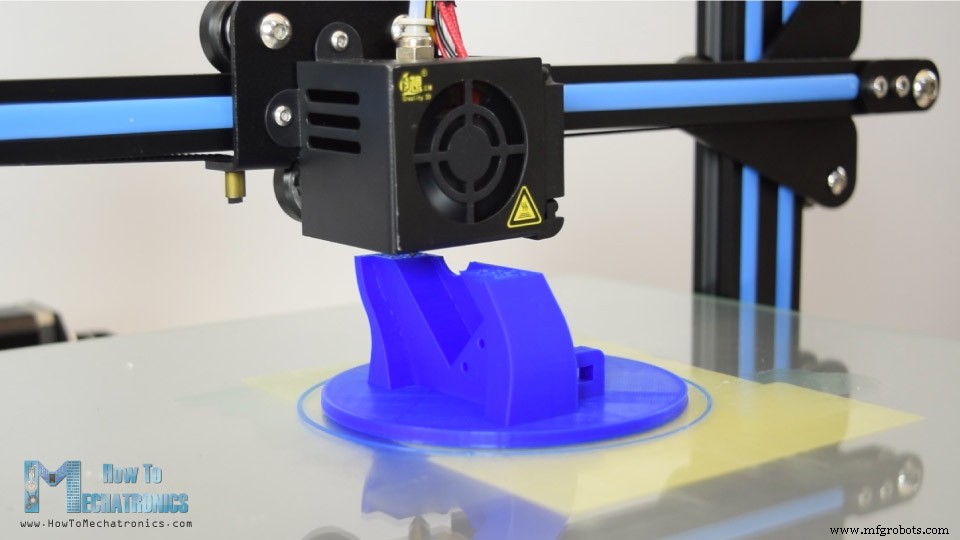
Geprint op Creality CR-10 (via Banggood). Kwaliteit uitstekend voor prijs, ~90% pre-assembled.
Assemblage: boven-/onderframe verbinden (bouten/beugels), electronica aansturen via meegeleverde kabels.
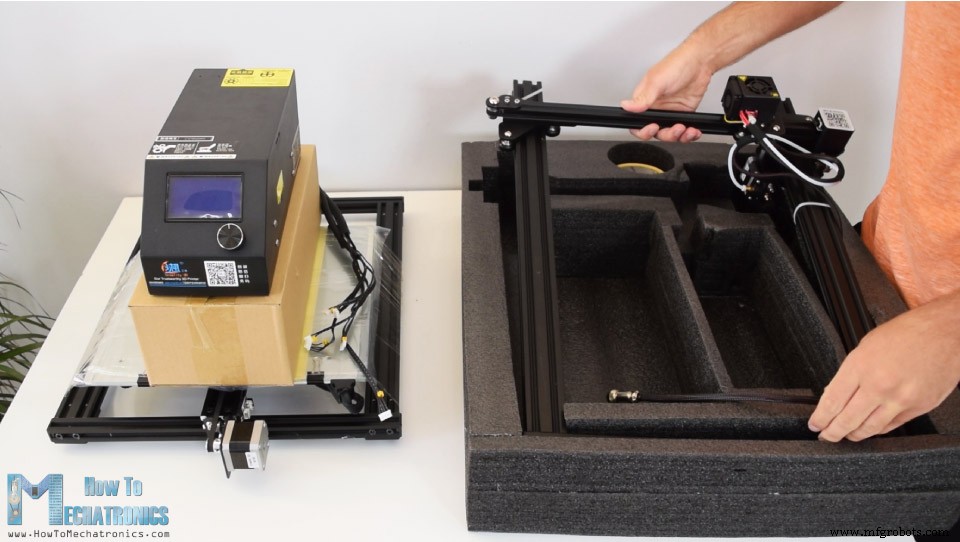
Check rolwielen (excentrische moeren vastdraaien). Bed levelen → printen.
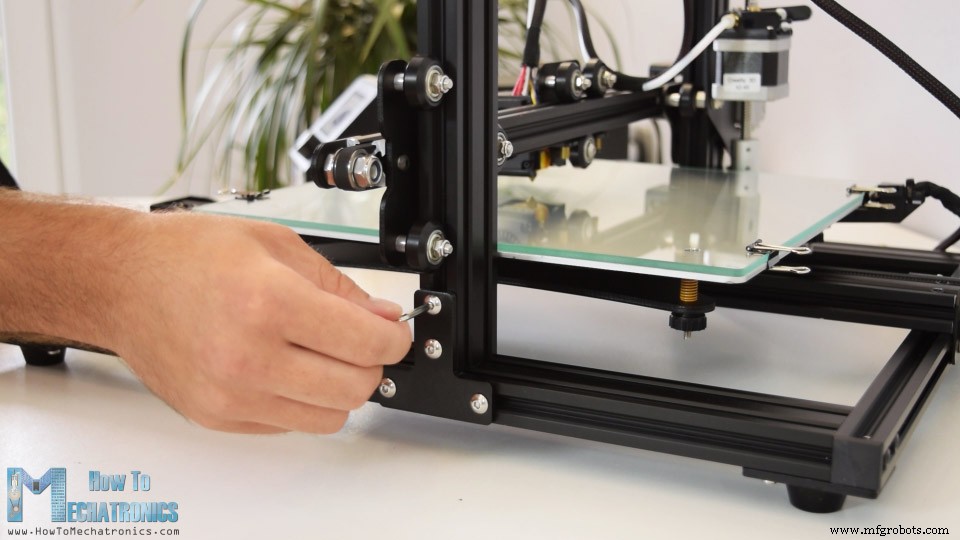
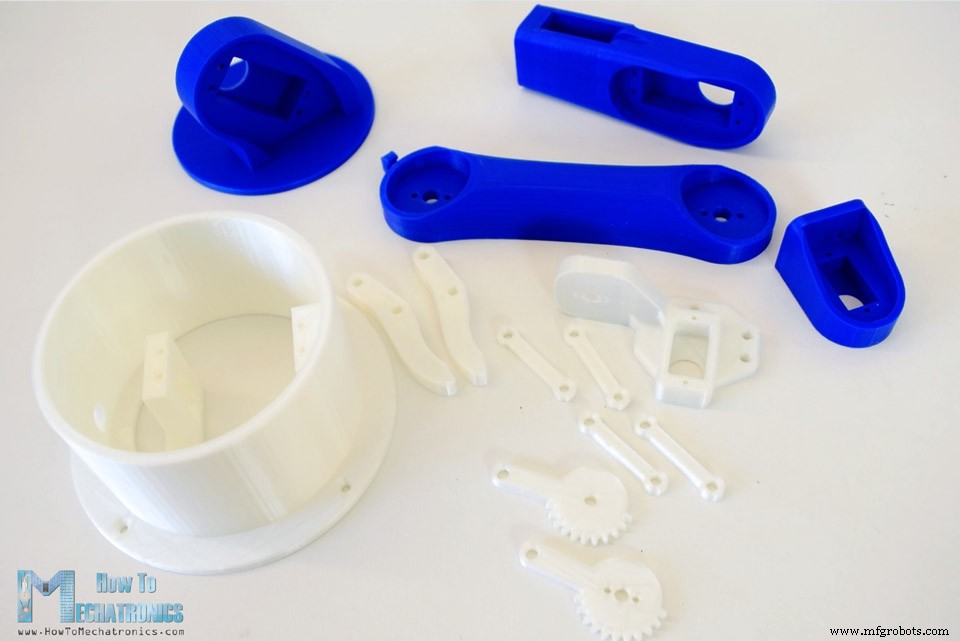
Alle onderdelen in enkele uren klaar.
Lees meer: Top 15 Must-Have 3D-printer Accessoires en Tools
Robotarm Monteren
Basis: eerste servo vastzetten (bijgeleverde schroeven). Rond horen op uitvoeras, bout. Bovenstuk erop, 2 schroeven.
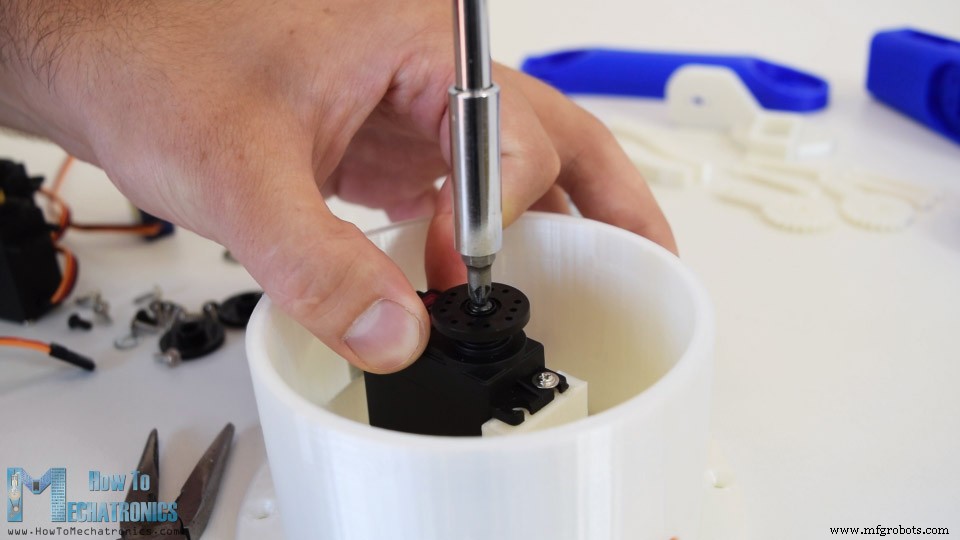
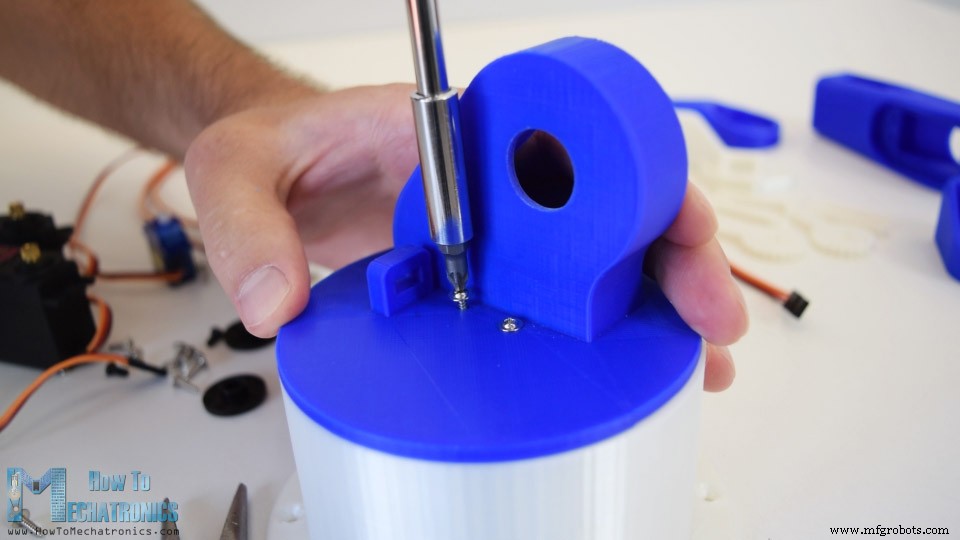
Volgende as: servo → rond horen → bout. Bij schouderas: veer/rubberband voor ondersteuning (zwaarte arm + lading).
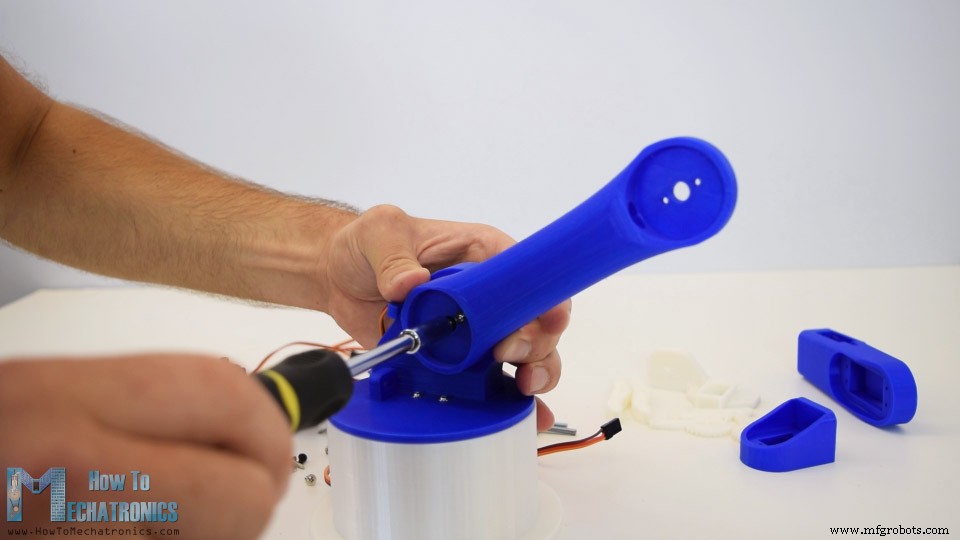
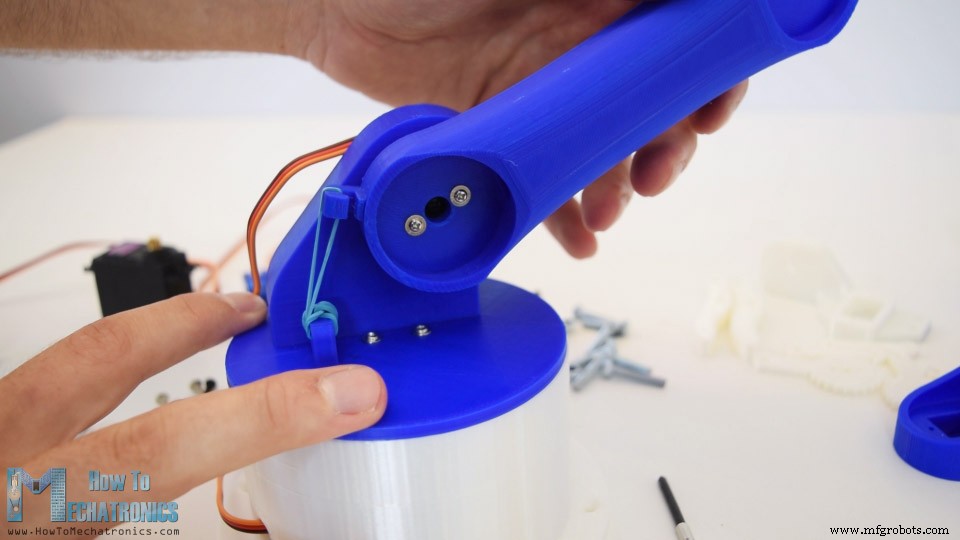
Rest analog. Grijper: 4mm bouten/moeren.
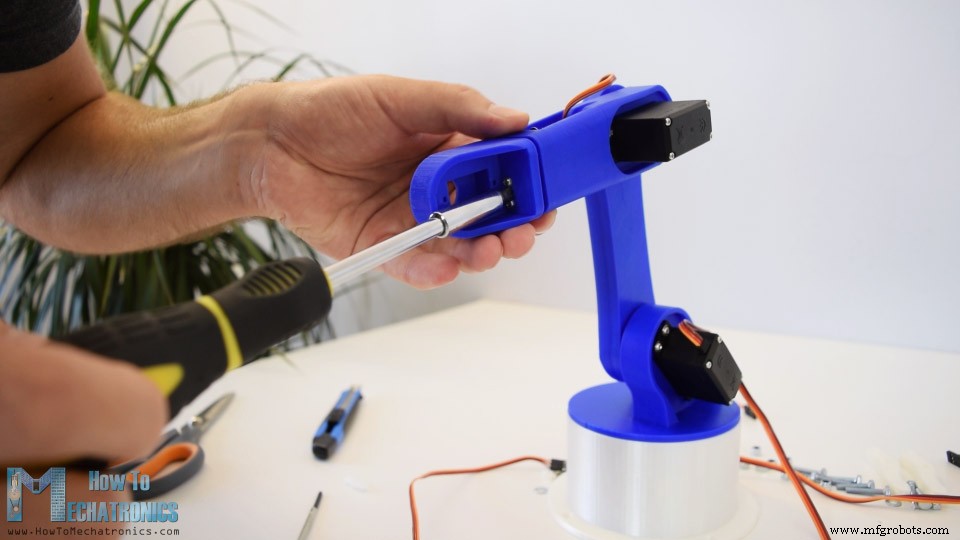
Grijper op laatste servo → robotarm compleet.
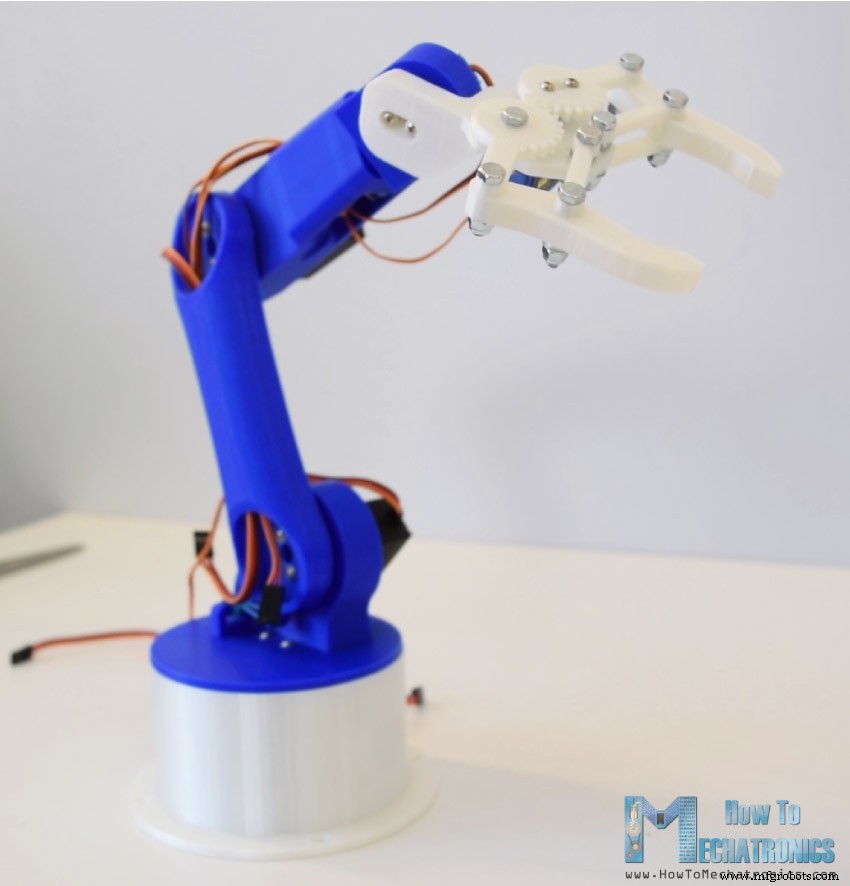
Robotarm Aansluitschema
Simpel: Arduino + HC-05 Bluetooth module. 6 servo controle-pinnen → 6 digitale Arduino-pinnen.
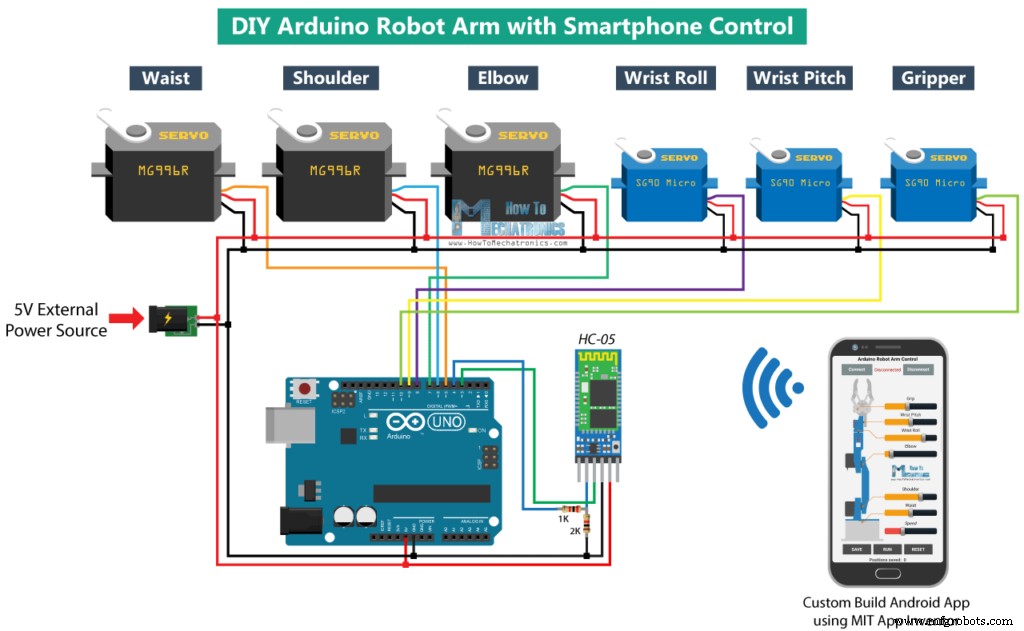
Servo voeding: 5V vanaf *externe* bron (Arduino kan stroom niet aan). Minimaal 2A. Alles aangesloten → Arduino programmeren + Android-app maken.
Componenten: MG996R Servo, SG90 Micro Servo, HC-05 Bluetooth, Arduino Board, 5V 2A DC Voeding.
Arduino Robotarm Code
Code is langer → in secties met uitleg. Complete code aan het eind.
Eerst: SoftwareSerial (Bluetooth) en Servo bibliotheek (beide standaard in Arduino IDE). 6 servo's definiëren, HC-05, variabelen voor huidige/vorige posities, arrays voor opgeslagen stappen (automatische modus).
#include <SoftwareSerial.h>
#include <Servo.h>
Servo servo01, servo02, servo03, servo04, servo05, servo06;
SoftwareSerial Bluetooth(3, 4); // Arduino(RX, TX) - HC-05(TX, RX)
int servo1Pos, servo2Pos, servo3Pos, servo4Pos, servo5Pos, servo6Pos;
int servo1PPos, servo2PPos, servo3PPos, servo4PPos, servo5PPos, servo6PPos;
int servo01SP[50], servo02SP[50], servo03SP[50], servo04SP[50], servo05SP[50], servo06SP[50];
int speedDelay = 20;
int index = 0;
String dataIn = "";setup(): servo's initialiseren, Bluetooth (38400 baud, standaard), time-out, initiele armpositie.
void setup() {
  servo01.attach(5); servo02.attach(6); servo03.attach(7);
  servo04.attach(8); servo05.attach(9); servo06.attach(10);
  Bluetooth.begin(38400); Bluetooth.setTimeout(1); delay(20);
  servo1PPos = 90;  servo01.write(servo1PPos);
  servo2PPos = 150; servo02.write(servo2PPos);
  servo3PPos = 35;  servo03.write(servo3PPos);
  servo4PPos = 140; servo04.write(servo4PPos);
  servo5PPos = 85;  servo05.write(servo5PPos);
  servo6PPos = 80;  servo06.write(servo6PPos);
}loop(): check Bluetooth.available(), lees string via readString() → dataIn. Actie afhankelijk van prefix.
if (Bluetooth.available() > 0) {
  dataIn = Bluetooth.readString();
Android Besturings-app
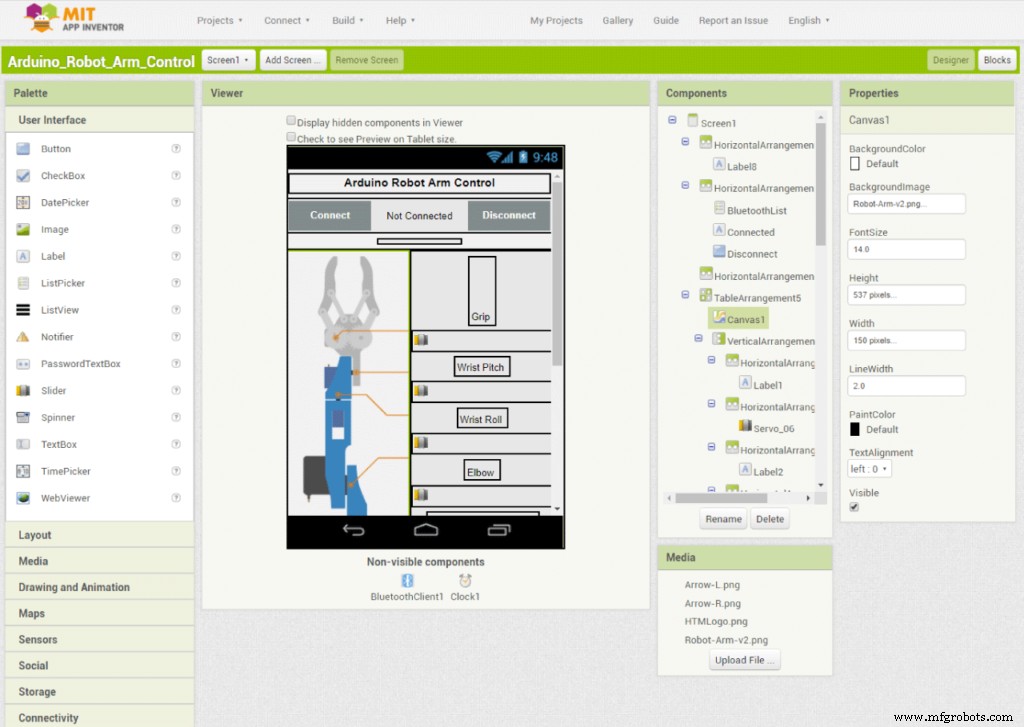
App gemaakt met MIT App Inventor.
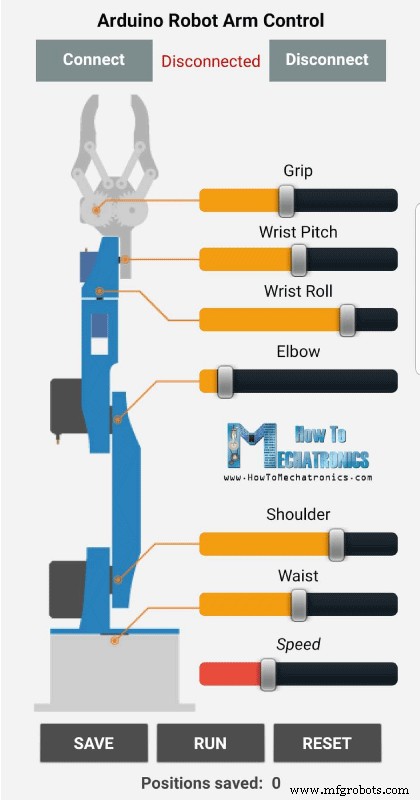
Boven: 2 knoppen voor Bluetooth-verbinding (HC-05). Links: robotarm afbeelding. Rechts: 6 sliders (servo's) + 1 slider (snelheid). Elke slider: eigen start/min/max waardes passend bij gewrichten. Onder: SAVE, RUN, RESET knoppen voor automatische modus. Label toont aantal opgeslagen stappen.
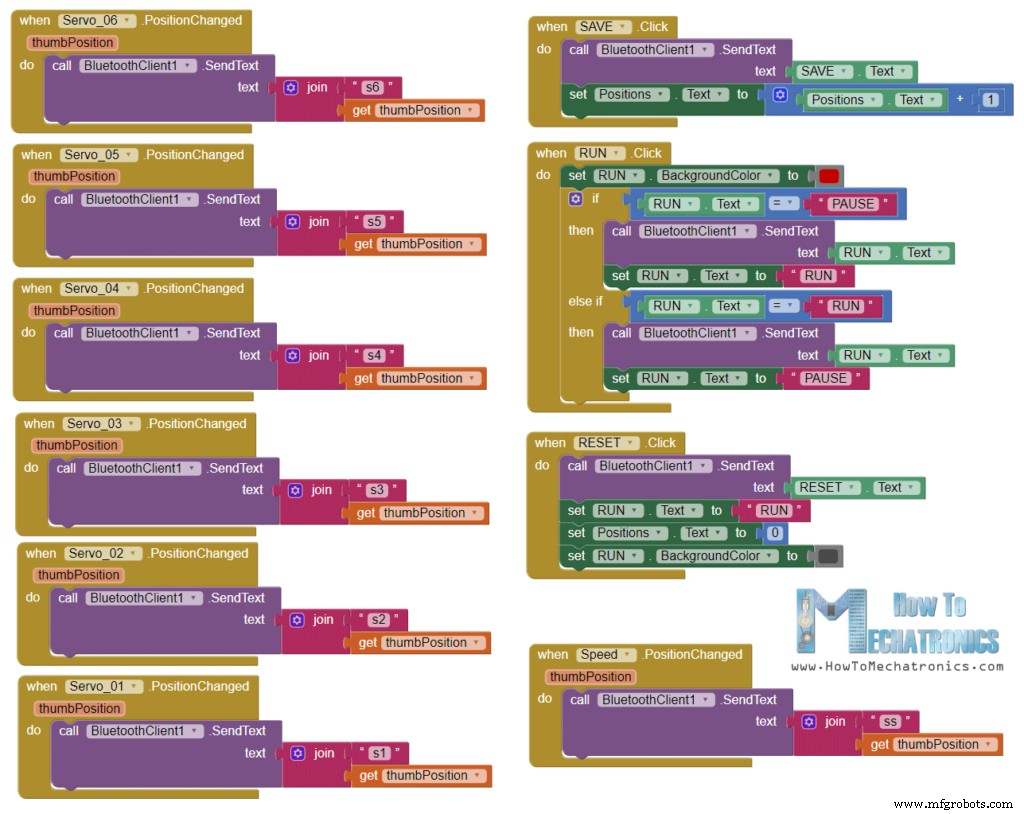
Blokken achter de app: linkerkant Bluetooth verbinding. Sliders: bij wijziging → Bluetooth.SendText met prefix (welke slider) + waarde.
Downloads: MIT App Inventor projectbestand + Android APK.
Arduino Robotarm Control MIT App Inventor Projectbestand
1 bestand(en) 24.85 KB DownloadArduino Robotarm Control Android App
1 bestand(en) 2.57 MB DownloadArduino: startsWith() checkt prefix → weet welke servo. substring() haalt waarde, toInt() → integer, servo naar positie.
if (dataIn.startsWith("s1")) {
  String dataInS = dataIn.substring(2, dataIn.length());
  servo1Pos = dataInS.toInt();
Rightstreeks write() = max snelheid (te hard). Snelheid regelen met FOR-lussen: stap voor stap van vorige naar huidige positie met delay.
if (servo1PPos > servo1Pos) {
  for (int j = servo1PPos; j >= servo1Pos; j--) {
    servo01.write(j); delay(20);
  }
}
if (servo1PPos < servo1Pos) {
  for (int j = servo1PPos; j <= servo1Pos; j++) {
    servo01.write(j); delay(20);
  }
}
servo1PPos = servo1Pos;
Zelfde methode voor alle assen.
SAVE-knop: posities opslaan in arrays, index verhogen.
if (dataIn.startsWith("SAVE")) {
  servo01SP[index] = servo1PPos;
  servo02SP[index] = servo2PPos;
  servo03SP[index] = servo3PPos;
  servo04SP[index] = servo4PPos;
  servo05SP[index] = servo5PPos;
  servo06SP[index] = servo6PPos;
  index++;
}
RUN-knop: roept runservo() aan (opgeslagen stappen afspelen). Functie: herhaal tot RESET. FOR-lus door alle stappen, check inkomende data (PAUSE/RUN, snelheid slider).
void runservo() {
  while (dataIn != "RESET") {
    for (int i = 0; i <= index - 2; i++) {
      if (Bluetooth.available() > 0) {
        dataIn = Bluetooth.readString();
        if (dataIn == "PAUSE") {
          while (dataIn != "RUN") {
            if (Bluetooth.available() > 0) {
              dataIn = Bluetooth.readString();
              if (dataIn == "RESET") break;
            }
          }
        }
        if (dataIn.startsWith("ss")) {
          String dataInS = dataIn.substring(2, dataIn.length());
          speedDelay = dataInS.toInt();
        }
      }
      // Servo 1
      if (servo01SP[i] > servo01SP[i+1]) {
        for (int j = servo01SP[i]; j >= servo01SP[i+1]; j--) {
          servo01.write(j); delay(speedDelay);
        }
      }
      if (servo01SP[i] < servo01SP[i+1]) {
        for (int j = servo01SP[i]; j <= servo01SP[i+1]; j++) {
          servo01.write(j); delay(speedDelay);
        }
      }
      // Servo 2-6 analoog...
    }
  }
}
RESET-knop: arrays wissen (memset naar 0), index = 0.
if (dataIn == "RESET") {
  memset(servo01SP, 0, sizeof(servo01SP));
  memset(servo02SP, 0, sizeof(servo02SP));
  memset(servo03SP, 0, sizeof(servo03SP));
  memset(servo04SP, 0, sizeof(servo04SP));
  memset(servo05SP, 0, sizeof(servo05SP));
  memset(servo06SP, 0, sizeof(servo06SP));
  index = 0;
}
Complete Arduino Robotarm Code:
/* DIY Arduino Robotarm Smartphone Control
 * by Dejan, www.HowToMechatronics.com
 */
#include <SoftwareSerial.h>
#include <Servo.h>
Servo servo01, servo02, servo03, servo04, servo05, servo06;
SoftwareSerial Bluetooth(3, 4);
int servo1Pos, servo2Pos, servo3Pos, servo4Pos, servo5Pos, servo6Pos;
int servo1PPos, servo2PPos, servo3PPos, servo4PPos, servo5PPos, servo6PPos;
int servo01SP[50], servo02SP[50], servo03SP[50], servo04SP[50], servo05SP[50], servo06SP[50];
int speedDelay = 20; int index = 0; String dataIn = "";

void setup() {
  servo01.attach(5); servo02.attach(6); servo03.attach(7);
  servo04.attach(8); servo05.attach(9); servo06.attach(10);
  Bluetooth.begin(38400); Bluetooth.setTimeout(1); delay(20);
  servo1PPos = 90;  servo01.write(servo1PPos);
  servo2PPos = 150; servo02.write(servo2PPos);
  servo3PPos = 35;  servo03.write(servo3PPos);
  servo4PPos = 140; servo04.write(servo4PPos);
  servo5PPos = 85;  servo05.write(servo5PPos);
  servo6PPos = 80;  servo06.write(servo6PPos);
}

void loop() {
  if (Bluetooth.available() > 0) {
    dataIn = Bluetooth.readString();
    // Servo 1 (s1)
    if (dataIn.startsWith("s1")) {
      String dataInS = dataIn.substring(2, dataIn.length());
      servo1Pos = dataInS.toInt();
      if (servo1PPos > servo1Pos) {
        for (int j = servo1PPos; j >= servo1Pos; j--) { servo01.write(j); delay(20); }
      }
      if (servo1PPos < servo1Pos) {
        for (int j = servo1PPos; j <= servo1Pos; j++) { servo01.write(j); delay(20); }
      }
      servo1PPos = servo1Pos;
    }
    // Servo 2 (s2)
    if (dataIn.startsWith("s2")) {
      String dataInS = dataIn.substring(2, dataIn.length());
      servo2Pos = dataInS.toInt();
      if (servo2PPos > servo2Pos) { for (int j = servo2PPos; j >= servo2Pos; j--) { servo02.write(j); delay(50); } }
      if (servo2PPos < servo2Pos) { for (int j = servo2PPos; j <= servo2Pos; j++) { servo02.write(j); delay(50); } }
      servo2PPos = servo2Pos;
    }
    // Servo 3 (s3)
    if (dataIn.startsWith("s3")) {
      String dataInS = dataIn.substring(2, dataIn.length());
      servo3Pos = dataInS.toInt();
      if (servo3PPos > servo3Pos) { for (int j = servo3PPos; j >= servo3Pos; j--) { servo03.write(j); delay(30); } }
      if (servo3PPos < servo3Pos) { for (int j = servo3PPos; j <= servo3Pos; j++) { servo03.write(j); delay(30); } }
      servo3PPos = servo3Pos;
    }
    // Servo 4 (s4)
    if (dataIn.startsWith("s4")) {
      String dataInS = dataIn.substring(2, dataIn.length());
      servo4Pos = dataInS.toInt();
      if (servo4PPos > servo4Pos) { for (int j = servo4PPos; j >= servo4Pos; j--) { servo04.write(j); delay(30); } }
      if (servo4PPos < servo4Pos) { for (int j = servo4PPos; j <= servo4Pos; j++) { servo04.write(j); delay(30); } }
      servo4PPos = servo4Pos;
    }
    // Servo 5 (s5)
    if (dataIn.startsWith("s5")) {
      String dataInS = dataIn.substring(2, dataIn.length());
      servo5Pos = dataInS.toInt();
      if (servo5PPos > servo5Pos) { for (int j = servo5PPos; j >= servo5Pos; j--) { servo05.write(j); delay(30); } }
      if (servo5PPos < servo5Pos) { for (int j = servo5PPos; j <= servo5Pos; j++) { servo05.write(j); delay(30); } }
      servo5PPos = servo5Pos;
    }
    // Servo 6 (s6)
    if (dataIn.startsWith("s6")) {
      String dataInS = dataIn.substring(2, dataIn.length());
      servo6Pos = dataInS.toInt();
      if (servo6PPos > servo6Pos) { for (int j = servo6PPos; j >= servo6Pos; j--) { servo06.write(j); delay(30); } }
      if (servo6PPos < servo6Pos) { for (int j = servo6PPos; j <= servo6Pos; j++) { servo06.write(j); delay(30); } }
      servo6PPos = servo6Pos;
    }
    // SAVE
    if (dataIn.startsWith("SAVE")) {
      servo01SP[index] = servo1PPos;
      servo02SP[index] = servo2PPos;
      servo03SP[index] = servo3PPos;
      servo04SP[index] = servo4PPos;
      servo05SP[index] = servo5PPos;
      servo06SP[index] = servo6PPos;
      index++;
    }
    // RUN
    if (dataIn.startsWith("RUN")) { runservo(); }
    // RESET
    if (dataIn == "RESET") {
      memset(servo01SP, 0, sizeof(servo01SP));
      memset(servo02SP, 0, sizeof(servo02SP));
      memset(servo03SP, 0, sizeof(servo03SP));
      memset(servo04SP, 0, sizeof(servo04SP));
      memset(servo05SP, 0, sizeof(servo05SP));
      memset(servo06SP, 0, sizeof(servo06SP));
      index = 0;
    }
  }
}

void runservo() {
  while (dataIn != "RESET") {
    for (int i = 0; i <= index - 2; i++) {
      if (Bluetooth.available() > 0) {
        dataIn = Bluetooth.readString();
        if (dataIn == "PAUSE") {
          while (dataIn != "RUN") {
            if (Bluetooth.available() > 0) {
              dataIn = Bluetooth.readString();
              if (dataIn == "RESET") break;
            }
          }
        }
        if (dataIn.startsWith("ss")) {
          String dataInS = dataIn.substring(2, dataIn.length());
          speedDelay = dataInS.toInt();
        }
      }
      // Alle 6 servo's in auto modus
      if (servo01SP[i] > servo01SP[i+1]) { for (int j = servo01SP[i]; j >= servo01SP[i+1]; j--) { servo01.write(j); delay(speedDelay); } }
      if (servo01SP[i] < servo01SP[i+1]) { for (int j = servo01SP[i]; j <= servo01SP[i+1]; j++) { servo01.write(j); delay(speedDelay); } }
      if (servo02SP[i] > servo02SP[i+1]) { for (int j = servo02SP[i]; j >= servo02SP[i+1]; j--) { servo02.write(j); delay(speedDelay); } }
      if (servo02SP[i] < servo02SP[i+1]) { for (int j = servo02SP[i]; j <= servo02SP[i+1]; j++) { servo02.write(j); delay(speedDelay); } }
      if (servo03SP[i] > servo03SP[i+1]) { for (int j = servo03SP[i]; j >= servo03SP[i+1]; j--) { servo03.write(j); delay(speedDelay); } }
      if (servo03SP[i] < servo03SP[i+1]) { for (int j = servo03SP[i]; j <= servo03SP[i+1]; j++) { servo03.write(j); delay(speedDelay); } }
      if (servo04SP[i] > servo04SP[i+1]) { for (int j = servo04SP[i]; j >= servo04SP[i+1]; j--) { servo04.write(j); delay(speedDelay); } }
      if (servo04SP[i] < servo04SP[i+1]) { for (int j = servo04SP[i]; j <= servo04SP[i+1]; j++) { servo04.write(j); delay(speedDelay); } }
      if (servo05SP[i] > servo05SP[i+1]) { for (int j = servo05SP[i]; j >= servo05SP[i+1]; j--) { servo05.write(j); delay(speedDelay); } }
      if (servo05SP[i] < servo05SP[i+1]) { for (int j = servo05SP[i]; j <= servo05SP[i+1]; j++) { servo05.write(j); delay(speedDelay); } }
      if (servo06SP[i] > servo06SP[i+1]) { for (int j = servo06SP[i]; j >= servo06SP[i+1]; j--) { servo06.write(j); delay(speedDelay); } }
      if (servo06SP[i] < servo06SP[i+1]) { for (int j = servo06SP[i]; j <= servo06SP[i+1]; j++) { servo06.write(j); delay(speedDelay); } }
    }
  }
}
Veel plezier met de robotarm! Vragen? Reacties hieronder. Bekijk mijn Arduino Projecten Collectie.
Productieproces
- Slimme spaarpot bouwen: Muntenacceptor besturen met Arduino Nano
- Een slimme voltmeter bouwen met Arduino en smartphone – Eenvoudig DIY-project
- Externe IoT-besturing van een zelfgebouwde robotarm
- Servo-gestuurde obstakelvermijdende robot: Bouw met Arduino & HC-SR04
- Een LED bedienen via Bluetooth met Arduino – Eenvoudige DIY Handleiding
- Arduino-gebaseerde 6-DoF Robotarm Gestoeerd met Wii Nunchuk
- Twee Stappenmotors Sturen met Arduino Nano & Joystick – Simpele Tutorial
- MobBob: Bouw Je Eigen Arduino Robot, Naadloos Bestuurd via Android Smartphone
- LittleArm 2C: Bouw een Duurzame 3D-geprinte Arduino Robotarm voor STEM Onderwijs
- ThimbleKrox: Vingergemonteerde Muizenbesturing met Arduino Micro & MPU-6050
- Yama Seiki GA-2000CR: Compact draaicenter met geavanceerde robotarm & palletsysteem