



Een LED bedienen via Bluetooth met Arduino – Eenvoudige DIY Handleiding
Onderdelen en benodigdheden
- 1x Arduino UNO
- 1x HC-05 Bluetooth Module
- 1x Weerstand 1k ohm
- 8x Man/Man Jumper Wires
- 1x 5 mm Rode LED
Apps en online diensten
- Arduino IDE
- MIT App Inventor
Over dit project
De Arduino Bluetooth-verbinding maken
Ik had recent een robot-kit gekocht met een HC-05 module. Omdat ik een lijnvolgende robot bouwde, had ik de Bluetooth-module nog niet nodig. Maar ik was benieuwd en wilde hem toch gebruiken – ik wilde geen component liggen laten. Besloot om een LED te besturen via een mobiele app gemaakt met MIT App Inventor.
Je kunt MIT App Inventor bereiken via: https://appinventor.mit.edu/

Het is leuk om een LED aan en uit te schakelen via een app op je telefoon. Hiervoor heb je bijna geen programmeerkennis nodig; MIT App Inventor werkt met slepen-en-plakken van blokken.
Het werkt als volgt: je klikt een knop in de app → er wordt een signaal via Bluetooth naar de Arduino gestuurd → de Arduino ontvangt het signaal en handelt daarop. In MIT App Inventor kies je welk signaal verstuurd wordt; ik koos voor de tekens '0' en '1'.
Een Bluetooth-module communiceert via seriële communicatie (RX/TX pinnen). Als je andere pinnen wilt gebruiken, heb je de SoftwareSerial bibliotheek nodig (niet behandeld in deze tutorial).
Het schema
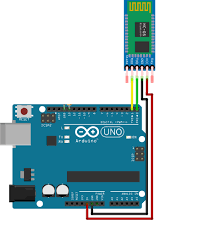
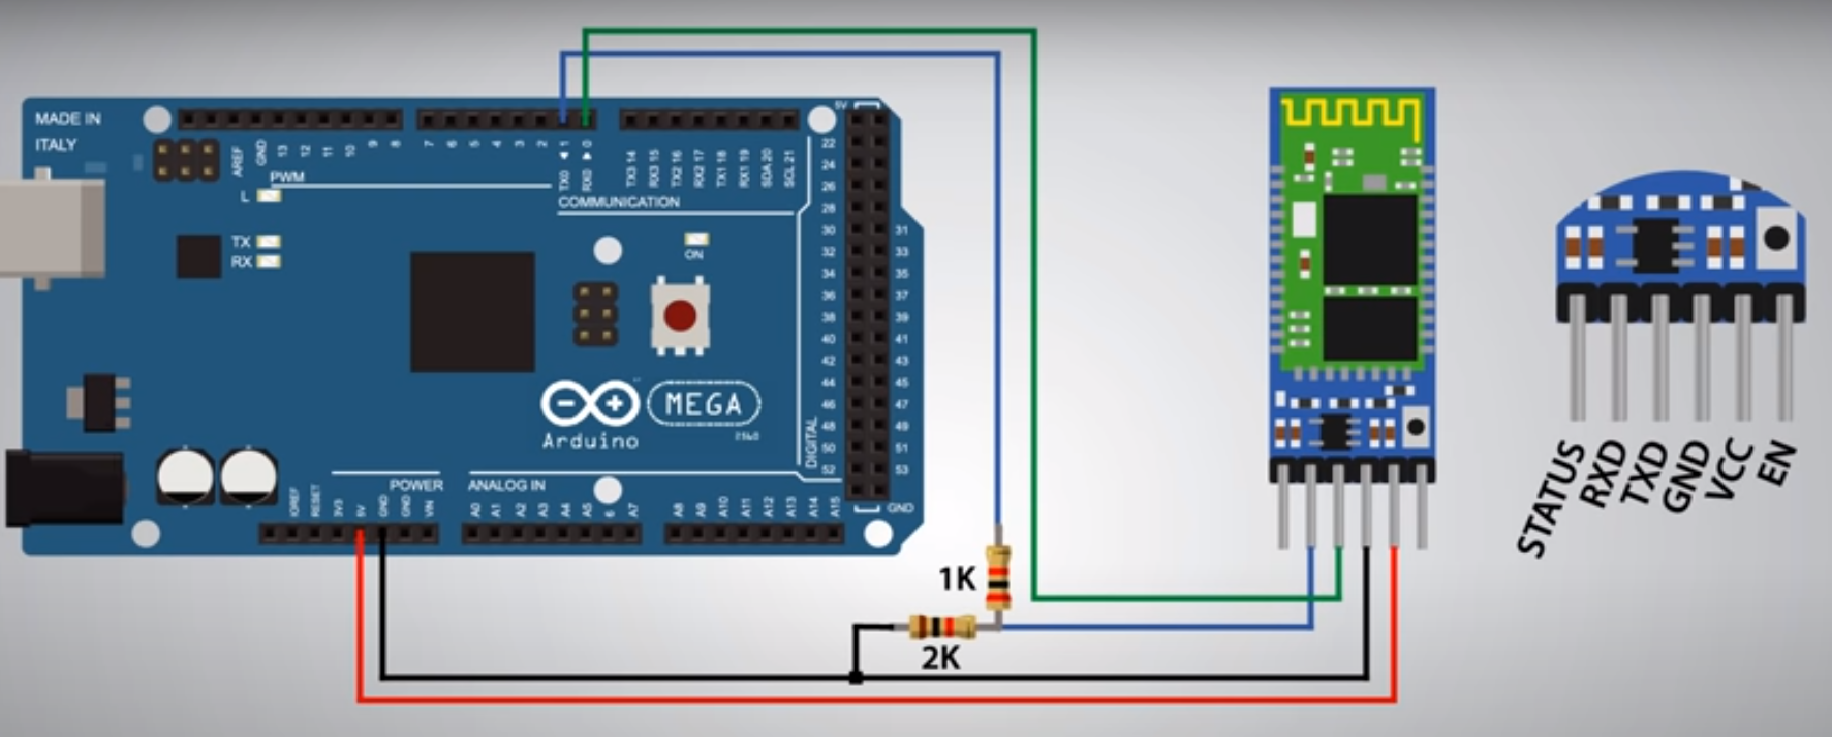
De HC-05 heeft 6 pinnen; we gebruiken de midden 4.

De labels staan op de achterkant van de module:
- HC-05 RX → Arduino TX
- HC-05 TX → Arduino RX
- HC-05 GND → Arduino GND
- HC-05 VCC → Arduino 5V
Voor veiligheid (spanningsdeler): Verbind HC-05 RX via een weerstand met Arduino TX, en HC-05 RX via een andere weerstand met GND. De GND van HC-05 gaat via dezelfde weerstand naar Arduino GND. Zo gaan zowel RX als GND van de HC-05 naar GND van de Arduino. Dit is een spanningsdeler-circuit.

Omdat we een breakout-board gebruiken met ingebouwde spanningsregelaar, werkt het ook zonder deze extra veiligheidsmaatregelen.
LED: lange poot (anode) → pin 5 (via weerstand op breadboard), korte poot (kathode) → GND. Een LED heeft ~1,7V nodig, niet 5V!

Belangrijk: Tijdens uploaden van de code mogen er geen draden op de TX/RX pinnen van de Arduino zitten. Pas na uploaden aansluiten. Arduino gebruikt TX/RX voor uploaden; extra draden daar veroorzaken fouten.

De App
In MIT App Inventor heb je nodig: een ListPicker, twee knoppen (ON/OFF) en een BluetoothClient component (onder 'Design').

In de Blocks-editor sleep je de volgende blokken:
- Voor het kiezen: stel ListPicker1's Elements in op adressen en namen die de BluetoothClient vindt.
- Na selectie: verbinden met het geselecteerde apparaat.
- Knop ON: verstuur tekst '1'.
- Knop OFF: verstuur tekst '0'.

Download de MIT App Inventor Companion app op je telefoon, scan de QR-code van de website, en de app is tijdelijk op je telefoon. Je moet telkens scannen als je hem wilt gebruiken.
Open de app, klik op de ListPicker, kies de HC-05 (standaard wachtwoord: 1234 of 0000), verbind, en test de ON/OFF knoppen.
Vergeet niet de Arduino te programmeren! De code staat hieronder. Let op: gebruik char voor tekstvergelijking, geen int (ik maakte die fout).
Code
Code voor HC-05 en Arduino Interfacing
/*Code to control an LED via bluetooth through a phone app. Project by MukeshArvindh. Code by MukeshArvindh.*/
/*If you are going to copy and paste the code, then do not forget to delete the void setup() and void loop() function from the sketch you are using before doing so,as the functions already exist in this sketch. Copy-pasting the comments will not cause any changes in the outcome or code.*/
/*Note:This code has been compiled and checked multiple times, and has proven to be accurate. The product also works as intended.*/
//Bluetooth uses serial communication. So, we use many serial functions
//in this sketch.
const int LED = 5; /*Declaring that there is an LED on pin 5 of the arduino board. We use const as we will not change this. You don't have to name it LED. You can even put your name instead.*/
char switchstate; /*declaring that there is a variable called switchstate, which will hold a character value. This is due to programming of the app, which will send a text value to arduino. If we use 'int' instead of 'char' the code will not work properly.*/
void setup() {
  //Here the code only runs once.
  Serial.begin(9600); /*To start serial communication at a rate of 9600 bits per second. This is the default rate anyways.*/
  pinMode(LED, OUTPUT); //Declaring that the LED is an output.
}
void loop() {
  //This code repeats. This is our main code.
  while(Serial.available()>0){
    //code to be executed only when Serial.available()>0
    /*Serial.available>0 is to check if there is any reading from the HC-05 Bluetooth module.*/
    switchstate = Serial.read(); /*The character we had declared earlier is now being assigned a value- the value of whatever Serial.read() is.*/
    //Serial.read() is to read the value coming from app.
    Serial.print(switchstate); //This will print the value onto the Serial monitor.
    Serial.print("\n"); //This moves to the next line after every new line printed.
    delay(15); /*Gives a break of 15 milliseconds. Delay is for human eye, and for speed of some computers, as some will crash at high speeds.*/
    if(switchstate == '1'){//Checking if the value from app is '1'
      digitalWrite(5, HIGH); //If it is, write the component on pin 5(LED) high.
    } else if(switchstate == '0'){//Else, if the vaue from app is '0',
      digitalWrite(5, LOW);//Write the component on pin 5(LED) low.
    }
  }
}
Schema's
Productieproces
- Arduino Nano Flight Simulator 2020 Bedieningspaneel – LCD & CDI Display
- Arduino-gebaseerd schakelaar- & LED-paneel voor Microsoft Flight Simulator 2020
- Slimme spaarpot bouwen: Muntenacceptor besturen met Arduino Nano
- Twee Stappenmotors Sturen met Arduino Nano & Joystick – Simpele Tutorial
- Bouw een Slimme Arduino Vierpotige Robot: Stap-voor-Stap Handleiding
- Spraakgestuurde huishoudapparaten: Bluetooth-besturing met Google Assistant
- Een Arduino LED besturen met Cortana via Bluetooth op Windows 10
- Een 8×8 LED-matrix beheersen met Arduino Uno: Stap-voor-stap handleiding
- ThimbleKrox: Vingergemonteerde Muizenbesturing met Arduino Micro & MPU-6050
- DIY Arduino Kakerlakbesturingssysteem – Bouw voor minder dan $30
- 25 kHz 4-pins PWM-ventilatorbesturing met Arduino Uno – Bouw, Code & Test