



Externe Besturing van een 6-DOF Arduino Robotarm via Webinterface
Onderdelen en Benodigdheden
| Onderdeel | Aantal | Opmerkingen |
|---|---|---|
| Arduino UNO | 1 | |
| PHPoC WiFi Shield voor Arduino | 1 | |
| 6DOF Arm Robot | 1 |
Over Dit Project
Als je beginner bent, raad ik aan de volgende tutorials te lezen:
- Arduino - Motor
- Arduino - Servomotor
- Arduino - WiFi
1. Demonstratie
2. Gebruikersinterface
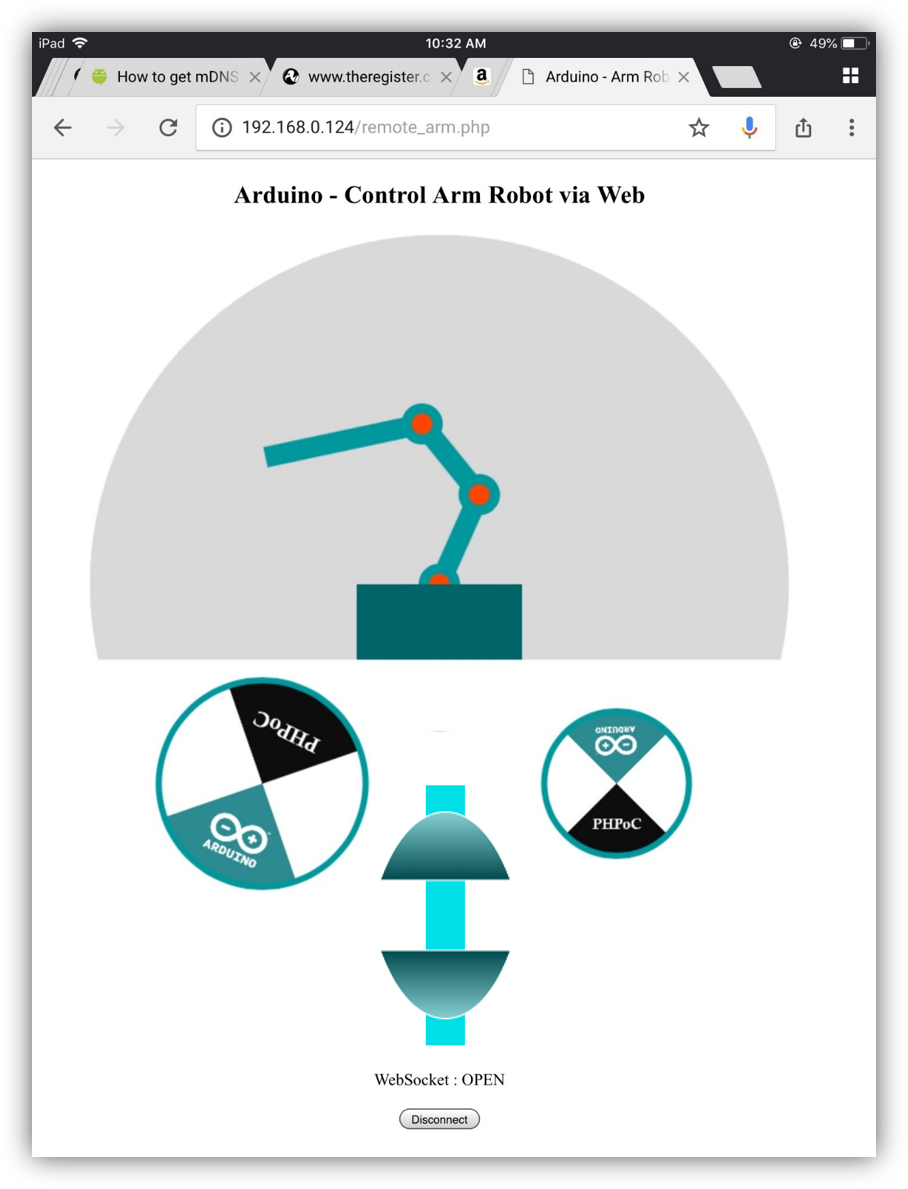

De robotarm heeft 6 motoren.
- Zone A: Bestuurt motor 2, 3, 4 (drie handgewrichten)
- Zone B: Bestuurt motor 1 (basis)
- Zone C: Bestuurt motor 5 (rotatie van grijper)
- Zone D: Bestuurt motor 6 (grijper open/dicht)
3. Systeemarchitectuur

4. Werkingsstroom
Client Side (webgebruikersinterface - JavaScript + HTML + CSS)
Wanneer een gebruiker aanraakt of wipt (of klikt/sleept met muis), verkrijgen we coördinaten (x, y). De werkstroom is als volgt:
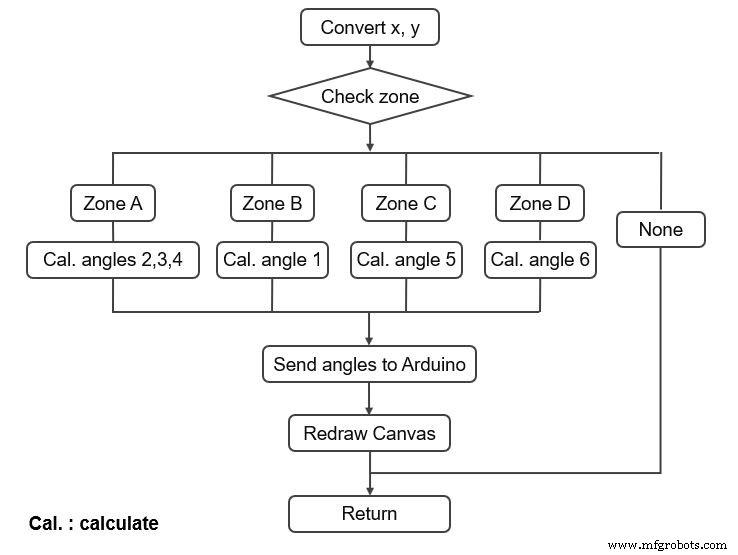
In Zone A, om de hoeken van motor 2, 3, 4 te berekenen, is geometrische berekening nodig. Zie het einde van deze pagina.
Server Side (Arduino-code):
Na ontvangst van een set hoeken van clients, bewegen de zes motoren geleidelijk van de huidige hoeken naar de nieuwe hoeken. Alle zes motoren moeten tegelijkertijd de nieuwe hoeken bereiken. Eerst bekijken we hoe één motor te besturen. Stel we willen een motor van huidige hoek (angle) naar nieuwe hoek (new_angle) bewegen. Omdat de motorsnelheid hoog is, moeten we het vertragen. Hiervoor herhalen we twee stappen tot de motor de nieuwe hoek bereikt:
- Beweeg de motor met een kleine stap.
- Pauzeer een korte tijd en beweeg de volgende stap.
Het volgende diagram illustreert dit voor het geval dat de nieuwe hoek groter is dan de huidige hoek:

Waarbij step_num het aantal stappen is dat de motor moet maken. step en time zijn vooraf gedefinieerde waarden die de snelheid en vloeiendheid bepalen. Dit is nog maar voor één motor. Om alle motoren tegelijkertijd te laten starten en aankomen, kiezen we step_num als het maximum van alle motoren. Elke motor heeft een andere step.
Algemeen is de werkstroom van de Arduino als volgt:

5. Geometrische Berekening
Laten we de robotarm-berekening omzetten in een meetkundig probleem:
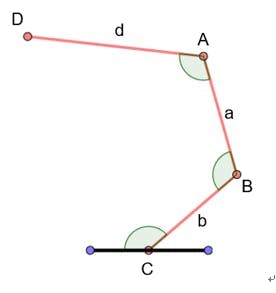
Bekend
- C is vast
- Bekend punt D = invoer van gebruiker
- Bekende lengtes: CB, BA, AD (aangeduid als b, a, d)
- Lengtes van elk armsegment
Gezocht: hoeken C, B, A
Oplossing:
- Veronderstel dat hoek B en A gelijk zijn
- Voeg extra punten en segmenten toe
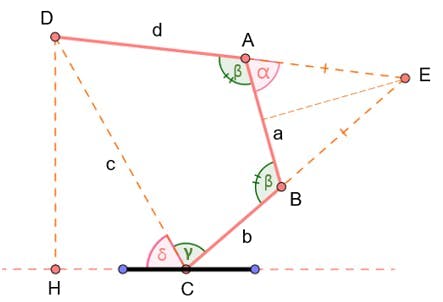
Berekening
- We weten punten C en D → we kunnen lengte DC berekenen (aangeduid als c)
- We kunnen ook δ berekenen
- Bekijk driehoek ABE: AE = BE en ∠E = π - 2α.

- Cosinusregel in driehoek CDE:

- Vervang (1) en (2) in (3):

Vereenvoudigen
- Vereenvoudig de bovenstaande:

- Omdat we a, b, c en d kennen, lossen we de kwadratische vergelijking op om α te berekenen. En β = π – α.
- Nu β gevonden, zoeken we γ. Cosinusregel in driehoeken BDC en BDA:
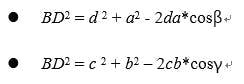
- Los deze stelsel vergelijkingen op om γ te berekenen.
- De benodigde hoeken zijn: (δ+γ), β en β. Dit zijn de hoeken van motor 2, 3 en 4 respectievelijk.
6. Broncode
De broncode bestaat uit twee bestanden:
- RobotArmWeb.ino: Arduino-code
- Remote_arm.php: Webapp-code, geüpload naar PHPoC WiFi Shield of PHPoC Shield. (Zie instructies in dit artikel.)
Je moet ook het afbeeldingsbestand flywheel.png uploaden naar de PHPoC Shield.

Functiereferenties
- Arduino - Servo Library
- Servo.attach()
- Servo.write()
- Servo.writeMicroseconds()
- Servo.read()
- Servo.attached()
- Servo.detach()
- Serial.begin()
- Serial.println()
Code
RobotArmWeb (Arduino)
#include <Phpoc.h>
#include <Servo.h>

int angle_init[] = {90, 101, 165, 153, 90, 120}; // motor rechtop
int angle_offset[] = {0, 11, -15, -27, 0, 137}; // offset tussen echte servo en web-hoek
int cur_angles[] = {90, 101, 165, 153, 90, 120};
int dest_angles[] = {0, 0, 0, 0, 0, 0};
int angle_max[] = {180, 180, 160, 120, 180, 137};
int angle_min[] = {0, 0, 0, 20, 0, 75};
int direction[] = {1, 1, 1, 1, 1, -1};
int angleSteps[] = {3, 2, 2, 2, 4, 4}; // stappen per motor (graden)

Servo servo1, servo2, servo3, servo4, servo5, servo6;
Servo servo[6] = {servo1, servo2, servo3, servo4, servo5, servo6};

PhpocServer server(80);
PhpocClient client;
int stepNum = 0;

void setup() {
  Serial.begin(9600);
  Phpoc.begin(PF_LOG_SPI | PF_LOG_NET);
  server.beginWebSocket("remote_arm");
  servo1.attach(2);
  servo2.attach(3);
  servo3.attach(4);
  servo4.attach(5);
  servo5.attach(6);
  servo6.attach(7);
  for (int i = 0; i < 6; i++) servo[i].write(angle_init[i]);
}

void loop() {
  PhpocClient client = server.available();
  if (client) {
    String angleStr = client.readLine();
    if (angleStr) {
      Serial.println(angleStr);
      int commaPos1 = -1, commaPos2;
      for (int i = 0; i < 5; i++) {
        commaPos2 = angleStr.indexOf(',', commaPos1 + 1);
        int angle = angleStr.substring(commaPos1 + 1, commaPos2).toInt();
        dest_angles[i] = angle * direction[i] + angle_offset[i];
        commaPos1 = commaPos2;
      }
      int angle5 = angleStr.substring(commaPos1 + 1).toInt();
      dest_angles[5] = angle5 * direction[5] + angle_offset[5];
      stepNum = 0;
      // Stapberekening voor vloeiende beweging
      for (int i = 0; i < 6; i++) {
        int dif = abs(cur_angles[i] - dest_angles[i]);
        int step = dif / angleSteps[i];
        if (stepNum < step) stepNum = step;
      }
    }
  }
  // Motoren stap voor stap bewegen
  if (stepNum > 0) {
    for (int i = 0; i < 6; i++) {
      int angleStepMove = (dest_angles[i] - cur_angles[i]) / stepNum;
      cur_angles[i] += angleStepMove;
      if (cur_angles[i] > angle_max[i]) cur_angles[i] = angle_max[i];
      else if (cur_angles[i] < angle_min[i]) cur_angles[i] = angle_min[i];
      servo[i].write(cur_angles[i]);
    }
    stepNum--;
    delay(20);
  }
}
remote_arm.php (PHP)
<!DOCTYPE html>
<html>
<head>
<title>Arduino - Arm Robot - Web</title>
<meta name="viewport" content="width=device-width, initial-scale=0.9">
<style>
body { text-align: center; }
canvas { background-color: #FFFFFF; }
</style>
<script>
var MOTOR_1 = 0, MOTOR_2 = 1, MOTOR_3 = 2, MOTOR_4 = 3, MOTOR_5 = 4, MOTOR_6 = 5;
var ARM_LENGTH_1 = 95, ARM_LENGTH_2 = 88, ARM_LENGTH_3 = 155;
var SOLE_WIDTH = 160, SOLE_HEIGHT = 73;
var flywheel_img = new Image(); flywheel_img.src = "flywheel.png";
var zone_A_radius = ARM_LENGTH_1 + ARM_LENGTH_2 + ARM_LENGTH_3;
var pivot_x = zone_A_radius + 5;
var pivot_y = zone_A_radius + 5;
var zone_B_radius = 100;
var zone_B_center_x = pivot_x / 2;
var zone_B_center_y = -(zone_B_radius + SOLE_HEIGHT + 20);
var zone_B_last_angle = 0;
var zone_C_radius = 70;
var zone_C_center_x = -pivot_x / 2;
var zone_C_center_y = -(zone_B_radius + SOLE_HEIGHT + 20);
var zone_C_last_angle = 0;
var zone_D_width = 30, zone_D_height = 200.0;
var zone_D_center_x = 0;
var zone_D_center_y = -(zone_B_radius + SOLE_HEIGHT + 110);
var grip_height = 70, grip_width = 100;
var canvas_width = zone_A_radius * 2 + 10;
var canvas_height = zone_A_radius + SOLE_HEIGHT + zone_B_radius * 2 + 180;
var grip_max_angle = 62.0;
var click_state = 0;
var mouse_xyra = {x:0, y:0, r:0.0, a:0.0};
var angles = [90, 90, 180, 180, 90, 17];
var ws = null, servo = null, ctx = null;
var last_time, a = 0, b = 0, c = 0;

function init() {
  servo = document.getElementById("servo");
  servo.width = canvas_width; servo.height = canvas_height;
  servo.addEventListener("touchstart", mouse_down);
  servo.addEventListener("touchend", mouse_up);
  servo.addEventListener("touchmove", mouse_move);
  servo.addEventListener("mousedown", mouse_down);
  servo.addEventListener("mouseup", mouse_up);
  servo.addEventListener("mousemove", mouse_move);
  ctx = servo.getContext("2d");
  ctx.translate(pivot_x, pivot_y);
  ctx.rotate(Math.PI);
  a = 4*ARM_LENGTH_1*ARM_LENGTH_3;
  b = 2*(ARM_LENGTH_2*ARM_LENGTH_1 + ARM_LENGTH_2*ARM_LENGTH_3);
  c = Math.pow(ARM_LENGTH_1,2) + Math.pow(ARM_LENGTH_2,2) + Math.pow(ARM_LENGTH_3,2) - 2*ARM_LENGTH_1*ARM_LENGTH_3;
}

function update_view() {
  ctx.clearRect(-canvas_width/2, -SOLE_HEIGHT, canvas_width, canvas_height);
  ctx.save();
  // Zone A
  ctx.fillStyle = "#D9D9D9";
  ctx.beginPath(); ctx.arc(0,0,zone_A_radius, 0, 2*Math.PI); ctx.fill();
  ctx.fillStyle = "#FFFFFF";
  ctx.fillRect(-pivot_x, -canvas_height + pivot_y, canvas_width, canvas_height - pivot_y - SOLE_HEIGHT);
  // Arm segmenten
  ctx.strokeStyle = "#00979D"; ctx.fillStyle = "#FF4500"; ctx.lineWidth = 20;
  ctx.rotate(angles[MOTOR_2] / 180 * Math.PI);
  ctx.beginPath(); ctx.moveTo(0,0); ctx.lineTo(ARM_LENGTH_1,0); ctx.stroke();
  draw_pivot(0,0);
  ctx.translate(ARM_LENGTH_1,0);
  ctx.rotate(-Math.PI + angles[MOTOR_3] / 180 * Math.PI);
  ctx.beginPath(); ctx.moveTo(0,0); ctx.lineTo(ARM_LENGTH_2,0); ctx.stroke();
  draw_pivot(0,0);
  ctx.translate(ARM_LENGTH_2,0);
  ctx.rotate(-Math.PI + angles[MOTOR_4] / 180 * Math.PI);
  ctx.beginPath(); ctx.moveTo(0,0); ctx.lineTo(ARM_LENGTH_3,0); ctx.stroke();
  draw_pivot(0,0);
  ctx.restore();
  ctx.strokeStyle = "#00979D"; ctx.lineWidth = 6;
  // Zone B
  var angle = (angles[MOTOR_1] + 45) * Math.PI / 180;
  ctx.save(); ctx.translate(zone_B_center_x, zone_B_center_y); ctx.rotate(angle);
  ctx.drawImage(flywheel_img, -zone_B_radius, -zone_B_radius, zone_B_radius*2, zone_B_radius*2);
  ctx.beginPath(); ctx.arc(0,0,zone_B_radius,0,2*Math.PI); ctx.stroke(); ctx.restore();
  // Zone C
  angle = (angles[MOTOR_5] + 45) * Math.PI / 180;
  ctx.save(); ctx.translate(zone_C_center_x, zone_C_center_y); ctx.rotate(angle);
  ctx.drawImage(flywheel_img, -zone_C_radius, -zone_C_radius, zone_C_radius*2, zone_C_radius*2);
  ctx.beginPath(); ctx.arc(0,0,zone_C_radius,0,2*Math.PI); ctx.stroke(); ctx.restore();
  // Zone D
  ctx.fillStyle = "#00DEE6"; ctx.lineWidth = 15;
  var grip_dist = Math.floor(angles[MOTOR_6] / grip_max_angle * zone_D_height);
  ctx.fillRect(zone_D_center_x - zone_D_width/2, zone_D_center_y - zone_D_height/2, zone_D_width, zone_D_height);
  ctx.lineWidth = 1; ctx.strokeStyle = "#FFFFFF";
  var center_x = zone_D_center_x, center_y = zone_D_center_y + grip_dist/2;
  var grd = ctx.createLinearGradient(center_x, center_y, center_x, center_y + grip_height);
  grd.addColorStop(0,"#004A4D"); grd.addColorStop(1,"#b3fcff");
  ctx.fillStyle = grd;
  ctx.beginPath();
  ctx.moveTo(center_x + grip_width/2, center_y);
  ctx.bezierCurveTo(center_x + grip_width/4, center_y + grip_height, center_x - grip_width/4, center_y + grip_height, center_x - grip_width/2, center_y);
  ctx.closePath(); ctx.fill(); ctx.stroke();
  center_x = zone_D_center_x; center_y = zone_D_center_y - grip_dist/2;
  grd = ctx.createLinearGradient(center_x, center_y, center_x, center_y - grip_height);
  grd.addColorStop(0,"#004A4D"); grd.addColorStop(1,"#b3fcff");
  ctx.fillStyle = grd;
  ctx.beginPath();
  ctx.moveTo(center_x + grip_width/2, center_y);
  ctx.bezierCurveTo(center_x + grip_width/4, center_y - grip_height, center_x - grip_width/4, center_y - grip_height, center_x - grip_width/2, center_y);
  ctx.closePath(); ctx.fill(); ctx.stroke();
  ctx.restore();
  // Zolen
  ctx.fillStyle = "#006468";
  ctx.fillRect(-SOLE_WIDTH/2, -SOLE_HEIGHT, SOLE_WIDTH, SOLE_HEIGHT);
}

function event_handler(event) {
  var x, y, r, alpha;
  if (event.touches) {
    var touches = event.touches;
    x = (touches[0].pageX - touches[0].target.offsetLeft) - pivot_x;
    y = (touches[0].pageY - touches[0].target.offsetTop) - pivot_y;
  } else {
    x = event.offsetX - pivot_x;
    y = event.offsetY - pivot_y;
  }
  x = -x; y = -y;
  // Zone A
  r = Math.sqrt(x*x + y*y);
  if (r < zone_A_radius && y > -SOLE_HEIGHT) {
    if ((x < SOLE_WIDTH/2) && (x > -SOLE_WIDTH/2) && (y < 0)) return false;
    alpha = Math.atan2(y, x);
    if (alpha < 0) alpha += 2*Math.PI;
    mouse_xyra.x = x; mouse_xyra.y = y; mouse_xyra.r = r; mouse_xyra.a = alpha;
    if (geometric_calculation()) return true;
  }
  // Zone B
  var temp_x = x - zone_B_center_x;
  var temp_y = y - zone_B_center_y;
  var distance = Math.sqrt(temp_x*temp_x + temp_y*temp_y);
  if (distance < zone_B_radius) {
    var angle = Math.atan2(temp_y, temp_x) * 180 / Math.PI;
    if (click_state == 0) zone_B_last_angle = angle;
    else {
      if ((Math.abs(angle) > 90) && (angle * zone_B_last_angle < 0)) {
        if (zone_B_last_angle > 0) zone_B_last_angle = -180; else zone_B_last_angle = 180;
      }
      angles[MOTOR_1] += Math.floor(angle - zone_B_last_angle);
      angles[MOTOR_1] = Math.max(0, angles[MOTOR_1]);
      angles[MOTOR_1] = Math.min(180, angles[MOTOR_1]);
      zone_B_last_angle = angle;
    }
    return true;
  }
  // Zone C
  temp_x = x - zone_C_center_x;
  temp_y = y - zone_C_center_y;
  distance = Math.sqrt(temp_x*temp_x + temp_y*temp_y);
  if (distance < zone_C_radius) {
    var angle = Math.atan2(temp_y, temp_x) * 180 / Math.PI;
    if (click_state == 0) zone_C_last_angle = angle;
    else {
      if ((Math.abs(angle) > 90) && (angle * zone_C_last_angle < 0)) {
        if (zone_C_last_angle > 0) zone_C_last_angle = -180; else zone_C_last_angle = 180;
      }
      angles[MOTOR_5] += Math.floor(angle - zone_C_last_angle);
      angles[MOTOR_5] = Math.max(0, angles[MOTOR_5]);
      angles[MOTOR_5] = Math.min(180, angles[MOTOR_5]);
      zone_C_last_angle = angle;
    }
    return true;
  }
  // Zone D
  temp_x = Math.abs(x - zone_D_center_x);
  temp_y = Math.abs(y - zone_D_center_y);
  if (temp_x < (zone_D_width/2) && temp_y < (zone_D_height/2)) {
    var angle = temp_y / (zone_D_height/2) * grip_max_angle;
    angles[MOTOR_6] = Math.floor(angle);
    console.log(angles[MOTOR_6]);
    return true;
  }
  return false;
}

function geometric_calculation() {
  var c_ = c - Math.pow(mouse_xyra.r, 2);
  var delta = b*b - 4*a*c_;
  if (delta < 0) return false;
  var x1 = (-b + Math.sqrt(delta)) / (2*a);
  var x2 = (-b - Math.sqrt(delta)) / (2*a);
  var x = x1;
  if (x > 1) return false;
  var alpha = Math.acos(x) * 180 / Math.PI;
  var beta = 180 - alpha;
  var cos_C = (Math.pow(mouse_xyra.r,2) + Math.pow(ARM_LENGTH_1,2) - (Math.pow(ARM_LENGTH_2,2) + Math.pow(ARM_LENGTH_3,2) + 2*ARM_LENGTH_2*ARM_LENGTH_3*x)) / (2*mouse_xyra.r*ARM_LENGTH_1);
  var angle_C = Math.acos(cos_C);
  var gamma = (angle_C + mouse_xyra.a) % (2*Math.PI) * 180 / Math.PI;
  if (gamma < 0) gamma += 360;
  if (gamma > 180) {
    var temp = gamma - mouse_xyra.a * 180 / Math.PI;
    gamma = gamma - 2*temp;
    beta = 360 - beta;
  }
  if (gamma < 0 || gamma > 180) return false;
  angles[MOTOR_3] = Math.floor(beta);
  angles[MOTOR_4] = Math.floor(beta);
  angles[MOTOR_2] = Math.floor(gamma);
  return true;
}

function draw_pivot(x, y) {
  ctx.beginPath(); ctx.arc(x,y,10,0,2*Math.PI); ctx.stroke(); ctx.fill();
}

function ws_onmessage(e_msg) { e_msg = e_msg || window.event; }
function ws_onopen() {
  document.getElementById("ws_state").innerHTML = "OPEN";
  document.getElementById("wc_conn").innerHTML = "Disconnect";
  angles_change_notice(); update_view();
}
function ws_onclose() {
  document.getElementById("ws_state").innerHTML = "CLOSED";
  document.getElementById("wc_conn").innerHTML = "Connect";
  console.log("socket was closed");
  ws.onopen = null; ws.onclose = null; ws.onmessage = null; ws = null;
}
function wc_onclick() {
  if (ws == null) {
    ws = new WebSocket("ws:///remote_arm", "text.phpoc");
    document.getElementById("ws_state").innerHTML = "CONNECTING";
    ws.onopen = ws_onopen; ws.onclose = ws_onclose; ws.onmessage = ws_onmessage;
  } else ws.close();
}
function mouse_down() {
  if (ws == null) return;
  if (event.touches && (event.touches.length > 1)) click_state = event.touches.length;
  if (click_state > 1) return;
  var state = event_handler(event);
  if (state) { click_state = 1; angles_change_notice(); }
  event.preventDefault();
}
function mouse_up() { click_state = 0; }
function mouse_move() {
  if (ws == null) return;
  var d = new Date(); var time = d.getTime();
  if ((time - last_time) < 50) return;
  last_time = time;
  if (event.touches && (event.touches.length > 1)) click_state = event.touches.length;
  if (click_state > 1) return;
  if (!click_state) return;
  var state = event_handler(event);
  if (state) { click_state = 1; angles_change_notice(); }
  event.preventDefault();
}
function angles_change_notice() {
  if (ws != null && ws.readyState == 1) {
    ws.send(angles.join(",") + "\r\n");
    update_view();
  }
}
window.onload = init;
setTimeout(function(){ update_view();}, 500);
</script>
</head>
<body>
<h2>Arduino - Control Arm Robot via Web</h2>
<canvas id="servo"></canvas>
<p>WebSocket : <span id="ws_state">null</span><br></p>
<button id="wc_conn" type="button" onclick="wc_onclick();">Connect</button>
</body>
</html>
Schema's
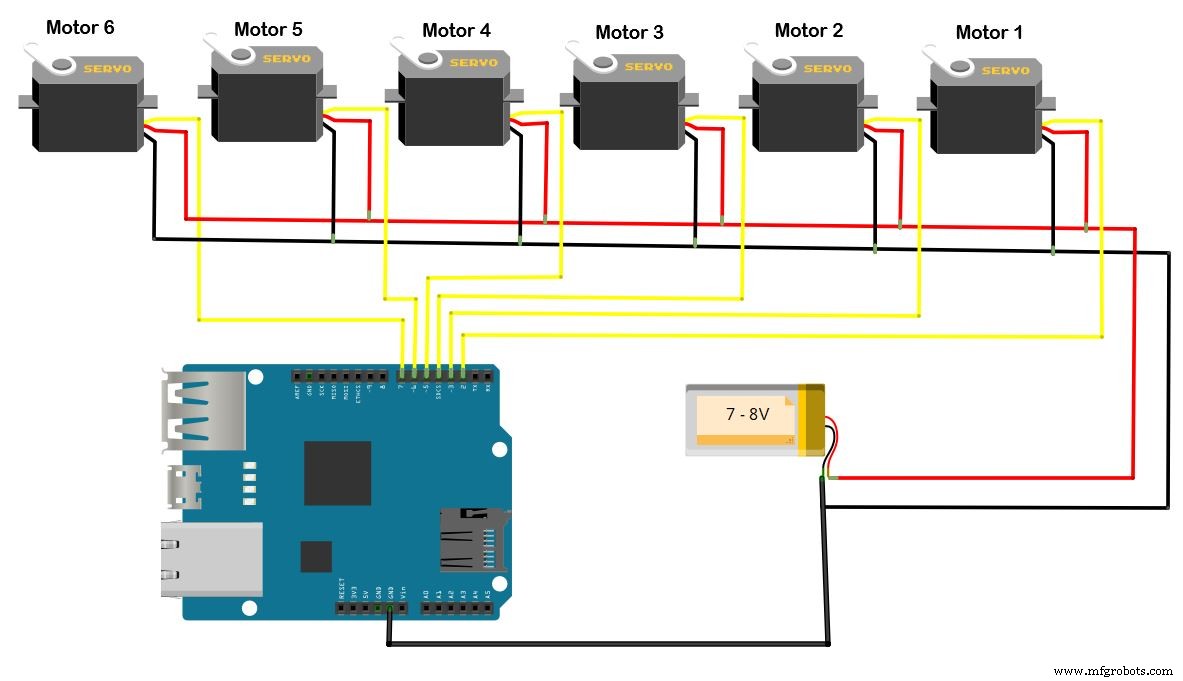
Er is een externe voedingsbron nodig voor de 6 motoren.
Productieproces
- Simple Pi Robot – Bouw een 2-WD Autonome Rover met Raspberry Pi
- Arduino Power Control Center: N-FET, P-FET, Relais & RTC Kit
- Externe IoT-besturing van een zelfgebouwde robotarm
- Servo-gestuurde obstakelvermijdende robot: Bouw met Arduino & HC-SR04
- Bouw Een Autonome Lijnvolgende Robot Met Arduino UNO
- DIY Arduino Luchtbevochtiger Controller met Relais – Veilige Hoogspanningsopstelling
- Arduino UNO & WiFi Shield: Realtime Temperatuurweergave op het Web via Serieel
- LittleArm 2C: Bouw een Duurzame 3D-geprinte Arduino Robotarm voor STEM Onderwijs
- Bouw een Autonome Thuisassistent Robot: Complete Onderdelenlijst & Opzetgids
- Bewegingsgeactiveerd verlichtingssysteem met Intel Curie (Arduino 101)
- Slim Indoor Navigatie Robot Kit voor Arduino Projecten