



Bouw een AI LCD-maatje: Jouw interactieve vriend
Onderdelen en benodigdheden
| Arduino UNO | 1 |
| Draaipotentiometer (standaard) | 1 |
| Draadbruggen (standaard) | 19 |
| Breadboard (standaard) | 1 |
| Knop | 4 |
| Weerstand 100 ohm | 3 |
| Weerstand 221 ohm | 1 |
| Adafruit Standaard LCD - 16x2 Wit op Blauw | 1 |
Apps en online diensten
- Arduino IDE
- Arduino Web Editor
Over dit project
Om je een maatje te geven tijdens eenzame momenten.
Code
De code (C/C++)
Je kunt het uitbreiden als je wilt, plaats de uitgebreide code dan in een reactie! Kopieer en plak dit na "to be continued." -->
lcd.clear();
lcd.print("To be ");
lcd.setCursor(2, 2);
lcd.print("continued.");
delay(2000);
#include
LiquidCrystal lcd(12, 11, 5, 4, 3, 2);
const int buttonPin = 9;
int buttonState = 0;
const int buttonPin2 = 10;
const int buttonPin3 = 8;

void setup() {
  pinMode(buttonPin, INPUT);
  pinMode(buttonPin2, INPUT);
  pinMode(buttonPin3, INPUT);
  lcd.begin(16, 2);
  lcd.print(" (.) (.) Hi I");
  lcd.setCursor(2, 2);
  lcd.print("(____) am Robi");
  delay(2000);
  lcd.clear();
  lcd.print(" (.) (.) You ");
  lcd.setCursor(2, 2);
  lcd.print(" ____ can talk");
  delay(2000);
  lcd.clear();
  lcd.print(" (-) (-) to ");
  lcd.setCursor(2, 2);
  lcd.print(" (____) me!");
  delay(2000);
  lcd.clear();
  lcd.print(" (.) (.)Tap");
  lcd.setCursor(2, 2);
  lcd.print(" ____ the");
  delay(2000);
  lcd.clear();
  lcd.print(" (.) (.) but");
  lcd.setCursor(2, 2);
  lcd.print(" (____) ton");
  delay(2000);
}

void loop() {
  buttonState = digitalRead(buttonPin);
  if (buttonState == HIGH) {
    lcd.clear();
    lcd.print("Hello I am");
    lcd.setCursor(2, 2);
    lcd.print("Alexander");
    delay(2000);
    lcd.clear();
    lcd.print(" (*) (*) Hi!");
    lcd.setCursor(2, 2);
    lcd.print(" (____)");
    delay(2000);
    lcd.clear();
    lcd.print(" (.) (.)Let's");
    lcd.setCursor(2, 2);
    lcd.print(" ____ play");
    delay(2000);
    lcd.clear();
    lcd.print("OK!");
    lcd.setCursor(2, 2);
    lcd.print(" But Where?");
    delay(2000);
    lcd.clear();
    lcd.print(" (.) (.) Park");
    lcd.setCursor(2, 2);
    lcd.print(" (____)or home?");
    delay(2000);
    lcd.clear();
    lcd.print("Left = Park");
    lcd.setCursor(2, 2);
    lcd.print("Right = Home");
    delay(2000);
  }
  buttonState = digitalRead(buttonPin2);
  if (buttonState == HIGH) {
    lcd.clear();
    lcd.print("You go to");
    lcd.setCursor(2, 2);
    lcd.print("the Park...");
    delay(2000);
    lcd.clear();
    lcd.print(" (.) (.) Lets");
    lcd.setCursor(2, 2);
    lcd.print(" ____ swing!");
    delay(2000);
    lcd.clear();
    lcd.print("OK!");
    lcd.setCursor(2, 2);
    lcd.print("You swing...");
    delay(2000);
    lcd.clear();
    lcd.print(" (*) (*) I'm");
    lcd.setCursor(2, 2);
    lcd.print(" (___) tired");
    delay(2000);
    lcd.clear();
    lcd.print("Me too!");
    lcd.setCursor(2, 2);
    lcd.print("Lets drink.");
    delay(2000);
    lcd.clear();
    lcd.print(" (.) (.) Yeah");
    lcd.setCursor(2, 2);
    lcd.print(" (____) ");
    delay(2000);
    lcd.clear();
    lcd.print("You go buy");
    lcd.setCursor(2, 2);
    lcd.print("a drink...");
    delay(2000);
    lcd.clear();
    lcd.print(" (*) (*) Ahh!");
    lcd.setCursor(2, 2);
    lcd.print(" ____ OW!!");
    delay(2000);
    lcd.clear();
    lcd.print("What?");
    lcd.setCursor(2, 2);
    lcd.print("...");
    delay(2000);
    lcd.clear();
    lcd.print(" (*) (*)Water");
    lcd.setCursor(2, 2);
    lcd.print(" []got in my eye");
    delay(2000);
    lcd.clear();
    lcd.print("To be ");
    lcd.setCursor(2, 2);
    lcd.print("continued.");
    delay(2000);
  }
  buttonState = digitalRead(buttonPin3);
  if (buttonState == HIGH) {
    lcd.clear();
    lcd.print("You go to");
    lcd.setCursor(2, 2);
    lcd.print("your home...");
    delay(2000);
    lcd.clear();
    lcd.print(" (.) (.) WOW!");
    lcd.setCursor(2, 2);
    lcd.print(" ___ Cool!");
    delay(2000);
    lcd.clear();
    lcd.print("You play for");
    lcd.setCursor(2, 2);
    lcd.print("the day...");
    delay(2000);
    lcd.clear();
    lcd.print("To be");
    lcd.setCursor(2, 2);
    lcd.print("continued.");
    delay(2000);
    lcd.clear();
  }
}
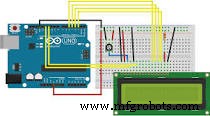
Schema's
DIY Arduino Kakerlakbesturingssysteem – Bouw voor minder dan $30
Contactloos Gebaarslot: Veilige toegang met APDS-9960 en Arduino
Productieproces
- Bouw je eigen UFO Attack Game met Arduino UNO & MAX7219 Display
- Bouw een 20 kHz Arduino Oscilloscoop op een Nokia 5110 LCD – Eenvoudige DIY Handleiding
- Slimme Jaloezieën: Geautomatiseerd Lichtbeheer met Arduino & Zonne-energie
- 3D RGB Arduclock – Bluetooth LED Tijdstuk met Real-Time Clock
- Riviergezondheidsmonitor: Arduino-gebaseerd Waterkwaliteitssysteem
- Een eenvoudige obstakelsensor bouwen met Arduino – IR LED & Fotodiodo Tutorial
- Interactieve Joystick Game met Arduino en LED Feedback
- Find Me: Slimme Item Locator met Arduino en Bluetooth
- Zelfbouw Arduino Nano Oscilloscoop (10 Hz – 50 kHz) met 128×64 LCD
- Arduino-aangedreven mini-rover: Bouw je eigen autonome robot
- Bouw een Aangepaste Arduino Joystick Stuurwiel voor Gaming