


Arduino Touchscreen-zelfstudie | TFT LCD
In deze Arduino-touchscreen-tutorial leren we hoe we TFT LCD-touchscreen met Arduino kunnen gebruiken. Je kunt de volgende video bekijken of de schriftelijke tutorial hieronder lezen.
Overzicht
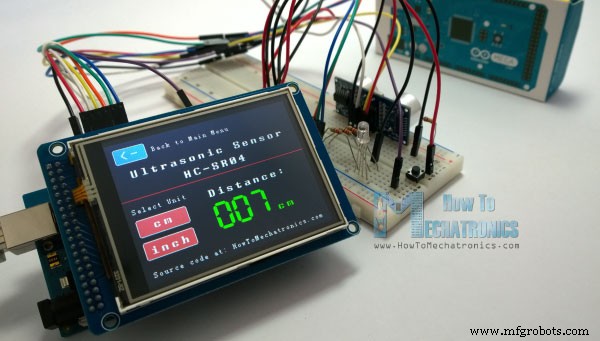
Voor deze tutorial heb ik drie voorbeelden samengesteld. Het eerste voorbeeld is afstandsmeting met behulp van een ultrasone sensor. De uitvoer van de sensor of de afstand wordt op het scherm afgedrukt en met behulp van het aanraakscherm kunnen we de eenheden selecteren, centimeters of inches.
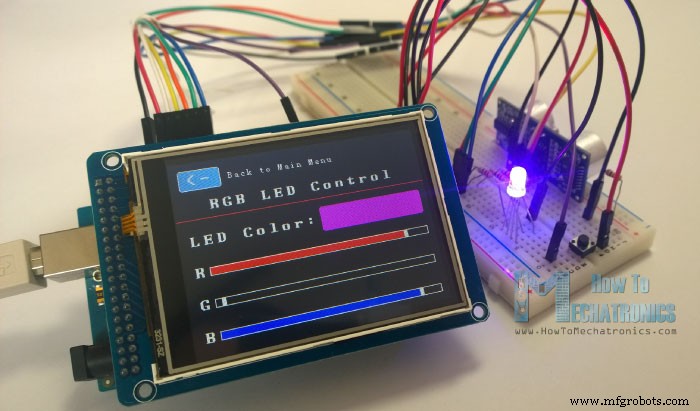
Het volgende voorbeeld is het besturen van een RGB-LED met behulp van deze drie RGB-schuifregelaars. Als we bijvoorbeeld de blauwe schuifregelaar beginnen te schuiven, zal de LED blauw oplichten en het licht vergroten naarmate we naar de maximale waarde gaan. De schuifregelaars kunnen dus van 0 naar 255 gaan en met hun combinatie kunnen we elke kleur instellen voor de RGB-led, maar houd er rekening mee dat de led de kleuren niet zo nauwkeurig kan weergeven.
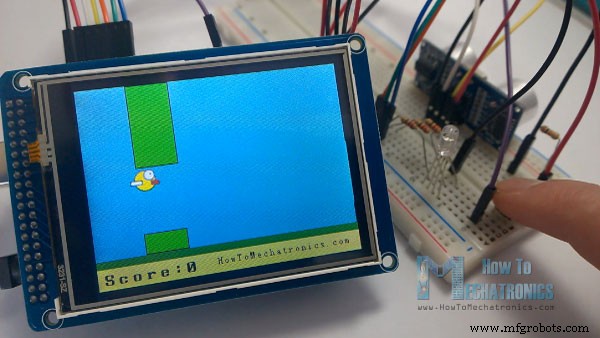
Het derde voorbeeld is een spel. Eigenlijk is het een replica van het populaire Flappy Bird-spel voor smartphones. We kunnen het spel spelen met de drukknop of zelfs met het touchscreen zelf.
Nu zullen we elk van deze voorbeelden doornemen en stap voor stap de codes erachter uitleggen.
Benodigde onderdelen voor dit Arduino-touchscreen
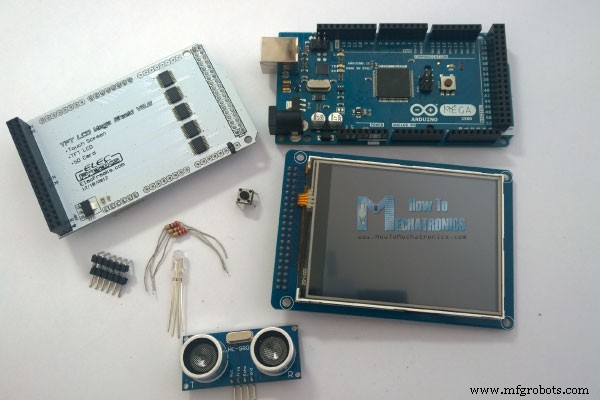
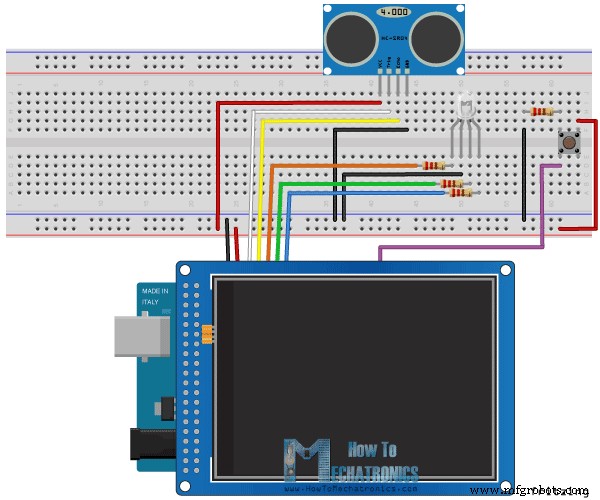
Als voorbeeld gebruik ik een 3.2” TFT Touch Screen in combinatie met een TFT LCD Arduino Mega Shield. We hebben een schild nodig omdat het TFT-aanraakscherm op 3,3 V werkt en de Arduino Mega-uitgangen 5 V zijn. Voor het eerste voorbeeld heb ik de HC-SR04 ultrasone sensor, dan voor het tweede voorbeeld een RGB-led met drie weerstanden en een drukknop voor het spelvoorbeeld. Ook moest ik een op maat gemaakte pin-header zoals deze maken, door pin-headers te solderen en erop te buigen zodat ik ze tussen het Arduino-bord en het TFT-schild kon plaatsen.
U kunt deze componenten op een van de onderstaande sites krijgen:
- 3.2″ TFT-aanraakscherm………………..
- TFT-scherm Mega Shield………………
- Arduino-bord …………………………
- Ultrasone module HC-SR04…………..
Hier is het circuitschema. We zullen de GND-pin gebruiken, de digitale pinnen van 8 tot 13, evenals pinnummer 14. Omdat de 5V-pinnen al worden gebruikt door het TFT-scherm, zal ik pinnummer 13 gebruiken als VCC, door deze meteen hoog in te stellen in het setup-gedeelte van de code.
Arduino-aanraakschermcode
Omdat de code wat langer is en voor een beter begrip, zal ik de broncode van het programma in secties plaatsen met een beschrijving voor elke sectie. En aan het einde van dit artikel zal ik de volledige broncode posten.
Ik zal de UTFT- en URTouch-bibliotheken van Henning Karlsen gebruiken. Hier wil ik hem bedanken voor het ongelooflijke werk dat hij heeft gedaan. De bibliotheken maken het gebruik van de TFT-schermen heel eenvoudig en ze werken met veel verschillende TFT-schermformaten, schilden en controllers. U kunt deze bibliotheken downloaden van zijn website, RinkyDinkElectronics.com en ook veel demovoorbeelden en gedetailleerde documentatie vinden over het gebruik ervan.
Nadat we de bibliotheken hebben opgenomen, moeten we UTFT- en URTouch-objecten maken. De parameters van deze objecten zijn afhankelijk van het model van het TFT-scherm en schild en deze details zijn ook te vinden in de documentatie van de bibliotheken.
Vervolgens moeten we de lettertypen definiëren die bij de bibliotheken worden geleverd en ook enkele variabelen definiëren die nodig zijn voor het programma. In de setup-sectie moeten we het scherm en de aanraking starten, de pin-modi definiëren voor de aangesloten sensor, de led en de knop, en in eerste instantie de aangepaste functie drawHomeSreen() aanroepen, die het startscherm van het programma zal tekenen.
#include <UTFT.h>
#include <URTouch.h>

//==== Creating Objects
UTFT    myGLCD(SSD1289,38,39,40,41); //Parameters should be adjusted to your Display/Schield model
URTouch  myTouch( 6, 5, 4, 3, 2);

//==== Defining Variables
extern uint8_t SmallFont[];
extern uint8_t BigFont[];
extern uint8_t SevenSegNumFont[];

extern unsigned int bird01[0x41A];

int x, y;

char currentPage, selectedUnit;

//Ultrasonic Sensor
const int VCC = 13;
const int trigPin = 11;
const int echoPin = 12;

long duration;
int distanceInch, distanceCm;

// RGB LEDs
const int redLed = 10;
const int greenLed = 9;
const int blueLed = 8;
int xR=38;
int xG=38;
int xB=38;

// Floppy Bird
int xP = 319;
int yP = 100;
int yB = 30;
int fallRateInt = 0;
float fallRate =0;
int score=0;
const int button = 14;
int buttonState = 0;

void setup() {
// Initial setup
  myGLCD.InitLCD();
  myGLCD.clrScr();
  myTouch.InitTouch();
  myTouch.setPrecision(PREC_MEDIUM);

  // Defining Pin Modes
  pinMode(VCC, OUTPUT); // VCC
  pinMode(trigPin, OUTPUT); // Sets the trigPin as an Output
  pinMode(echoPin, INPUT); // Sets the echoPin as an Input
  pinMode(redLed, OUTPUT);
  pinMode(greenLed, OUTPUT);
  pinMode(blueLed, OUTPUT);
  pinMode(button, INPUT);
  digitalWrite(VCC, HIGH); // +5V - Pin 13 as VCC

  drawHomeScreen();  // Draws the Home Screen
  currentPage = '0'; // Indicates that we are at Home Screen
  selectedUnit = '0'; // Indicates the selected unit for the first example, cms or inches
}Code language: Arduino (arduino)
Dus nu zal ik uitleggen hoe we het startscherm van het programma kunnen maken. Met de functie setBackColor() moeten we de achtergrondkleur van de tekst instellen, in ons geval zwart. Vervolgens moeten we de kleur instellen op wit, het grote lettertype instellen en met de functie print() de tekenreeks "Arduino TFT-zelfstudie" in het midden van het scherm en 10 pixels langs de Y-as van het scherm afdrukken. Vervolgens stellen we de kleur in op rood en tekenen we de rode lijn onder de tekst. Daarna moeten we de kleur weer wit instellen en de twee andere tekenreeksen afdrukken, "by HowToMechatronics.com" met het kleine lettertype en "Voorbeeld selecteren" met het grote lettertype.
De volgende is de afstandssensorknop. Eerst moeten we de kleur instellen en vervolgens met de functie fillRoundRect() tekenen we de afgeronde rechthoek. Vervolgens zullen we de kleur terugzetten naar wit en met behulp van de functie drawRoundRect() tekenen we nog een afgeronde rechthoek bovenop de vorige, maar deze zal zonder vulling zijn, zodat het algehele uiterlijk van de knop eruitziet alsof deze een frame heeft . Bovenop de knop drukken we de tekst af met het grote lettertype en dezelfde achtergrondkleur als de vulling van de knop. Dezelfde procedure geldt voor de twee andere knoppen.
// drawHomeScreen - Custom Function
void drawHomeScreen() {
  // Title
  myGLCD.setBackColor(0,0,0); // Sets the background color of the area where the text will be printed to black
  myGLCD.setColor(255, 255, 255); // Sets color to white
  myGLCD.setFont(BigFont); // Sets font to big
  myGLCD.print("Arduino TFT Tutorial", CENTER, 10); // Prints the string on the screen
  myGLCD.setColor(255, 0, 0); // Sets color to red
  myGLCD.drawLine(0,32,319,32); // Draws the red line
  myGLCD.setColor(255, 255, 255); // Sets color to white
  myGLCD.setFont(SmallFont); // Sets the font to small
  myGLCD.print("by HowToMechatronics.com", CENTER, 41); // Prints the string
  myGLCD.setFont(BigFont);
  myGLCD.print("Select Example", CENTER, 64);

  // Button - Distance Sensor
  myGLCD.setColor(16, 167, 103); // Sets green color
  myGLCD.fillRoundRect (35, 90, 285, 130); // Draws filled rounded rectangle
  myGLCD.setColor(255, 255, 255); // Sets color to white
  myGLCD.drawRoundRect (35, 90, 285, 130); // Draws rounded rectangle without a fill, so the overall appearance of the button looks like it has a frame
  myGLCD.setFont(BigFont); // Sets the font to big
  myGLCD.setBackColor(16, 167, 103); // Sets the background color of the area where the text will be printed to green, same as the button
  myGLCD.print("DISTANCE SENSOR", CENTER, 102); // Prints the string

  // Button - RGB LED Control
  myGLCD.setColor(16, 167, 103);
  myGLCD.fillRoundRect (35, 140, 285, 180);
  myGLCD.setColor(255, 255, 255);
  myGLCD.drawRoundRect (35, 140, 285, 180);
  myGLCD.setFont(BigFont);
  myGLCD.setBackColor(16, 167, 103);
  myGLCD.print("RGB LED CONTROL", CENTER, 152);

  // Button - Birduino
  myGLCD.setColor(16, 167, 103);
  myGLCD.fillRoundRect (35, 190, 285, 230);
  myGLCD.setColor(255, 255, 255);
  myGLCD.drawRoundRect (35, 190, 285, 230);
  myGLCD.setFont(BigFont);
  myGLCD.setBackColor(16, 167, 103);
  myGLCD.print("BIRDUINO GAME", CENTER, 202);
}Code language: Arduino (arduino)
Nu moeten we de knoppen functioneel maken, zodat wanneer we erop drukken, ze ons naar het juiste voorbeeld zouden sturen. In de setup-sectie stellen we het teken '0' in op de currentPage-variabele, wat aangeeft dat we op het startscherm zijn. Dus als dat waar is, en als we op het scherm op dit if-statement drukken, wordt het waar en als we deze regels hier gebruiken, krijgen we de X- en Y-coördinaten waar het scherm is ingedrukt. Als dat het gebied is dat de eerste knop bedekt, zullen we de aangepaste functie drawDistanceSensor() aanroepen die het voorbeeld van de afstandssensor activeert. We zullen ook het teken '1' instellen op de variabele currentPage, wat aangeeft dat we bij het eerste voorbeeld zijn. De aangepaste functie drawFrame() wordt gebruikt om de knop te markeren wanneer erop wordt gedrukt. Dezelfde procedure geldt voor de twee andere knoppen.
//========== The loop section ========
void loop() {
  // Home Screen
  if (currentPage == '0') {
    if (myTouch.dataAvailable()) {
      myTouch.read();
      x=myTouch.getX(); // X coordinate where the screen has been pressed
      y=myTouch.getY(); // Y coordinates where the screen has been pressed
      // If we press the Distance Sensor Button
      if ((x>=35) && (x<=285) && (y>=90) && (y<=130)) {
        drawFrame(35, 90, 285, 130); // Custom Function -Highlighs the buttons when it's pressed
        currentPage = '1'; // Indicates that we are the first example
        myGLCD.clrScr(); // Clears the screen
        drawDistanceSensor(); // It is called only once, because in the next iteration of the loop, this above if statement will be false so this funtion won't be called. This function will draw the graphics of the first example.
      }
      // If we press the RGB LED Control Button
      if ((x>=35) && (x<=285) && (y>=140) && (y<=180)) {
        drawFrame(35, 140, 285, 180);
        currentPage = '2';
        myGLCD.clrScr();
        drawLedControl();
      }
      // If we press the Birduino Game Button
      if ((x>=35) && (x<=285) && (y>=190) && (y<=230)) {
        drawFrame(35, 190, 285, 230);
        currentPage = '3';
        myGLCD.clrScr();
        myGLCD.setColor(114, 198, 206);
        myGLCD.fillRect(0,0,319,239);
        drawGround();
        drawPilars(xP,yP);
        drawBird(30);
        delay(1000);
      }
    }
  }
  // Distance Sensor Example
  if (currentPage == '1') {
      getDistance(); // Gets distance from the sensor and this function is repeatedly called while we are at the first example in order to print the lasest results from the distance sensor
      if (myTouch.dataAvailable()) {
        myTouch.read();
        x=myTouch.getX();
        y=myTouch.getY();

        // If we press the Centimeters Button
        if ((x>=10) && (x<=135) &&(y>=90) && (y<=163)) {
          selectedUnit = '0';
        }
        // If we press the Inches Button
        if ((x>=10) && (x<=135) &&(y>=173) && (y<=201)) {
          selectedUnit = '1';
        }
        // If we press the Back Button
        if ((x>=10) && (x<=60) &&(y>=10) && (y<=36)) {
          drawFrame(10, 10, 60, 36);
          currentPage = '0'; // Indicates we are at home screen
          myGLCD.clrScr();
          drawHomeScreen(); // Draws the home screen
        }
      }
  }

  // RGB LED Control
  if (currentPage == '2') {
    setLedColor();
    if (myTouch.dataAvailable()) {
        myTouch.read();
        x=myTouch.getX();
        y=myTouch.getY();

        //Back button
        if ((x>=10) && (x<=60) &&(y>=10) && (y<=36)) {
          drawFrame(10, 10, 60, 36);
          currentPage = '0';
          myGLCD.clrScr();
          drawHomeScreen();
          // Turns the LED off
          analogWrite(redLed, 0);
          analogWrite(greenLed, 0);
          analogWrite(blueLed, 0);
        }
    }
  }
//==== This section of the code, for the game example, is explained in my next tutorial
  // Birduino Game
  if (currentPage == '3') {
    //delay(1);
    xP=xP-3;
    drawPilars(xP, yP);

    yB+=fallRateInt;
    fallRate=fallRate+0.4;
    fallRateInt= int(fallRate);
    if (yB>=220) {
      yB=220;
    }
    if(yB>=180 || yB<=0){
      restartGame();
    }
    if((xP<=85) && (xP>=30) && (yB<=yP-2)){
      restartGame();
    }
    if((xP<=85) && (xP>=30) && (yB>=yP+60)){
      restartGame();
    }
    drawBird(yB);

    if (xP<=-51){
      xP=319;
      yP = rand() % 100+20;
      score++;
    }
    if (myTouch.dataAvailable()) {
        myTouch.read();
        x=myTouch.getX();
        y=myTouch.getY();
        if ((x>=0) && (x<=319) &&(y>=50) && (y<=239)) {
          fallRate=-5;
        }
    }
    buttonState = digitalRead(button);
    if (buttonState == HIGH) {
      fallRate=-5;
      }
  }
    if (myTouch.dataAvailable()) {
        myTouch.read();
        x=myTouch.getX();
        y=myTouch.getY();
        if ((x>=10) && (x<=60) &&(y>=10) && (y<=36)) {
          drawFrame(10, 10, 60, 36);
          currentPage = '0';
          myGLCD.clrScr();
          drawHomeScreen();
          analogWrite(redLed, 0);
          analogWrite(greenLed, 0);
          analogWrite(blueLed, 0);
        }
    }
}Code language: Arduino (arduino)
Dus de aangepaste functie drawDistanceSensor() hoeft maar één keer te worden aangeroepen wanneer de knop wordt ingedrukt om alle afbeeldingen van dit voorbeeld op dezelfde manier te tekenen als we hebben beschreven voor het startscherm. De aangepaste functie getDistance() moet echter herhaaldelijk worden aangeroepen om de laatste resultaten van de door de sensor gemeten afstand af te drukken.
Hier is die functie die de ultrasone sensor gebruikt om de afstand te berekenen en de waarden af te drukken met het SevenSegNum-lettertype in groene kleur, in centimeters of inches. Als je meer details nodig hebt over hoe de ultrasone sensor werkt, kun je daarvoor mijn specifieke tutorial raadplegen. Terug in de loop-sectie kunnen we zien wat er gebeurt als we zowel op de unit select-knoppen als op de back-knop drukken.
//===== getDistance() - Custom Function
void getDistance() {
  // Clears the trigPin
  digitalWrite(trigPin, LOW);
  delayMicroseconds(2);
  // Sets the trigPin on HIGH state for 10 micro seconds
  digitalWrite(trigPin, HIGH);
  delayMicroseconds(10);
  digitalWrite(trigPin, LOW);
  // Reads the echoPin, returns the sound wave travel time in microseconds
  duration = pulseIn(echoPin, HIGH);
  // Calculating the distance
  distanceCm= duration*0.034/2;
  distanceInch= distanceCm/2.53;
  // Prints the distance in centimeters
  if (selectedUnit == '0' && distanceCm <=400) {
    myGLCD.setFont(SevenSegNumFont);
    myGLCD.setColor(0, 255, 0);
    myGLCD.setBackColor(0, 0, 0);
    myGLCD.printNumI(distanceCm,130, 145, 3,'0');
    myGLCD.setFont(BigFont);
    myGLCD.print("cm  ", 235, 178);

  }
  // Prints the distance in inches
  if (selectedUnit == '1' && distanceCm <=160) {
    myGLCD.setFont(SevenSegNumFont);
    myGLCD.setColor(0, 255, 0);
    myGLCD.setBackColor(0, 0, 0);
    myGLCD.printNumI(distanceInch,130, 145, 3,'0');
    myGLCD.setFont(BigFont);
    myGLCD.print("inch", 235, 178);
  }
  delay(10);
}Code language: Arduino (arduino)
Ok, het volgende is het RGB LED-besturingsvoorbeeld. Als we op de tweede knop drukken, wordt de aangepaste functie drawLedControl() slechts één keer aangeroepen voor het tekenen van de afbeelding van dat voorbeeld en wordt de aangepaste functie setLedColor() herhaaldelijk aangeroepen. In deze functie gebruiken we het aanraakscherm om de waarden van de 3 schuifregelaars in te stellen van 0 tot 255. Met de if-statements beperken we het gebied van elke schuifregelaar en krijgen we de X-waarde van de schuifregelaar. Dus de waarden van de X-coördinaat van elke schuifregelaar zijn van 38 tot 310 pixels en we moeten deze waarden in kaart brengen in waarden van 0 tot 255 die zullen worden gebruikt als een PWM-signaal voor het verlichten van de LED. Als je meer details nodig hebt over hoe de RGB-LED werkt, kun je daarvoor mijn specifieke tutorial raadplegen. De rest van de code in deze aangepaste functie is voor het tekenen van de schuifregelaars. Terug in de loop-sectie hebben we alleen de terug-knop die ook de LED uitschakelt wanneer erop wordt gedrukt.
//============= setLedColor() - Custom Funtion
void setLedColor() {
  if (myTouch.dataAvailable()) {
    myTouch.read();
    x=myTouch.getX();
    y=myTouch.getY();
    // Area of the Red color slider
    if( (y>=130) && (y<=156)) {
      xR=x; // Stores the X value where the screen has been pressed in to variable xR
      if (xR<=38) { // Confines the area of the slider to be above 38 pixels
        xR=38;
      }
      if (xR>=303){ /// Confines the area of the slider to be under 310 pixels
        xR=303;
      }
    }
    // Area of the Green color slider
    if( (y>=170) && (y<=196)) {
      xG=x;
      if (xG<=38) {
        xG=38;
      }
      if (xG>=303){
        xG=303;
      }
    }
    // Area of the Blue color slider
    if( (y>=210) && (y<=236)) {
      xB=x;
      if (xB<=38) {
        xB=38;
      }
      if (xB>=303){
        xB=303;
      }
    }
  }
  // Maps the values of the X - Axis from 38 to 0 and 310 to 255, because we need values from 0 to 255 for turning on the led
  int xRC = map(xR,38,310,0,255);
  int xGC = map(xG,38,310,0,255);
  int xBC = map(xB,38,310,0,255);

  // Sends PWM signal to the pins of the led
  analogWrite(redLed, xRC);
  analogWrite(greenLed, xGC);
  analogWrite(blueLed, xBC);

  // Draws a rectangle with the latest color combination
  myGLCD.setColor(xRC, xGC, xBC);
  myGLCD.fillRoundRect(175, 87, 310, 119);

  // Draws the positioners
  myGLCD.setColor(255, 255, 255);
  myGLCD.fillRect(xR,139,(xR+4),147); // Positioner
  myGLCD.setColor(xRC, 0, 0);
  myGLCD.fillRect(31, 139, (xR-1), 147);
  myGLCD.setColor(0, 0, 0);
  myGLCD.fillRect((xR+5), 139, 309, 147);

  myGLCD.setColor(255, 255, 255);
  myGLCD.fillRect(xG,179,(xG+4),187);
  myGLCD.setColor(0, xGC, 0);
  myGLCD.fillRect(31, 179, (xG-1), 187);
  myGLCD.setColor(0, 0, 0);
  myGLCD.fillRect((xG+5), 179, 309, 187);


  myGLCD.setColor(255, 255, 255);
  myGLCD.fillRect(xB,219,(xB+4),227);
  myGLCD.setColor(0, 0, xBC);
  myGLCD.fillRect(31, 219, (xB-1), 227);
  myGLCD.setColor(0, 0, 0);
  myGLCD.fillRect((xB+5), 219, 309, 227);
}Code language: Arduino (arduino)
Het volgende is het Arduino-spelvoorbeeld, maar ik laat dat over voor mijn volgende zelfstudie, zodat we het beter kunnen begrijpen omdat het een beetje ingewikkelder is.
Volledige broncode van programma
Om de code te laten werken en compileren, moet u een aanvullend ".c" -bestand opnemen in dezelfde map als de Arduino-schets. Dit bestand is voor het derde spelvoorbeeld en het is een bitmap van de vogel. Voor meer informatie over hoe dit deel van de code werkt, kun je mijn specifieke tutorial bekijken. Hier kunt u dat bestand downloaden:

Arduino TFT-zelfstudiebestanden
1 bestand(en) 6,07 KB downloadenHier is de volledige broncode van het programma:
/*  Arduino TFT Tutorial
 *  Program made by Dejan Nedelkovski,
 *  www.HowToMechatronics.com
 */

/*  This program uses the UTFT and URTouch libraries
 *  made by Henning Karlsen.
 *  You can find and download them at:
 *  www.RinkyDinkElectronics.com
 */

#include <UTFT.h>
#include <URTouch.h>

//==== Creating Objects
UTFT    myGLCD(SSD1289,38,39,40,41); //Parameters should be adjusted to your Display/Schield model
URTouch  myTouch( 6, 5, 4, 3, 2);

//==== Defining Variables
extern uint8_t SmallFont[];
extern uint8_t BigFont[];
extern uint8_t SevenSegNumFont[];

extern unsigned int bird01[0x41A];

int x, y;

char currentPage, selectedUnit;

//Ultrasonic Sensor
const int VCC = 13;
const int trigPin = 11;
const int echoPin = 12;

long duration;
int distanceInch, distanceCm;

// RGB LEDs
const int redLed = 10;
const int greenLed = 9;
const int blueLed = 8;
int xR=38;
int xG=38;
int xB=38;

// Floppy Bird
int xP = 319;
int yP = 100;
int yB = 30;
int fallRateInt = 0;
float fallRate =0;
int score=0;
const int button = 14;
int buttonState = 0;

void setup() {
// Initial setup
  myGLCD.InitLCD();
  myGLCD.clrScr();
  myTouch.InitTouch();
  myTouch.setPrecision(PREC_MEDIUM);

  // Defining Pin Modes
  pinMode(VCC, OUTPUT); // VCC
  pinMode(trigPin, OUTPUT); // Sets the trigPin as an Output
  pinMode(echoPin, INPUT); // Sets the echoPin as an Input
  pinMode(redLed, OUTPUT);
  pinMode(greenLed, OUTPUT);
  pinMode(blueLed, OUTPUT);
  pinMode(button, INPUT);
  digitalWrite(VCC, HIGH); // +5V - Pin 13 as VCC

  drawHomeScreen();  // Draws the Home Screen
  currentPage = '0'; // Indicates that we are at Home Screen
  selectedUnit = '0'; // Indicates the selected unit for the first example, cms or inches
}

void loop() {
  // Home Screen
  if (currentPage == '0') {
    if (myTouch.dataAvailable()) {
      myTouch.read();
      x=myTouch.getX(); // X coordinate where the screen has been pressed
      y=myTouch.getY(); // Y coordinates where the screen has been pressed
      // If we press the Distance Sensor Button
      if ((x>=35) && (x<=285) && (y>=90) && (y<=130)) {
        drawFrame(35, 90, 285, 130); // Custom Function -Highlighs the buttons when it's pressed
        currentPage = '1'; // Indicates that we are the first example
        myGLCD.clrScr(); // Clears the screen
        drawDistanceSensor(); // It is called only once, because in the next iteration of the loop, this above if statement will be false so this funtion won't be called. This function will draw the graphics of the first example.
      }
      // If we press the RGB LED Control Button
      if ((x>=35) && (x<=285) && (y>=140) && (y<=180)) {
        drawFrame(35, 140, 285, 180);
        currentPage = '2';
        myGLCD.clrScr();
        drawLedControl();
      }
      // If we press the Birduino Game Button
      if ((x>=35) && (x<=285) && (y>=190) && (y<=230)) {
        drawFrame(35, 190, 285, 230);
        currentPage = '3';
        myGLCD.clrScr();
        myGLCD.setColor(114, 198, 206);
        myGLCD.fillRect(0,0,319,239);
        drawGround();
        drawPilars(xP,yP);
        drawBird(30);
        delay(1000);
      }
    }
  }
  // Distance Sensor Example
  if (currentPage == '1') {
      getDistance(); // Gets distance from the sensor and this function is repeatedly called while we are at the first example in order to print the lasest results from the distance sensor
      if (myTouch.dataAvailable()) {
        myTouch.read();
        x=myTouch.getX();
        y=myTouch.getY();

        // If we press the Centimeters Button
        if ((x>=10) && (x<=135) &&(y>=90) && (y<=163)) {
          selectedUnit = '0';
        }
        // If we press the Inches Button
        if ((x>=10) && (x<=135) &&(y>=173) && (y<=201)) {
          selectedUnit = '1';
        }
        // If we press the Back Button
        if ((x>=10) && (x<=60) &&(y>=10) && (y<=36)) {
          drawFrame(10, 10, 60, 36);
          currentPage = '0'; // Indicates we are at home screen
          myGLCD.clrScr();
          drawHomeScreen(); // Draws the home screen
        }
      }
  }

  // RGB LED Control
  if (currentPage == '2') {
    setLedColor();
    if (myTouch.dataAvailable()) {
        myTouch.read();
        x=myTouch.getX();
        y=myTouch.getY();

        //Back button
        if ((x>=10) && (x<=60) &&(y>=10) && (y<=36)) {
          drawFrame(10, 10, 60, 36);
          currentPage = '0';
          myGLCD.clrScr();
          drawHomeScreen();
          // Turns the LED off
          analogWrite(redLed, 0);
          analogWrite(greenLed, 0);
          analogWrite(blueLed, 0);
        }
    }
  }
//==== This section of the code, for the game example, is explained in my next tutorial
  // Birduino Game
  if (currentPage == '3') {
    //delay(1);
    xP=xP-3;
    drawPilars(xP, yP);

    yB+=fallRateInt;
    fallRate=fallRate+0.4;
    fallRateInt= int(fallRate);
    if (yB>=220) {
      yB=220;
    }
    if(yB>=180 || yB<=0){
      restartGame();
    }
    if((xP<=85) && (xP>=30) && (yB<=yP-2)){
      restartGame();
    }
    if((xP<=85) && (xP>=30) && (yB>=yP+60)){
      restartGame();
    }
    drawBird(yB);

    if (xP<=-51){
      xP=319;
      yP = rand() % 100+20;
      score++;
    }
    if (myTouch.dataAvailable()) {
        myTouch.read();
        x=myTouch.getX();
        y=myTouch.getY();
        if ((x>=0) && (x<=319) &&(y>=50) && (y<=239)) {
          fallRate=-5;
        }
    }
    buttonState = digitalRead(button);
    if (buttonState == HIGH) {
      fallRate=-5;
      }
  }
    if (myTouch.dataAvailable()) {
        myTouch.read();
        x=myTouch.getX();
        y=myTouch.getY();
        if ((x>=10) && (x<=60) &&(y>=10) && (y<=36)) {
          drawFrame(10, 10, 60, 36);
          currentPage = '0';
          myGLCD.clrScr();
          drawHomeScreen();
          analogWrite(redLed, 0);
          analogWrite(greenLed, 0);
          analogWrite(blueLed, 0);
        }
    }
}

// ====== Custom Funtions ======
// drawHomeScreen - Custom Function
void drawHomeScreen() {
  // Title
  myGLCD.setBackColor(0,0,0); // Sets the background color of the area where the text will be printed to black
  myGLCD.setColor(255, 255, 255); // Sets color to white
  myGLCD.setFont(BigFont); // Sets font to big
  myGLCD.print("Arduino TFT Tutorial", CENTER, 10); // Prints the string on the screen
  myGLCD.setColor(255, 0, 0); // Sets color to red
  myGLCD.drawLine(0,32,319,32); // Draws the red line
  myGLCD.setColor(255, 255, 255); // Sets color to white
  myGLCD.setFont(SmallFont); // Sets the font to small
  myGLCD.print("by HowToMechatronics.com", CENTER, 41); // Prints the string
  myGLCD.setFont(BigFont);
  myGLCD.print("Select Example", CENTER, 64);

  // Button - Distance Sensor
  myGLCD.setColor(16, 167, 103); // Sets green color
  myGLCD.fillRoundRect (35, 90, 285, 130); // Draws filled rounded rectangle
  myGLCD.setColor(255, 255, 255); // Sets color to white
  myGLCD.drawRoundRect (35, 90, 285, 130); // Draws rounded rectangle without a fill, so the overall appearance of the button looks like it has a frame
  myGLCD.setFont(BigFont); // Sets the font to big
  myGLCD.setBackColor(16, 167, 103); // Sets the background color of the area where the text will be printed to green, same as the button
  myGLCD.print("DISTANCE SENSOR", CENTER, 102); // Prints the string

  // Button - RGB LED Control
  myGLCD.setColor(16, 167, 103);
  myGLCD.fillRoundRect (35, 140, 285, 180);
  myGLCD.setColor(255, 255, 255);
  myGLCD.drawRoundRect (35, 140, 285, 180);
  myGLCD.setFont(BigFont);
  myGLCD.setBackColor(16, 167, 103);
  myGLCD.print("RGB LED CONTROL", CENTER, 152);

  // Button - Birduino
  myGLCD.setColor(16, 167, 103);
  myGLCD.fillRoundRect (35, 190, 285, 230);
  myGLCD.setColor(255, 255, 255);
  myGLCD.drawRoundRect (35, 190, 285, 230);
  myGLCD.setFont(BigFont);
  myGLCD.setBackColor(16, 167, 103);
  myGLCD.print("BIRDUINO GAME", CENTER, 202);
}

// Highlights the button when pressed
void drawFrame(int x1, int y1, int x2, int y2) {
  myGLCD.setColor(255, 0, 0);
  myGLCD.drawRoundRect (x1, y1, x2, y2);
  while (myTouch.dataAvailable())
    myTouch.read();
    myGLCD.setColor(255, 255, 255);
    myGLCD.drawRoundRect (x1, y1, x2, y2);
}
//====================================================
void drawDistanceSensor() {
  myGLCD.setColor(100, 155, 203);
  myGLCD.fillRoundRect (10, 10, 60, 36);
  myGLCD.setColor(255, 255, 255);
  myGLCD.drawRoundRect (10, 10, 60, 36);
  myGLCD.setFont(BigFont);
  myGLCD.setBackColor(100, 155, 203);
  myGLCD.print("<-", 18, 15);
  myGLCD.setBackColor(0, 0, 0);
  myGLCD.setFont(SmallFont);
  myGLCD.print("Back to Main Menu", 70, 18);
  myGLCD.setFont(BigFont);
  myGLCD.print("Ultrasonic Sensor", CENTER, 50);
  myGLCD.print("HC-SR04", CENTER, 76);
  myGLCD.setColor(255, 0, 0);
  myGLCD.drawLine(0,100,319,100);
  myGLCD.setBackColor(0, 0, 0);
  myGLCD.setColor(255, 255, 255);
  myGLCD.setFont(SmallFont);
  myGLCD.print("Select Unit", 10, 114);
  myGLCD.setFont(BigFont);
  myGLCD.print("Distance:", 130, 120);
  myGLCD.setColor(223, 77, 55);
  myGLCD.fillRoundRect (10, 135, 90, 163);
  myGLCD.setColor(225, 255, 255);
  myGLCD.drawRoundRect (10, 135, 90, 163);
  myGLCD.setBackColor(223, 77, 55);
  myGLCD.setColor(255, 255, 255);
  myGLCD.print("cm", 33, 140);
  myGLCD.setColor(223, 77, 55);
  myGLCD.fillRoundRect (10, 173, 90, 201);
  myGLCD.setColor(255, 255, 255);
  myGLCD.drawRoundRect (10, 173, 90, 201);
  myGLCD.setBackColor(223, 77, 55);
  myGLCD.setColor(255, 255, 255);
  myGLCD.print("inch", 17, 180);
  myGLCD.setBackColor(0, 0, 0);
  myGLCD.setFont(SmallFont);
  myGLCD.print("Source code at: HowToMechatronics.com", CENTER, 220);
}
//====================================================
//===== getDistance - Custom Function
void getDistance() {
  // Clears the trigPin
  digitalWrite(trigPin, LOW);
  delayMicroseconds(2);
  // Sets the trigPin on HIGH state for 10 micro seconds
  digitalWrite(trigPin, HIGH);
  delayMicroseconds(10);
  digitalWrite(trigPin, LOW);
  // Reads the echoPin, returns the sound wave travel time in microseconds
  duration = pulseIn(echoPin, HIGH);
  // Calculating the distance
  distanceCm= duration*0.034/2;
  distanceInch= distanceCm/2.53;
  // Prints the distance in centimeters
  if (selectedUnit == '0' && distanceCm <=400) {
    myGLCD.setFont(SevenSegNumFont);
    myGLCD.setColor(0, 255, 0);
    myGLCD.setBackColor(0, 0, 0);
    myGLCD.printNumI(distanceCm,130, 145, 3,'0');
    myGLCD.setFont(BigFont);
    myGLCD.print("cm  ", 235, 178);

  }
  // Prints the distance in inches
  if (selectedUnit == '1' && distanceCm <=160) {
    myGLCD.setFont(SevenSegNumFont);
    myGLCD.setColor(0, 255, 0);
    myGLCD.setBackColor(0, 0, 0);
    myGLCD.printNumI(distanceInch,130, 145, 3,'0');
    myGLCD.setFont(BigFont);
    myGLCD.print("inch", 235, 178);
  }
  delay(10);
}
//====================================================
void drawLedControl() {
  myGLCD.setColor(100, 155, 203);
  myGLCD.fillRoundRect (10, 10, 60, 36);
  myGLCD.setColor(255, 255, 255);
  myGLCD.drawRoundRect (10, 10, 60, 36);
  myGLCD.setFont(BigFont);
  myGLCD.setBackColor(100, 155, 203);
  myGLCD.print("<-", 18, 15);
  myGLCD.setBackColor(0, 0, 0);
  myGLCD.setFont(SmallFont);
  myGLCD.print("Back to Main Menu", 70, 18);
  myGLCD.setFont(BigFont);
  myGLCD.print("RGB LED Control", CENTER, 50);
  myGLCD.print("LED Color:", 10, 95);
  myGLCD.print("R", 10, 135);
  myGLCD.print("G", 10, 175);
  myGLCD.print("B", 10, 215);
  myGLCD.setColor(255, 0, 0);
  myGLCD.drawLine(0,75,319,75);
  myGLCD.setColor(255, 255, 255);
  myGLCD.drawRect(30, 138, 310, 148); // R - Slider
  myGLCD.drawRect(30, 178, 310, 188);
  myGLCD.drawRect(30, 218, 310, 228);
}
//====================================================
//============= setLedColor() - Custom Funtion
void setLedColor() {
  if (myTouch.dataAvailable()) {
    myTouch.read();
    x=myTouch.getX();
    y=myTouch.getY();
    // Area of the Red color slider
    if( (y>=130) && (y<=156)) {
      xR=x; // Stores the X value where the screen has been pressed in to variable xR
      if (xR<=38) { // Confines the area of the slider to be above 38 pixels
        xR=38;
      }
      if (xR>=303){ /// Confines the area of the slider to be under 310 pixels
        xR=303;
      }
    }
    // Area of the Green color slider
    if( (y>=170) && (y<=196)) {
      xG=x;
      if (xG<=38) {
        xG=38;
      }
      if (xG>=303){
        xG=303;
      }
    }
    // Area of the Blue color slider
    if( (y>=210) && (y<=236)) {
      xB=x;
      if (xB<=38) {
        xB=38;
      }
      if (xB>=303){
        xB=303;
      }
    }
  }
  // Maps the values of the X - Axis from 38 to 0 and 310 to 255, because we need values from 0 to 255 for turning on the led
  int xRC = map(xR,38,310,0,255);
  int xGC = map(xG,38,310,0,255);
  int xBC = map(xB,38,310,0,255);

  // Sends PWM signal to the pins of the led
  analogWrite(redLed, xRC);
  analogWrite(greenLed, xGC);
  analogWrite(blueLed, xBC);

  // Draws a rectangle with the latest color combination
  myGLCD.setColor(xRC, xGC, xBC);
  myGLCD.fillRoundRect(175, 87, 310, 119);

  // Draws the positioners
  myGLCD.setColor(255, 255, 255);
  myGLCD.fillRect(xR,139,(xR+4),147); // Positioner
  myGLCD.setColor(xRC, 0, 0);
  myGLCD.fillRect(31, 139, (xR-1), 147);
  myGLCD.setColor(0, 0, 0);
  myGLCD.fillRect((xR+5), 139, 309, 147);

  myGLCD.setColor(255, 255, 255);
  myGLCD.fillRect(xG,179,(xG+4),187);
  myGLCD.setColor(0, xGC, 0);
  myGLCD.fillRect(31, 179, (xG-1), 187);
  myGLCD.setColor(0, 0, 0);
  myGLCD.fillRect((xG+5), 179, 309, 187);


  myGLCD.setColor(255, 255, 255);
  myGLCD.fillRect(xB,219,(xB+4),227);
  myGLCD.setColor(0, 0, xBC);
  myGLCD.fillRect(31, 219, (xB-1), 227);
  myGLCD.setColor(0, 0, 0);
  myGLCD.fillRect((xB+5), 219, 309, 227);
}
//====================================================
void drawGround() {
  myGLCD.setColor(221,216,148);
  myGLCD.fillRect(0, 215, 319, 239);
  myGLCD.setColor(47,175,68);
  myGLCD.fillRect(0, 205, 319, 214);
  myGLCD.setColor(0, 0, 0);
  myGLCD.setBackColor(221, 216, 148);
  myGLCD.setFont(BigFont);
  myGLCD.print("Score:",5,220);
  myGLCD.setFont(SmallFont);
  myGLCD.print("HowToMechatronics.com", 140, 220);
}
void drawPilars(int x, int y) {

    if (x>=270){
      myGLCD.setColor(0, 200, 20);
      myGLCD.fillRect(318, 0, x, y-1);
      myGLCD.setColor(0, 0, 0);
      myGLCD.drawRect(319, 0, x-1, y);

      myGLCD.setColor(0, 200, 20);
      myGLCD.fillRect(318, y+81, x, 203);
      myGLCD.setColor(0, 0, 0);
      myGLCD.drawRect(319, y+80, x-1, 204);
    }
    else if( x<=268) {
    myGLCD.setColor(114, 198, 206);
    myGLCD.fillRect(x+51, 0, x+53, y);
    myGLCD.setColor(0, 200, 20);
    myGLCD.fillRect(x+49, 1, x+1, y-1);
    myGLCD.setColor(0, 0, 0);
    myGLCD.drawRect(x+50, 0, x, y);
    myGLCD.setColor(114, 198, 206);
    myGLCD.fillRect(x-1, 0, x-3, y);

    myGLCD.setColor(114, 198, 206);
    myGLCD.fillRect(x+51, y+80, x+53, 204);
    myGLCD.setColor(0, 200, 20);
    myGLCD.fillRect(x+49, y+81, x+1, 203);
    myGLCD.setColor(0, 0, 0);
    myGLCD.drawRect(x+50, y+80, x, 204);
    myGLCD.setColor(114, 198, 206);
    myGLCD.fillRect(x-1, y+80, x-3, 204);
  }
  myGLCD.setColor(0, 0, 0);
  myGLCD.setBackColor(221, 216, 148);
  myGLCD.setFont(BigFont);
  myGLCD.printNumI(score, 100, 220);
}
//====================================================
void drawBird(int y) {
  if(y<=219) {
    myGLCD.drawBitmap (50, y, 35, 30, bird01);
    myGLCD.setColor(114, 198, 206);
    myGLCD.fillRoundRect(50,y,85,y-6);
    myGLCD.fillRoundRect(50,y+30,85,y+36);
  }
  else if(y>=200) {
    myGLCD.drawBitmap (50, 200, 35, 30, bird01);
    myGLCD.setColor(114, 198, 206);
    myGLCD.fillRoundRect(50,200,85,200-6);
    myGLCD.fillRoundRect(50,200+30,85,200+36);
  }
}
void gameOver() {
  myGLCD.clrScr();
  myGLCD.setColor(255, 255, 255);
  myGLCD.setBackColor(0, 0, 0);
  myGLCD.setFont(BigFont);
  myGLCD.print("GAME OVER", CENTER, 40);
  myGLCD.print("Score:", 100, 80);
  myGLCD.printNumI(score,200, 80);
  myGLCD.print("Restarting...", CENTER, 120);
  myGLCD.setFont(SevenSegNumFont);
  myGLCD.printNumI(2,CENTER, 150);
  delay(1000);
  myGLCD.printNumI(1,CENTER, 150);
  delay(1000);
  myGLCD.setColor(114, 198, 206);
  myGLCD.fillRect(0,0,319,239);
  drawBird(30);
  drawGround();
  delay(1000);
}
//====================================================
void restartGame() {
  delay(1000);
  gameOver();
  xP=319;
  yB=30;
  fallRate=0;
  score=0;
}
Code language: Arduino (arduino)Productieproces
- Arduino RFID Lock-zelfstudie
- Draagbare capacitieve aanraakpiano
- LCD-animatie en gaming
- Een afbeelding weergeven op een LCD TFT-scherm met Arduino UNO!
- BMP-afbeeldingen van SD-kaart weergeven op TFT LCD-scherm
- Interfacing en oplossen van aanraakprobleem op TFT LCD 2.4″ Shield
- Arduino-weerstation
- Tutorial Arduino-vingerafdruksensor
- Arduino-zelfstudie:minipiano
- Ontwijk de Defs!
- Arduino-zelfstudie 01:Aan de slag