



Slim plantenmonitoringssysteem met AWS IoT
Onderdelen en benodigdheden
| Arduino Yun | × | 1 |
| Seeed Grove Starter Kit Plus voor Intel Edison | × | 1 |
| Seeed Grove - Vochtsensor | × | 1 |
| 5mm rode LED | × | 1 |
| Weerstand 330 ohm | × | 1 |
Benodigde tools en machines
- 3D-printer
Apps en online diensten
- AWS IoT
- AWS IAM
- AWS DynamoDB
- AWS SNS
- dweet.io
- Arduino IDE
Over dit project
Je gaat een week op vakantie en maakt je zorgen over je kamerplant. Bouw een week van tevoren een monitoring- en notificatiesysteem met:
- Temperatuur, lichtwaarde, grondvocht monitoren via dweet.io
- OF via AWS IoT loggen naar AWS DynamoDB
- AWS SNS notificaties: e-mail naar jezelf → buren/vriendinnen waarschuwen om te wateren of thermostaat te checken
Inclusief 3D-geprinte behuizing voor Arduino Yun, Grove shield en sensoren.
Mijn plant volgen: dweet.io/follow/PlantMonitorTorontoON
Stappenplan
#1 Schakeling bouwen
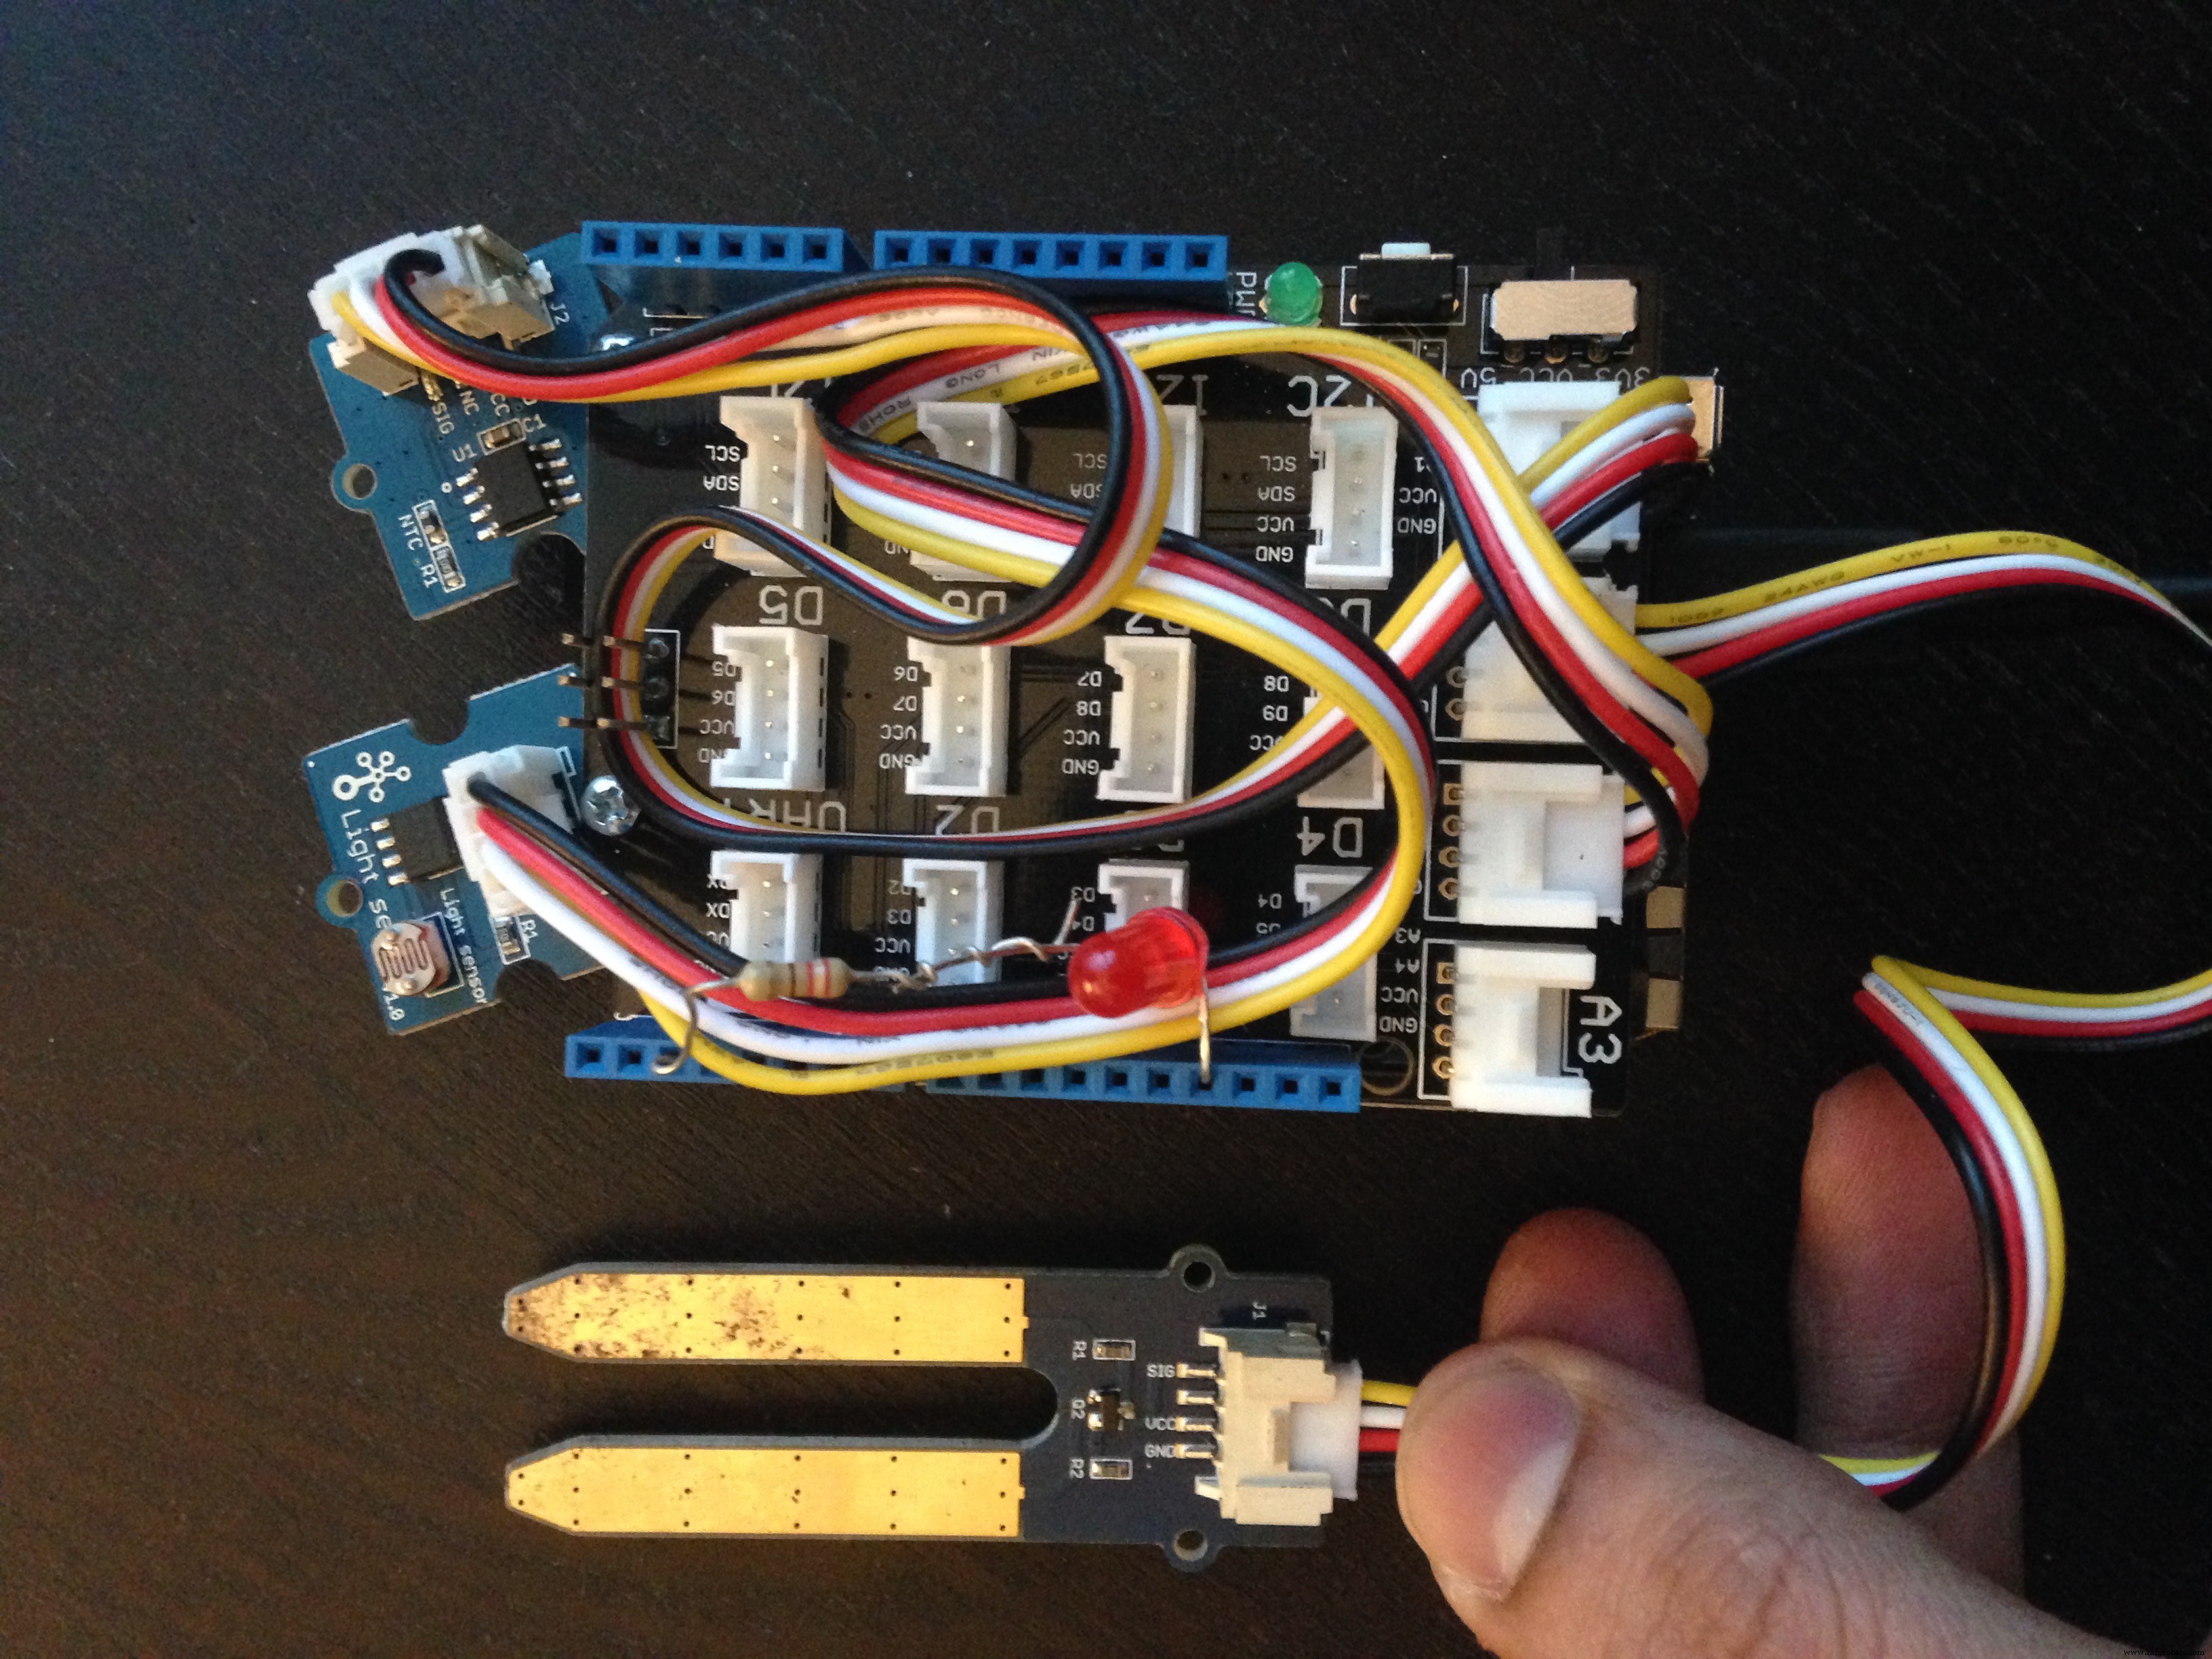
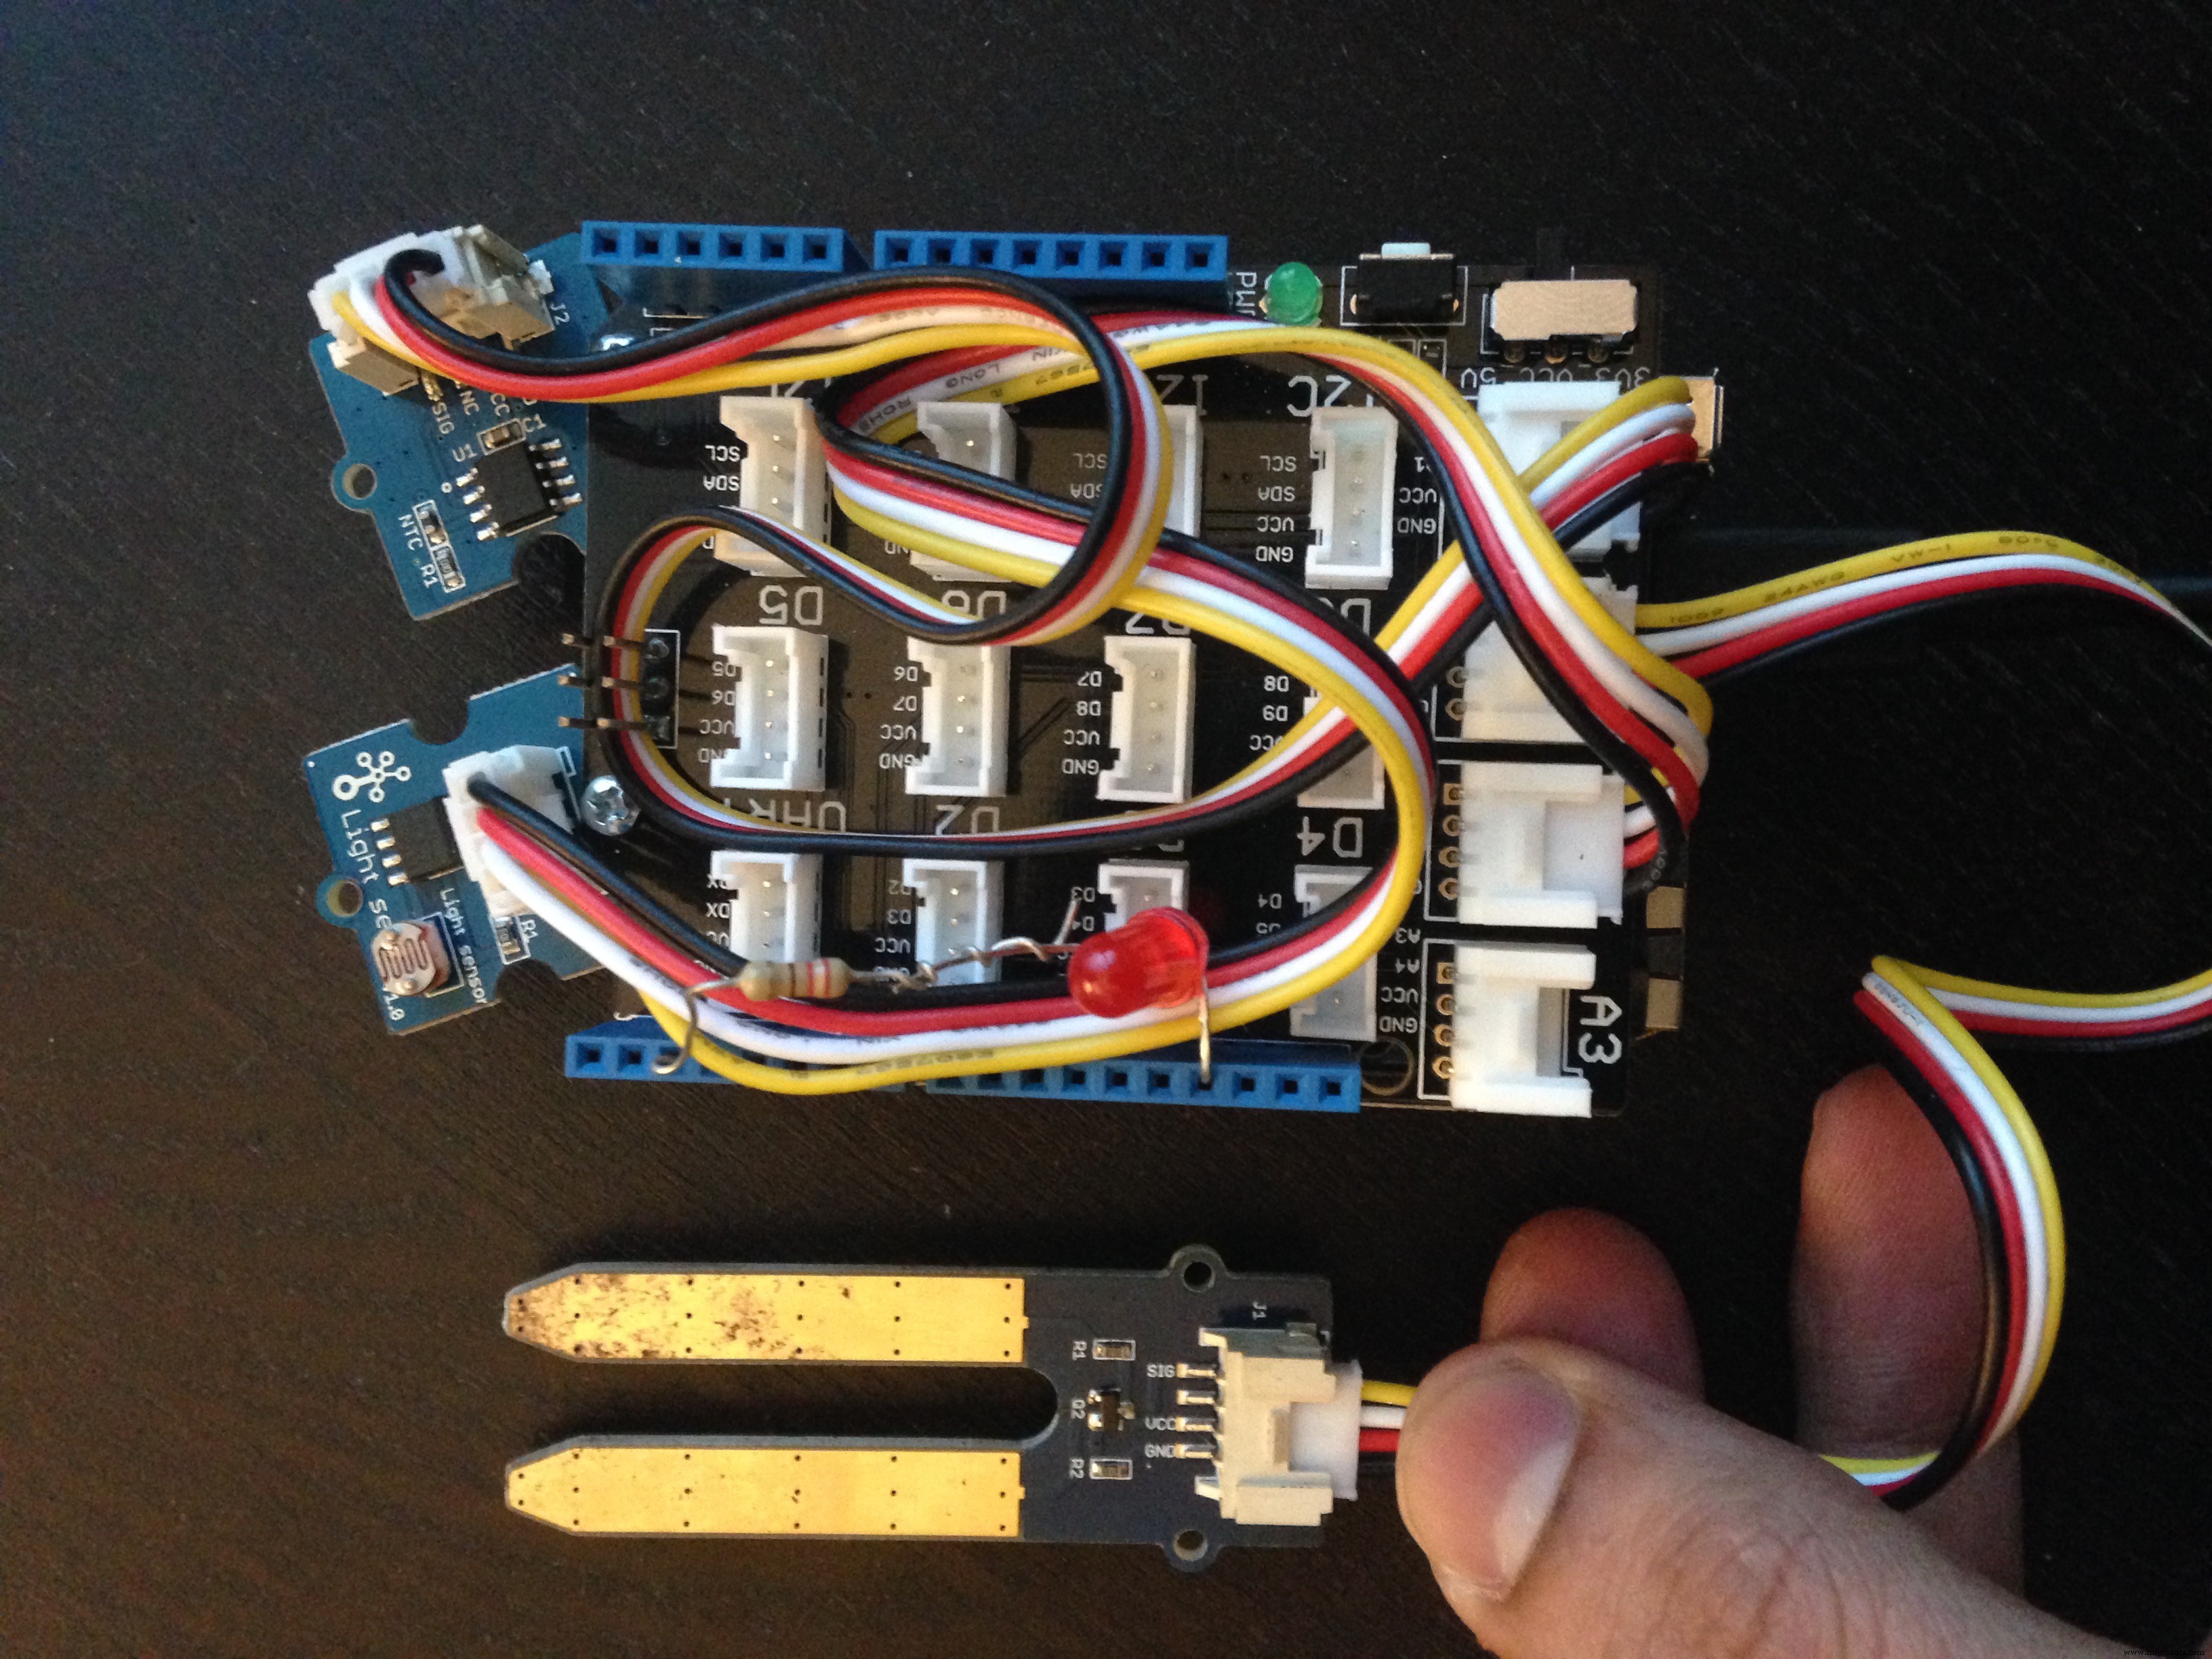
Grove connector shield:
- Temperatuursensor → A0
- Grondvochtsensor → A1
- Lichtsensor → A2
- LED + 220Ω weerstand → pin 2
#2 3D-printen
3 STL-bestanden (Custom parts sectie). Slicer: 0,3 mm laaghogte, ≥25% vulpercentage. Printtijd ~2 uur.

#3 Grondvocht-waarde bepalen
Upload SoilMoistureValue sketch. Bepaal tooDryValue: waarde onder wat plant water nodig heeft. Deze waarde gebruikt je later in AWS SNS-voorwaarde.
Video: methode tooDryValue bepalen.
#4 Data naar dweet.io sturen
Upload ArduinoYunDweetio.ino. Vervang PlantMonitorTorontoON door unieke naam.
Video: test upload naar dweet.io.
#5 AWS CLI instellen (Mac)
Account aanmaken: aws.amazon.com/free (gratis tier, geen kosten voor deze tutorial).
Map AWS aanmaken, AWS CLI installeren:
$ curl "https://s3.amazonaws.com/aws-cli/awscli-bundle.zip" -o "awscli-bundle.zip"
$ unzip awscli-bundle.zip
$ sudo ./awscli-bundle/install -i /usr/local/aws -b /usr/local/bin/aws

#6 "Thing" aanmaken in AWS IoT
aws iot create-thing --thing-name "plantSystem"

Meer info: AWS docs
#7 Certificaten aanmaken
aws iot create-keys-and-certificate --set-as-active \
  --certificate-pem-outfile cert.pem \
  --public-key-outfile publicKey.pem \
  --private-key-outfile privateKey.pem

#8 IoT-policy aanmaken & koppelen
Bestand policy.json:
{ "Version": "2012-10-17", "Statement": [{ "Effect": "Allow", "Action":["iot:*"], "Resource": ["*"] }] }
aws iot create-policy --policy-name "PubSub" --policy-document file://./policy.json

#9 Policy koppelen aan certificaat & certificaat aan thing
$ aws iot attach-principal-policy --principal "arn:aws:iot:xxxxxxxxxxxxxxxxxxxxxxxx" --policy-name "PubSub"
$ aws iot attach-thing-principal --thing-name "PlantSystem" --principal "arn:aws:iot:xxxxxxxxxxxxxxxxxxxxxxxx"
Certificaat ARN vind je in AWS IoT console → certificaat → Details.

Meer info: AWS docs
#10 Testen met MQTT.fx
Download: MQTT.fx. Setup verbindingsprofiel, koppel certificaten, test publish/subscribe via AWS IoT.
Root cert & setup: AWS docs
#11 Arduino Yun voorbereiden voor AWS IoT
Arduino Yun SDK downloaden: GitHub → in Arduino Libraries map.
Eerste keer Yun? Setup: Arduino Yun handleiding (WiFi verbinden).
Test internettoegang: Bestand → Voorbeelden → Bridge → Process.
Certificaten in certs map plaatsen:

codebase_upload.sh en environment_setup.sh aanpassen: [your_boards_IP] en wachtwoord invullen.
$ chmod 755 codebase_upload.sh
$ ./codebase_upload.sh
$ chmod 755 environment_setup.sh
$ ./environment_setup.sh
Duurt 5–10 min. Installeert: distribute, python-openssl, pip, paho-mqtt op Yun.


Linux/Windows installatie: GitHub README
#12 IAM-rol & rechten voor DynamoDB
IoT-regel nodig die op MQTT-bericht reageert → IAM-rol met rechten.
rolePolicy.json:
{"Version": "2012-10-17", "Statement": [{ "Sid": "", "Effect": "Allow", "Principal": { "Service": "iot.amazonaws.com" }, "Action": "sts:AssumeRole" }]}
aws iam create-role --role-name iot-actions-role --assume-role-policy-document file://./rolePolicy.json
policy.json:
{ "Version": "2012-10-17", "Statement": [{ "Effect": "Allow", "Action": [ "dynamodb:*", "lambda:InvokeFunction"], "Resource": ["*"] }] }
aws iam create-policy --policy-name iot-actions-policy --policy-document file://./policy.json
aws iam attach-role-policy --role-name iot-actions-role --policy-arn "arn:aws:xxxxxxxxxxxxx:policy/iot-action-policy"

Meer info: AWS docs
#13 DynamoDB-tabel aanmaken
AWS Console → DynamoDB:
- Tabelnaam:
plantSensor - Partition key:
key - Sort key:
timestamp - Read/Write capacity units: 1

#14 IoT-regel voor data-invoeging
plantdatarule.json (pas roleArn aan via IAM → Roles → iot-actions-role):
{ "sql": "SELECT * FROM 'topic/plantdata'", "ruleDisabled": false, "actions": [{ "dynamoDB": { "tableName": "plantSensor", "hashKeyField": "key", "hashKeyValue": "${topic(2)}", "rangeKeyField": "timestamp", "rangeKeyValue": "${timestamp()}", "roleArn": "arn:aws:iam::XXXXXXXXXXXX:role/iot-actions-role" } }] }
aws iot create-topic-rule --rule-name plantDataToDynamoDB --topic-rule-payload file://./plantdatarule.json

Test met MQTT.fx → controleer DynamoDB records.

#15 Arduino sketch voor AWS IoT uploaden
ArduinoJSON bibliotheek: GitHub.
Upload ArduinoYunAWSIoTDynamoDB.ino en aws_iot_config.h (nieuwe tab in IDE).
Serial Monitor openen → sensorwaarden worden naar DynamoDB gestuurd.

Let op: Voor permanent gebruik: delay in loop verhogen om kosten te beperken. Prijzen: AWS IoT pricing.
#16 SNS-regel voor e-mail bij te lage grondvocht
IAM-rol iot-actions-role rechten geven: AmazonSNSRole, AmazonSNSFullAccess.
SNS Console → Topic sendMail aanmaken → subscription met jouw e-mail.
AWS IoT Console → +Create Resource → Rule EmailSend:
- Attribute:
moistval(moet overeenkomen met JSON-veld in Arduino-code) - Topic filter:
topic/plantdata - Condition:
moistval < 250(jouwtooDryValue) - Action: SNS push notification → target
sendEmail - Role:
iot-actions-role

Voorbeeld e-mail bij droge grond:

Meer over AWS SNS: AWS SNS FAQ
#17 3D-onderdelen monteren & in pot plaatsen
M4×40 schroef + moer: zwarte "soil poker" vast aan basis Yun.

Bovenste deel klikt erop. Opening naar raam richten, vochtsensor in pot prikken. Yun voeden via micro-USB aan stopcontact.

Ik leer nog steeds over AWS – suggesties voor verbeteringen welkom!
Code
SoilMoistureValue (Arduino)
//@CarmelitoA - Huiskamerplant monitoring: grondvochtwaarde bepalen
const int moisturePin = A1;
const int ledPin = 2;
int moisturValue = 0;
int tooDryValue = 250; // Aanpassen na testen

void setup() {
    Serial.begin(9600);
    pinMode(ledPin, OUTPUT);
    digitalWrite(ledPin, LOW);
}

void loop() {
    moisturValue = analogRead(moisturePin);
    Serial.print("Moisture sensor = ");
    Serial.println(moisturValue);
    if (moisturValue < tooDryValue) digitalWrite(ledPin, HIGH);
    else digitalWrite(ledPin, LOW);
    delay(3000);
}
ArduinoYunDweetio (Arduino)
//@CarmelitoA - Data naar dweet.io sturen (CC BY-SA)
#include <Bridge.h>
#include <YunClient.h>
#define SITE_URL "www.dweet.io"
#include <math.h>

const int moisturePin = A1;
const int ledPin = 2;
int moisturValue = 0;
const int tooDryValue = 500; // Aanpassen!
float tooLowTemp = 20; // Aanpassen per plantsoort

const int B = 4275;
const int R0 = 100000;
const int pinTempSensor = A0;
const int lightPin = A2;

unsigned long lastConnectionTime = 0;
const unsigned long postingInterval = 10L * 1000L;

void setup() {
    Bridge.begin();
    Serial.begin(9600);
    pinMode(ledPin, OUTPUT);
    digitalWrite(ledPin, LOW);
    while (!Serial);
}

void loop() {
    YunClient c;
    if (millis() - lastConnectionTime > postingInterval) {
        moisturValue = analogRead(moisturePin);
        Serial.print("sensor = "); Serial.println(moisturValue);

        int a = analogRead(pinTempSensor);
        float R = 1023.0/((float)a) - 1.0;
        R = 100000.0 * R;
        float temperature = 1.0/(log(R/100000.0)/B + 1/298.15) - 273.15;
        Serial.print("temperature = "); Serial.println(temperature);

        int lightValue = analogRead(lightPin);
        Serial.print("light value = "); Serial.println(lightValue);

        if (moisturValue < tooDryValue || temperature < tooLowTemp) digitalWrite(ledPin, HIGH);
        else digitalWrite(ledPin, LOW);

        if (c.connect(SITE_URL, 80)) {
            Serial.println("connected");
            String s = "POST /dweet/for/PlantMonitorTorontoON?Temperature="; // Unieke naam!
            s.concat(temperature);
            s.concat("&LightValue=");
            s.concat(lightValue);
            s.concat("&SoilMoisture=");
            s.concat(moisturValue);
            Serial.println(s);
            c.println(s);
            c.println("Host: www.dweet.io");
            c.println("Connection: close");
            c.println();
            lastConnectionTime = millis();
        } else {
            Serial.println("disconnected from server");
        }
    }
}
ArduinoYunAWSIoTDynamoDB (Arduino)
//@CarmelitoA 01-16-2016 - Data naar AWS DynamoDB
#include <aws_iot_mqtt.h>
#include <aws_iot_version.h>
#include "aws_iot_config.h"
#include <ArduinoJson.h>

char data[80];
StaticJsonBuffer<200> jsonBuffer;
#include <math.h>

const int moisturePin = A1;
const int ledPin = 2;
int moisturValue = 0;
const int tooDryValue = 250;
float tooLowTemp = 20;

const int B = 4275;
const int R0 = 100000;
const int pinTempSensor = A0;
const int lightPin = A2;

unsigned long lastConnectionTime = 0;
const unsigned long postingInterval = 10L * 1000L;

aws_iot_mqtt_client myClient;
char msg[32];
int cnt = 0;
int rc = -100;
bool success_connect = false;

void msg_callback(char* src, int len) {
    Serial.println("CALLBACK:");
    for (int i = 0; i < len; i++) Serial.print(src[i]);
    Serial.println();
}

void setup() {
    Bridge.begin();
    pinMode(ledPin, OUTPUT);
    digitalWrite(ledPin, LOW);
    Serial.begin(115200);
    while (!Serial);

    char curr_version[80];
    sprintf(curr_version, "AWS IoT SDK Version(dev) %d.%d.%d-%s\n", VERSION_MAJOR, VERSION_MINOR, VERSION_PATCH, VERSION_TAG);
    Serial.println(curr_version);

    if ((rc = myClient.setup(AWS_IOT_CLIENT_ID)) == 0) {
        if ((rc = myClient.config(AWS_IOT_MQTT_HOST, AWS_IOT_MQTT_PORT, AWS_IOT_ROOT_CA_PATH, AWS_IOT_PRIVATE_KEY_PATH, AWS_IOT_CERTIFICATE_PATH)) == 0) {
            if ((rc = myClient.connect()) == 0) {
                success_connect = true;
                // Geen subscribe nodig voor monitoring-only
            } else { Serial.println("Connect failed!"); Serial.println(rc); }
        } else { Serial.println("Config failed!"); Serial.println(rc); }
    } else { Serial.println("Setup failed!"); Serial.println(rc); }
    delay(2000);
}

void loop() {
    moisturValue = analogRead(moisturePin);
    Serial.print("sensor = "); Serial.println(moisturValue);

    int a = analogRead(pinTempSensor);
    float R = 1023.0/((float)a) - 1.0;
    R = 100000.0 * R;
    float temperature = 1.0/(log(R/100000.0)/B + 1/298.15) - 273.15;
    Serial.print("temperature = "); Serial.println(temperature);

    int lightValue = analogRead(lightPin);
    Serial.print("light value = "); Serial.println(lightValue);

    if (moisturValue < tooDryValue || temperature < tooLowTemp) digitalWrite(ledPin, HIGH);
    else digitalWrite(ledPin, LOW);

    String temp = "\"temp\": " + String(temperature);
    String light = ", \"lightval\":" + String(lightValue);
    String soilMoist = ", \"moistval\":" + String(moisturValue);
    String value = temp + light + soilMoist;
    Serial.println(value);
    String payload = "{" + value + "}";
    payload.toCharArray(data, (payload.length() + 1));

    if (success_connect) {
        if ((rc = myClient.publish("topic/plantdata", data, strlen(data), 1, false)) != 0) {
            Serial.println("Publish failed!"); Serial.println(rc);
        }
        if ((rc = myClient.yield()) != 0) {
            Serial.println("Yield failed!"); Serial.println(rc);
        }
        sprintf(msg, "publish %d done", cnt++);
        Serial.println(msg);
        delay(10000);
    }
    delay(5000);
}
aws_iot_config.h (Arduino – nieuwe tab)
/* AWS IoT SDK config - aangepast voor plant monitoring */
#ifndef config_usr_h
#define config_usr_h

#define AWS_IOT_MQTT_HOST "XXXXXXXXXXX.iot.us-west-2.amazonaws.com"
#define AWS_IOT_MQTT_PORT 8883
#define AWS_IOT_CLIENT_ID "clientYun2"
#define AWS_IOT_MY_THING_NAME "PlantSystem"
#define AWS_IOT_ROOT_CA_FILENAME "rootCA.pem"
#define AWS_IOT_CERTIFICATE_FILENAME "cert.pem"
#define AWS_IOT_PRIVATE_KEY_FILENAME "privateKey.pem"

#define AWS_IOT_PATH_PREFIX "./certs/"
#define AWS_IOT_ROOT_CA_PATH AWS_IOT_PATH_PREFIX AWS_IOT_ROOT_CA_FILENAME
#define AWS_IOT_CERTIFICATE_PATH AWS_IOT_PATH_PREFIX AWS_IOT_CERTIFICATE_FILENAME
#define AWS_IOT_PRIVATE_KEY_PATH AWS_IOT_PATH_PREFIX AWS_IOT_PRIVATE_KEY_FILENAME
#endif
Schema's
Sensoren aan Grove starter kit:
- Temperatuursensor → A0
- Grondvochtsensor → A1
- Lichtsensor → A2
- LED + 220Ω weerstand → pin 2
Productieproces
- Externe weerbewaking met Raspberry Pi 3 en PubNub
- Bouw een Beweging-gestuurde AWS IoT-knop met Raspberry Pi, PIR-sensor en MQTT
- Contactloze hartslagmonitoring via slimme speakers: Een revolutionair systeem
- Verhoog uw operaties: IoT-tankmonitoring voor veiliger, slimmer en winstgevender petroleumbeheer
- Geavanceerd AI-aangedreven IoT-systeem voor vroege bosbranddetectie & boomgezondheidsmonitoring
- IoT-ingeschakeld Remote Monitoring Systeem voor Olie- & Dieseltanks
- Ontdek 8 Belangrijkste Voordelen van IoT-aangedreven Vloot Gewichtsmonitoring
- Hoe IoT-Enabled Asset Monitoring Veiligheid en Efficiëntie in Olie & Gas Drijft
- Revolutioneer Zuivelbeheer met IoT-geïntegreerde Melkpeilmonitoring
- Slim IoT Riviermonitoring-systeem Verbeter Waterbeheer & Overstromingspreventie
- C# using-statements: imports, aliasen en static directives