


Arduino Game Project – Replica van Flappy Bird voor Arduino
In dit Arduino-project gaan we een cool Arduino-spel maken, eigenlijk een replica van het populaire Flappy Bird-spel voor smartphones, met behulp van een Arduino en een TFT-touchscreen. Je kunt leren hoe het werkt door de volgende video te bekijken of de geschreven tekst hieronder te lezen.
Overzicht
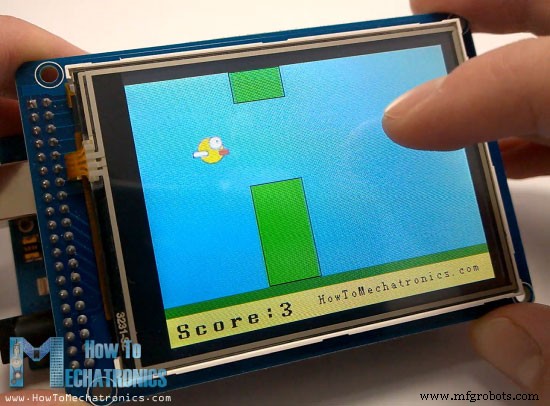
De game is vrij eenvoudig, maar interessant en verslavend. Met behulp van het aanraakscherm besturen we de vogel en proberen we de bewegende pilaren te vermijden die in snelheid toenemen naarmate we verder komen. De game kan ook je hoogste score opslaan, zelfs als je de stekker uit het stopcontact haalt.[/column]
In de vorige tutorial (Arduino TFT Tutorial) hebben we in detail geleerd hoe je TFT Touch Screens kunt gebruiken met een Arduino en we lieten het spelvoorbeeld over om in deze tutorial te worden uitgelegd. Dus nu, net als in de vorige tutorial, zullen we stap voor stap de code achter dit Arduino-spel uitleggen.
Broncode
Omdat de code wat langer is en voor een beter begrip, zal ik de broncode van het programma in secties plaatsen met een beschrijving voor elke sectie. En aan het einde van dit artikel zal ik de volledige broncode posten.
We zullen de UTFT- en URTouch-bibliotheken van Henning Karlsen gebruiken. U kunt deze bibliotheken downloaden van zijn website, www.RinkyDinkElectronics.com. We zullen ook de EEPROM-bibliotheek gebruiken om de hoogste score in de EEPROM op te slaan. De EEPROM is een geheugen dat gegevens kan opslaan, zelfs als het bord is uitgeschakeld.
Nadat we de bibliotheken hebben toegevoegd, moeten we de UTFT- en URTouch-objecten maken en de variabelen definiëren die nodig zijn voor het spel. In de setup-sectie moeten we de weergave en de aanraking starten, de hoogste score van de EEPROM lezen en het spel starten met de aangepaste functie initialGame() .
#include <UTFT.h>
#include <URTouch.h>
#include <EEPROM.h>
//==== Creating Objects
UTFT myGLCD(SSD1289,38,39,40,41); //Parameters should be adjusted to your Display/Schield model
URTouch myTouch( 6, 5, 4, 3, 2);
//==== Defining Fonts
extern uint8_t SmallFont[];
extern uint8_t BigFont[];
extern uint8_t SevenSegNumFont[];
extern unsigned int bird01[0x41A]; // Bird Bitmap
int x, y; // Variables for the coordinates where the display has been pressed
// Floppy Bird
int xP = 319;
int yP = 100;
int yB = 50;
int movingRate = 3;
int fallRateInt = 0;
float fallRate = 0;
int score = 0;
int lastSpeedUpScore = 0;
int highestScore;
boolean screenPressed = false;
boolean gameStarted = false;
void setup() {
// Initiate display
myGLCD.InitLCD();
myGLCD.clrScr();
myTouch.InitTouch();
myTouch.setPrecision(PREC_MEDIUM);
highestScore = EEPROM.read(0); // Read the highest score from the EEPROM
initiateGame(); // Initiate the game
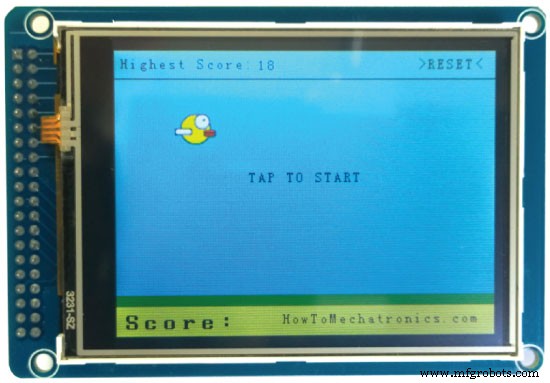
}Code language: Arduino (arduino)Dus met de initialGame()-aangepaste functie zullen we de beginstatus van het spel tekenen en hier is hoe we dat zullen doen. Eerst moeten we het scherm leegmaken, dan de blauwe achtergrond tekenen, het onderste gedeelte tekenen, de tekst toevoegen en de aangepaste functie drawBird() aanroepen om de vogel te tekenen. Hierna hebben we een while-lus nodig die voorkomt dat het spel start totdat we op het scherm tikken. Dus terwijl we in deze staat zijn, als we op de rechterbovenhoek drukken, kunnen we de hoogste score resetten naar nul en als we ergens anders op het scherm drukken, komen we uit de while-lus en komen we in de hoofdlus van de code die zal het spel starten.
// ===== initiateGame - Custom Function
void initiateGame() {
myGLCD.clrScr();
// Blue background
myGLCD.setColor(114, 198, 206);
myGLCD.fillRect(0,0,319,239);
// Ground
myGLCD.setColor(221,216,148);
myGLCD.fillRect(0, 215, 319, 239);
myGLCD.setColor(47,175,68);
myGLCD.fillRect(0, 205, 319, 214);
// Text
myGLCD.setColor(0, 0, 0);
myGLCD.setBackColor(221, 216, 148);
myGLCD.setFont(BigFont);
myGLCD.print("Score:",5,220);
myGLCD.setFont(SmallFont);
myGLCD.print("HowToMechatronics.com", 140, 220);
myGLCD.setColor(0, 0, 0);
myGLCD.setBackColor(114, 198, 206);
myGLCD.print("Highest Score: ",5,5);
myGLCD.printNumI(highestScore, 120, 6);
myGLCD.print(">RESET<",255,5);
myGLCD.drawLine(0,23,319,23);
myGLCD.print("TAP TO START",CENTER,100);
drawBird(yB); // Draws the bird
// Wait until we tap the sreen
while (!gameStarted) {
if (myTouch.dataAvailable()) {
myTouch.read();
x=myTouch.getX();
y=myTouch.getY();
// Reset higest score
if ((x>=250) && (x<=319) &&(y>=0) && (y<=28)) {
highestScore = 0;
myGLCD.setColor(114, 198, 206);
myGLCD.fillRect(120, 0, 150, 22);
myGLCD.setColor(0, 0, 0);
myGLCD.printNumI(highestScore, 120, 5);
}
if ((x>=0) && (x<=319) &&(y>=30) && (y<=239)) {
gameStarted = true;
myGLCD.setColor(114, 198, 206);
myGLCD.fillRect(0, 0, 319, 32);
}
}
}
// Clears the text "TAP TO START" before the game start
myGLCD.setColor(114, 198, 206);
myGLCD.fillRect(85, 100, 235, 116);
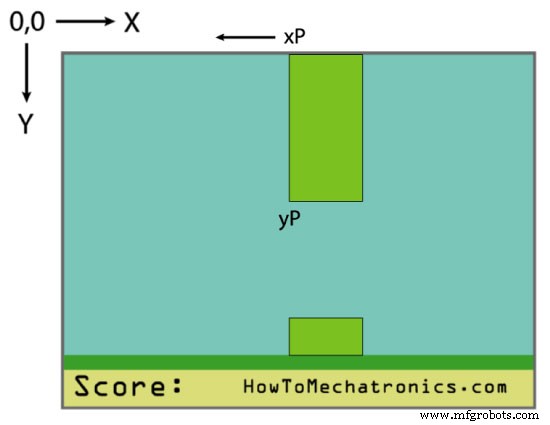
}Code language: Arduino (arduino)In de hoofdlussectie hebben we de xP-variabele die wordt gebruikt voor het tekenen van de pilaren, evenals de yP-variabele. In het begin heeft de xP-variabele de waarde 319 als de grootte van het scherm en de yP-variabele heeft de waarde 100, wat de hoogte van de eerste pilaar is. Elke iteratie wordt de waarde van de xP-variabele verlaagd met de waarde van de movingRate-variabele die in het begin de waarde 3 heeft en naarmate we verder komen in het spel, wordt deze groter.
// The Main Loop Section
void loop() {
    xP=xP-movingRate; // xP - x coordinate of the pilars; range: 319 - (-51)
    drawPilars(xP, yP); // Draws the pillars

    // yB - y coordinate of the bird which depends on value of the fallingRate variable
    yB+=fallRateInt;
    fallRate=fallRate+0.4; // Each inetration the fall rate increase so that we can the effect of acceleration/ gravity
    fallRateInt= int(fallRate);

    // Checks for collision
    if(yB>=180 || yB<=0){ // top and bottom
      gameOver();
    }
    if((xP<=85) && (xP>=5) && (yB<=yP-2)){ // upper pillar
      gameOver();
    }
    if((xP<=85) && (xP>=5) && (yB>=yP+60)){ // lower pillar
      gameOver();
    }

    // Draws the bird
    drawBird(yB);

    // After the pillar has passed through the screen
    if (xP<=-51){
      xP=319; // Resets xP to 319
      yP = rand() % 100+20; // Random number for the pillars height
      score++; // Increase score by one
    }
    //==== Controlling the bird
    if (myTouch.dataAvailable()&& !screenPressed) {
       fallRate=-6; // Setting the fallRate negative will make the bird jump
       screenPressed = true;
    }
    // Doesn't allow holding the screen / you must tap it
    else if ( !myTouch.dataAvailable() && screenPressed){
      screenPressed = false;
    }

    // After each five points, increases the moving rate of the pillars
    if ((score - lastSpeedUpScore) == 5) {
      lastSpeedUpScore = score;
      movingRate++;
    }
}Code language: Arduino (arduino)
Dit is het werkingsprincipe van het spel:we hebben pilaren van 50 pixels breed die van rechts naar links bewegen en elke volgende pilaar heeft een andere willekeurige hoogte. Om ze logischerwijs te laten bewegen, moeten we na elke iteratie het scherm leegmaken en de afbeelding opnieuw tekenen met de pilaren op hun nieuwe positie. Dat kunnen we echter niet doen vanwege de lage verversingssnelheid van het scherm, waardoor de graphics gaan flikkeren. Om al zijn pixels te activeren, heeft het scherm wat meer tijd nodig, dus we zullen moeten improviseren en alleen de bewegende dingen opnieuw moeten tekenen.
Laten we dus eens kijken hoe de aangepaste functie drawPilars() dat zal doen. Het neemt de xP- en yP-variabelen en gebruikt ze en de functie fillRect() om de pijlers te tekenen. Dus elke iteratie tekent het de pilaren op hun nieuwe locatie met extra blauwe rechthoeken aan hun linker- en rechterkant die de vorige getekende pilaar vrijmaken en op die manier doen we eigenlijk de improvisatie door alleen de bewegende pilaren opnieuw te tekenen. De if-statements hier zijn een extra improvisatie omdat om de een of andere reden de functie fillRect() niet werkte als de parameter 'x2' een waarde had buiten de schermgrootte. Aan het einde van deze aangepaste functie moeten we ook de waarde van de bereikte score afdrukken.
// ===== drawPlillars - Custom Function
void drawPilars(int x, int y) {
if (x>=270){
myGLCD.setColor(0, 200, 20);
myGLCD.fillRect(318, 0, x, y-1);
myGLCD.setColor(0, 0, 0);
myGLCD.drawRect(319, 0, x-1, y);
myGLCD.setColor(0, 200, 20);
myGLCD.fillRect(318, y+81, x, 203);
myGLCD.setColor(0, 0, 0);
myGLCD.drawRect(319, y+80, x-1, 204);
}
else if( x<=268) {
// Draws blue rectangle right of the pillar
myGLCD.setColor(114, 198, 206);
myGLCD.fillRect(x+51, 0, x+60, y);
// Draws the pillar
myGLCD.setColor(0, 200, 20);
myGLCD.fillRect(x+49, 1, x+1, y-1);
// Draws the black frame of the pillar
myGLCD.setColor(0, 0, 0);
myGLCD.drawRect(x+50, 0, x, y);
// Draws the blue rectangle left of the pillar
myGLCD.setColor(114, 198, 206);
myGLCD.fillRect(x-1, 0, x-3, y);
// The bottom pillar
myGLCD.setColor(114, 198, 206);
myGLCD.fillRect(x+51, y+80, x+60, 204);
myGLCD.setColor(0, 200, 20);
myGLCD.fillRect(x+49, y+81, x+1, 203);
myGLCD.setColor(0, 0, 0);
myGLCD.drawRect(x+50, y+80, x, 204);
myGLCD.setColor(114, 198, 206);
myGLCD.fillRect(x-1, y+80, x-3, 204);
}
// Draws the score
myGLCD.setColor(0, 0, 0);
myGLCD.setBackColor(221, 216, 148);
myGLCD.setFont(BigFont);
myGLCD.printNumI(score, 100, 220);
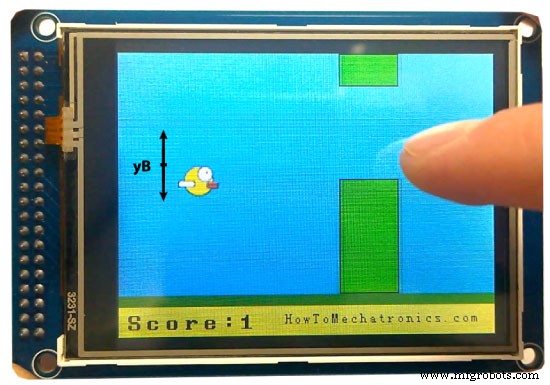
}Code language: Arduino (arduino)Terug in de lussectie hebben we de yB-variabele die de y-positie van de vogel is en het hangt af van de valsnelheid die na elke iteratie wordt verhoogd en op die manier krijgen we het effect van versnelling of zwaartekracht. Ook controleren we hier op botsingen en gebruiken we de if-statements om de vogel te beperken, zodat het spel voorbij is als het de top, de grond of de pilaren raakt.
De volgende is de aangepaste functie drawBird() en laten we eens kijken hoe het werkt. De vogel is eigenlijk een foto die is omgezet in een bitmap met behulp van de tool ImageConverter565 van Henning Karlsen. Het ".c"-bestand dat met de tool is gemaakt, moet in de map worden opgenomen, zodat het wordt geladen bij het starten van de schets. Ook moeten we de bitmap op deze manier definiëren en met de functie drawBitmap() zullen we de foto op het scherm tekenen. De vogel heeft een vaste X-coördinaat en de variabele yB als Y-coördinaat. Net als bij de pilaren zullen we de vorige staat van de vogel wissen door twee blauwe rechthoeken boven en onder de vogel te tekenen.
//====== drawBird() - Custom Function
void drawBird(int y) {
  // Draws the bird - bitmap
  myGLCD.drawBitmap (50, y, 35, 30, bird01);
  // Draws blue rectangles above and below the bird in order to clear its previus state
  myGLCD.setColor(114, 198, 206);
  myGLCD.fillRoundRect(50,y,85,y-6);
  myGLCD.fillRoundRect(50,y+30,85,y+36);
}Code language: Arduino (arduino)
Terug in de lus kunnen we zien dat nadat de pilaar door het scherm is gegaan, de xP-variabele wordt gereset naar 319, yP een nieuwe willekeurige waarde krijgt van 20 tot 100 voor de hoogte van de pilaren en de score met één zal toenemen. Met het volgende if-statement controleren we de vogel. Als we op het scherm tikken, stellen we de valsnelheid in op negatief, waardoor de vogel springt en de else if-verklaring zal niet gebeuren dat als we het scherm gewoon vasthouden. De laatste if-instructie is voor de moeilijkheidsgraad van het spel en het verhoogt de bewegingssnelheid van de pilaren na elke fijne punten.
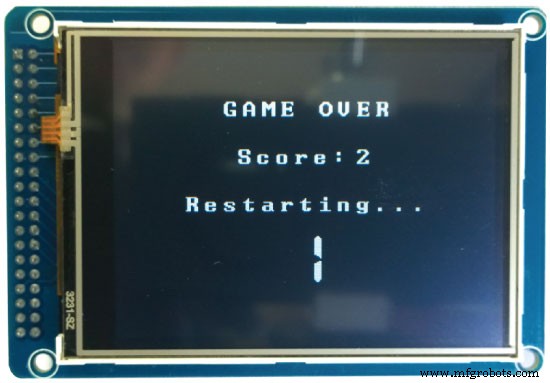
Oké, wat er nu nog over is, is om te zien hoe de aangepaste functie gameOver() werkt. Na een vertraging van een seconde wordt het scherm gewist, de score en wat tekst afgedrukt, als de score hoger is dan de hoogste score, wordt deze in de EEPROM geschreven, alle variabelen worden teruggezet naar hun startpositiewaarden en aan het einde het zal de aangepaste functie initialGame() aanroepen om het spel opnieuw te starten.
//======== gameOver() - Custom Function
void gameOver() {
  delay(1000); // 1 second
  // Clears the screen and prints the text
  myGLCD.clrScr();
  myGLCD.setColor(255, 255, 255);
  myGLCD.setBackColor(0, 0, 0);
  myGLCD.setFont(BigFont);
  myGLCD.print("GAME OVER", CENTER, 40);
  myGLCD.print("Score:", 100, 80);
  myGLCD.printNumI(score,200, 80);
  myGLCD.print("Restarting...", CENTER, 120);
  myGLCD.setFont(SevenSegNumFont);
  myGLCD.printNumI(2,CENTER, 150);
  delay(1000);
  myGLCD.printNumI(1,CENTER, 150);
  delay(1000);

  // Writes the highest score in the EEPROM
  if (score > highestScore) {
    highestScore = score;
    EEPROM.write(0,highestScore);
  }
  // Resets the variables to start position values
  xP=319;
  yB=50;
  fallRate=0;
  score = 0;
  lastSpeedUpScore = 0;
  movingRate = 3;
  gameStarted = false;
  // Restart game
  initiateGame();
}Code language: Arduino (arduino)
Dat is alles en ik hoop dat de uitleg van de code duidelijk genoeg was. Als je vragen hebt, stel ze dan gerust in de opmerkingen hieronder.
Hier is de volledige code van het spel:
/*  Arduino Game Proejct
 *  Program made by Dejan Nedelkovski,
 *  www.HowToMechatronics.com
 */

/*  This program uses the UTFT and URTouch libraries
 *  made by Henning Karlsen.
 *  You can find and download them at:
 *  www.RinkyDinkElectronics.com
 */

#include <UTFT.h>
#include <URTouch.h>
#include <EEPROM.h>

//==== Creating Objects
UTFT    myGLCD(SSD1289,38,39,40,41); //Parameters should be adjusted to your Display/Schield model
URTouch  myTouch( 6, 5, 4, 3, 2);

//==== Defining Fonts
extern uint8_t SmallFont[];
extern uint8_t BigFont[];
extern uint8_t SevenSegNumFont[];

extern unsigned int bird01[0x41A]; // Bird Bitmap

int x, y; // Variables for the coordinates where the display has been pressed

// Floppy Bird
int xP = 319;
int yP = 100;
int yB = 50;
int movingRate = 3;
int fallRateInt = 0;
float fallRate = 0;
int score = 0;
int lastSpeedUpScore = 0;
int highestScore;
boolean screenPressed = false;
boolean gameStarted = false;

void setup() {
  // Initiate display
  myGLCD.InitLCD();
  myGLCD.clrScr();
  myTouch.InitTouch();
  myTouch.setPrecision(PREC_MEDIUM);

  highestScore = EEPROM.read(0); // Read the highest score from the EEPROM

  initiateGame(); // Initiate the game
}

void loop() {
    xP=xP-movingRate; // xP - x coordinate of the pilars; range: 319 - (-51)
    drawPilars(xP, yP); // Draws the pillars

    // yB - y coordinate of the bird which depends on value of the fallingRate variable
    yB+=fallRateInt;
    fallRate=fallRate+0.4; // Each inetration the fall rate increase so that we can the effect of acceleration/ gravity
    fallRateInt= int(fallRate);

    // Checks for collision
    if(yB>=180 || yB<=0){ // top and bottom
      gameOver();
    }
    if((xP<=85) && (xP>=5) && (yB<=yP-2)){ // upper pillar
      gameOver();
    }
    if((xP<=85) && (xP>=5) && (yB>=yP+60)){ // lower pillar
      gameOver();
    }

    // Draws the bird
    drawBird(yB);

    // After the pillar has passed through the screen
    if (xP<=-51){
      xP=319; // Resets xP to 319
      yP = rand() % 100+20; // Random number for the pillars height
      score++; // Increase score by one
    }
    //==== Controlling the bird
    if (myTouch.dataAvailable()&& !screenPressed) {
       fallRate=-6; // Setting the fallRate negative will make the bird jump
       screenPressed = true;
    }
    // Doesn't allow holding the screen / you must tap it
    else if ( !myTouch.dataAvailable() && screenPressed){
      screenPressed = false;
    }

    // After each five points, increases the moving rate of the pillars
    if ((score - lastSpeedUpScore) == 5) {
      lastSpeedUpScore = score;
      movingRate++;
    }
}
// ===== initiateGame - Custom Function
void initiateGame() {
  myGLCD.clrScr();
  // Blue background
  myGLCD.setColor(114, 198, 206);
  myGLCD.fillRect(0,0,319,239);
  // Ground
  myGLCD.setColor(221,216,148);
  myGLCD.fillRect(0, 215, 319, 239);
  myGLCD.setColor(47,175,68);
  myGLCD.fillRect(0, 205, 319, 214);
  // Text
  myGLCD.setColor(0, 0, 0);
  myGLCD.setBackColor(221, 216, 148);
  myGLCD.setFont(BigFont);
  myGLCD.print("Score:",5,220);
  myGLCD.setFont(SmallFont);
  myGLCD.print("HowToMechatronics.com", 140, 220);
  myGLCD.setColor(0, 0, 0);
  myGLCD.setBackColor(114, 198, 206);
  myGLCD.print("Highest Score: ",5,5);
  myGLCD.printNumI(highestScore, 120, 6);
  myGLCD.print(">RESET<",255,5);
  myGLCD.drawLine(0,23,319,23);
  myGLCD.print("TAP TO START",CENTER,100);

  drawBird(yB); // Draws the bird

  // Wait until we tap the sreen
  while (!gameStarted) {
    if (myTouch.dataAvailable()) {
    myTouch.read();
    x=myTouch.getX();
    y=myTouch.getY();
    // Reset higest score
    if ((x>=250) && (x<=319) &&(y>=0) && (y<=28)) {
    highestScore = 0;
    myGLCD.setColor(114, 198, 206);
    myGLCD.fillRect(120, 0, 150, 22);
    myGLCD.setColor(0, 0, 0);
    myGLCD.printNumI(highestScore, 120, 5);
    }
    if ((x>=0) && (x<=319) &&(y>=30) && (y<=239)) {
    gameStarted = true;
    myGLCD.setColor(114, 198, 206);
    myGLCD.fillRect(0, 0, 319, 32);
    }
  }
  }
  // Clears the text "TAP TO START" before the game start
  myGLCD.setColor(114, 198, 206);
  myGLCD.fillRect(85, 100, 235, 116);

}
// ===== drawPlillars - Custom Function
void drawPilars(int x, int y) {
    if (x>=270){
      myGLCD.setColor(0, 200, 20);
      myGLCD.fillRect(318, 0, x, y-1);
      myGLCD.setColor(0, 0, 0);
      myGLCD.drawRect(319, 0, x-1, y);

      myGLCD.setColor(0, 200, 20);
      myGLCD.fillRect(318, y+81, x, 203);
      myGLCD.setColor(0, 0, 0);
      myGLCD.drawRect(319, y+80, x-1, 204);
    }
    else if( x<=268) {
      // Draws blue rectangle right of the pillar
      myGLCD.setColor(114, 198, 206);
      myGLCD.fillRect(x+51, 0, x+60, y);
      // Draws the pillar
      myGLCD.setColor(0, 200, 20);
      myGLCD.fillRect(x+49, 1, x+1, y-1);
      // Draws the black frame of the pillar
      myGLCD.setColor(0, 0, 0);
      myGLCD.drawRect(x+50, 0, x, y);
      // Draws the blue rectangle left of the pillar
      myGLCD.setColor(114, 198, 206);
      myGLCD.fillRect(x-1, 0, x-3, y);

      // The bottom pillar
      myGLCD.setColor(114, 198, 206);
      myGLCD.fillRect(x+51, y+80, x+60, 204);
      myGLCD.setColor(0, 200, 20);
      myGLCD.fillRect(x+49, y+81, x+1, 203);
      myGLCD.setColor(0, 0, 0);
      myGLCD.drawRect(x+50, y+80, x, 204);
      myGLCD.setColor(114, 198, 206);
      myGLCD.fillRect(x-1, y+80, x-3, 204);
  }
  // Draws the score
  myGLCD.setColor(0, 0, 0);
  myGLCD.setBackColor(221, 216, 148);
  myGLCD.setFont(BigFont);
  myGLCD.printNumI(score, 100, 220);
}

//====== drawBird() - Custom Function
void drawBird(int y) {
  // Draws the bird - bitmap
  myGLCD.drawBitmap (50, y, 35, 30, bird01);
  // Draws blue rectangles above and below the bird in order to clear its previus state
  myGLCD.setColor(114, 198, 206);
  myGLCD.fillRoundRect(50,y,85,y-6);
  myGLCD.fillRoundRect(50,y+30,85,y+36);
}
//======== gameOver() - Custom Function
void gameOver() {
  delay(3000); // 1 second
  // Clears the screen and prints the text
  myGLCD.clrScr();
  myGLCD.setColor(255, 255, 255);
  myGLCD.setBackColor(0, 0, 0);
  myGLCD.setFont(BigFont);
  myGLCD.print("GAME OVER", CENTER, 40);
  myGLCD.print("Score:", 100, 80);
  myGLCD.printNumI(score,200, 80);
  myGLCD.print("Restarting...", CENTER, 120);
  myGLCD.setFont(SevenSegNumFont);
  myGLCD.printNumI(2,CENTER, 150);
  delay(1000);
  myGLCD.printNumI(1,CENTER, 150);
  delay(1000);

  // Writes the highest score in the EEPROM
  if (score > highestScore) {
    highestScore = score;
    EEPROM.write(0,highestScore);
  }
  // Resets the variables to start position values
  xP=319;
  yB=50;
  fallRate=0;
  score = 0;
  lastSpeedUpScore = 0;
  movingRate = 3;
  gameStarted = false;
  // Restart game
  initiateGame();
}Code language: Arduino (arduino)
Hier is een downloadbestand met de Arduino-sketck, de afbeelding van de vogel en het bitmapbestand voor de vogel.
Productieproces