



Zerynth Lamp: Slimme IoT-omgevingslichtbesturing met NeoPixel LED's
Onderdelen en benodigdheden
| Zerynth Shield | 1 |
| Arduino Due | 1 |
| STM32 Nucleo ST NUCLEO | 1 |
| Particle Photon | 1 |
| UDOO DUAL | 1 |
| Adafruit NeoPixel | 1 |
Apps en online diensten
- Zerynth Studio
- Zerynth App
Over dit project
Laag-energie draadloze standaarden gecombineerd met goedkope, ultra-miniatuur LED's, sensoren en communicatieapparaten hebben slimme verlichting gemaakt tot een katalysator voor het Internet of Things en huisautomatisering.
In deze tutorial laten we zien hoe je een NeoPixel LED-strip via mobiel kunt besturen met de Zerynth App, die een kleurenkiezer en een menu toont voor het selecteren van vooraf geconfigureerde animaties.
Stap 1: Benodigd materiaal


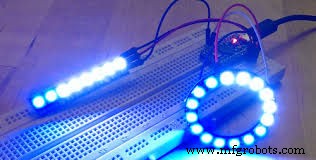
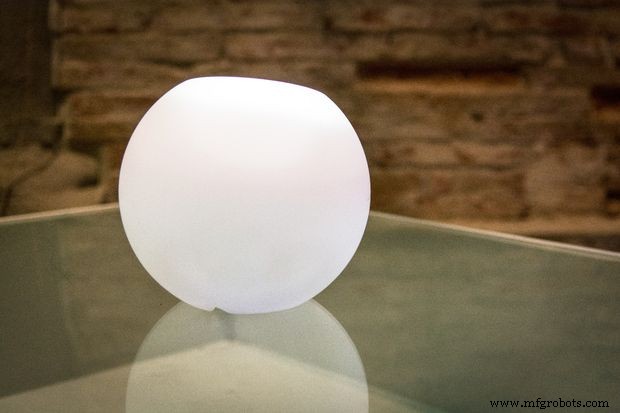
Het project vereist de volgende elementen:
- Zerynth Studio: een multi-platform, browser-gebaseerde Python-ontwikkelomgeving met cloud-synchronisatie en bordbeheer. Ongeacht welk OS je gebruikt, Zerynth draait! Download en installeer Zerynth (https://www.zerynth.com/zerynth-studio/).
- Zerynth App: de mobiele interface van Zerynth voor slimme objecten en IoT-systemen. Elke mobiele telefoon wordt het display en de afstandsbediening van het object. Download: https://www.zerynth.com/zerynth-app/
- Zerynth Shield (beschikbaar hier). Een kant-en-klaar multi-sensorbord dat slimme functies toevoegt aan je alledaagse objecten.
- Arduino DUE of ST Nucleo F401RE of Particle Photon of UDOO of Flip&Clip van Mikroelektronika. Ongeacht welk bord je gebruikt, Zerynth is multi-bord compatibel! Alle ondersteunde borden vind je hier.
- Als je geen Particle Photon gebruikt (die een WiFi-module aan boord heeft), heb je een element nodig dat het bord met het web verbindt, zoals de WiFi Shield van Adafruit. Je kunt echter elke andere adapter gebruiken die de WiFi-chip CC3000 van Texas Instruments monteert (https://www.ti.com/product/cc3000).
- Een strip (of ring) van NeoPixel LED's van Adafruit (beschikbaar hier).
- Een glas of 3D-geprinte lamp. De keuze is aan jou.
Stap 2: Montage

- Plaats de WiFi Shield en de Zerynth Shield op je Arduino (of ST Nucleo of UDOO). Als je Particle Photon gebruikt, plaats die dan op de speciale connectors op de Zerynth Shield.
- Sluit de NeoPixel LED's aan op de bijbehorende poort op de Zerynth Shield.
- Plaats alle borden en de LED's in de lamp.
Stap 3: Programmeren

Zerynth gebruiken is heel eenvoudig!
- Verbind en "virtualiseer" je bord (al uitgelegd hier).
- Maak een nieuw project in Zerynth (al uitgelegd hier). Let op: je moet 3 (+1) bestanden aanmaken: main.py, animation.py, template.html (en project.md).
- Kopieer de geposte code.
- Upload de code naar je bord en je bent klaar!
Na het aanzetten van de lamp, verbindt deze automatisch met het vooraf ingestelde netwerk.
Open dan de Zerynth App, die zoekt naar Zerynth-objecten die met het netwerk verbonden zijn, selecteer het object van je interesse, in dit geval de "Zerynth Lamp", en je kunt ermee interacteren! In dit geval toont de Zerynth App een kleurenkiezer en een menu voor het selecteren van diverse vooraf geconfigureerde animaties.
De code is heel simpel en bevat veel commentaar. Voor vragen of suggesties, voel je vrij om te posten op de Zerynth-communityforums: https://community.zerynth.com/
Stap 4: Maak IoT helderder!

Vond je het leuk? Laten we hardcore gaan!
De Zerynth Shield biedt een set sensoren en actuatoren, waaronder sensoren voor aanraakdetectie, infrarood LED, microfoon, lichtsensor en temperatuursensor. Je kunt vanaf deze eenvoudige voorbeeldcode het gedrag ontwikkelen dat je wilt. Gebruik de Zerynth Shield om de functionaliteiten van de lamp uit te breiden!
Luigi F. Cerfeda (@L_F_Cerfeda) - Zerynth team
Code
main.py (Python)
################################################################################
# Zerynth Lamp
# Created by Zerynth Team 2015 CC
# Authors: G. Baldi, D. Mazzei
################################################################################
# import needed modules
import streams
from bcm43362 import bcm43362 as wifi_driver
from wireless import wifi
import animation
from toishield import toishield
# and import the zerynthapp module
from zerynthapp import zerynthapp

streams.serial()

# connect to a wifi network
try:
    wifi_driver.auto_init()
    print("Establishing Link...")
    wifi.link("SSID", wifi.WIFI_WPA2, "password")
    print("Ok!")
except Exception as e:
    print(e)

# save the template.html in the board flash with new_resource
new_resource("template.html")

#### ZerynthApp Setup
# :: Javascript to Python ::
# the following functions will be called when buttons are pressed
def change_color(r, g, b):
    animation.setup_color(r, g, b)

def change_animation(n):
    animation.setup_anim(n)

def change_speed(n):
    animation.setup_anim_speed(n)

# configure the Zerynth app with a name, a description and the template url
vp = zerynthapp.ZerynthApp("Zerynth Lamp", "Try me!", "resource://template.html")

# everytime Javascript generates events the corresponding functions are called
vp.on("change_color", change_color)
vp.on("change_animation", change_animation)
vp.on("change_speed", change_speed)

# run the ZerynthApp!
vp.run()

# since vp.run starts a new thread, you can do whatever else you want down here!
# let's control leds
animation.start(D6, 24)
template.html (HTML)
<html>
<head>
<zerynth/>
<zerynth-jquery/>
<zerynth-jquery-mobile/>
<zerynth-jqwidgets/>
<meta name="viewport" content="width=device-width, initial-scale=1">
</head>
<body>
<div data-role="page">
<div data-role="header"><h1>Zerynth Lamp</h1></div>
<div role="main" class="ui-content" style="text-align:center">
<div style="margin: 3px; float: left;" id="dropDownButton">
<div style="padding: 3px;">
<div id="colorPicker"></div>
</div>
</div>
<button class="ui-btn ui-btn-inline ui-shadow" onclick="ZerynthApp.call('change_color',cur_color.r,cur_color.g,cur_color.b)">Colorize!</button>
<form>
<div data-role="fieldcontain">
<label for="animselect">Animation:</label>
<select name="animselect" id="animselect">
<option value="0">Little Snakes</option>
<option value="1">Spinner</option>
<option value="2">Rainbow</option>
<option value="3">Pulse</option>
</select>
</div>
</form>
<form>
<label for="speedslider">Animation Speed:</label>
<input type="range" name="speedslider" id="speedslider" data-highlight="true" min="0" max="100" value="50">
</form>
</div>
<div data-role="footer">Powered by Zerynth (www.zerynth.com)</div>
</div>
<script>
var cur_color = {r: 0x54, g: 0x9a, b:0x97};
function getTextElementByColor(color) {
  if (color == 'transparent' || color.hex == "") {
    return $("<div style='text-shadow: none; position: relative; padding-bottom: 2px; margin-top: 2px;'>transparent</div>");
  }
  var element = $("<div style='text-shadow: none; position: relative; padding-bottom: 2px; margin-top: 2px;'>#" + color.hex + "</div>");
  var nThreshold = 105;
  var bgDelta = (color.r * 0.299) + (color.g * 0.587) + (color.b * 0.114);
  cur_color.r = color.r;
  cur_color.g = color.g;
  cur_color.b = color.b;
  var foreColor = (255 - bgDelta < nThreshold) ? 'Black' : 'White';
  element.css('color', foreColor);
  element.css('background', "#" + color.hex);
  element.addClass('jqx-rc-all');
  return element;
}
$(document).ready(function () {
  console.log("ready!")
  $("#colorPicker").on('colorchange', function (event) {
    $("#dropDownButton").jqxDropDownButton('setContent', getTextElementByColor(event.args.color));
  });
  $("#colorPicker").jqxColorPicker({ color: "5a9a97", colorMode: 'saturation', width: 220, height: 220});
  $("#dropDownButton").jqxDropDownButton({ width: 150, height: 22});
  $("#dropDownButton").jqxDropDownButton('setContent', getTextElementByColor(new $.jqx.color({ hex: "549a97" })));
  ZerynthApp.jquerymobile_scalecontent();
  $("#animselect").change(function() {
    ZerynthApp.call('change_animation',parseInt($("#animselect").val()));
  });
  $("#speedslider").on('slidestop',function() {
    ZerynthApp.call('change_speed',parseInt($("#speedslider").val()));
  });
});
</script>
</body>
</html>
animation.py (Python)
################################################################################
# Zerynth Lamp
# Created by Zerynth Team 2015 CC
# Authors: G. Baldi, D. Mazzei
################################################################################
#Lamp animation functions
from neopixel import ledstrips as neo
import threading
lock = threading.Lock()

# the Zerynth color :)
color = [0x54,0x9a,0x97]
anim = 0
anim_speed = 50
leds = None
layer0 = None
layer1 = None
layer2 = None
npins =0
stopped=False
stopcolor = [0xff,0xff,0xff]

# create all the needed layers
# let's define some coefficients for smooth animation (half a sinus wave)
animation_coefficients = [
  0, 0.2588190451, 0.5, 0.7071067812, 0.8660254038, 0.9659258263,
  1, 0.9659258263, 0.8660254038, 0.7071067812, 0.5, 0.2588190451
]

rainbow = [
  (0xff,0x00,0x00), (0xff,0x7f,0x00), (0xff,0xff,0x00),
  (0x00,0xff,0x00), (0x00,0x00,0xff), (0x4b,0x00,0x82), (0x8f,0x00,0xff)
]

def setup_anim(n):
  global layer0,layer1,layer2,anim
  # fill layers with their initial values
  lock.acquire()
  leds.clear()
  layer2.clear()
  layer0.clear()
  layer1.clear()
  n=n%4
  if n==0:
    layer0[0]=(100,0,0)
    layer0[1]=(100,0,0)
    layer0[2]=(100,0,0)
    layer1[0]=(0,100,0)
    layer1[1]=(0,100,0)
    layer1[2]=(0,100,0)
  elif n==1:
    for x in range(npins//2):
      layer0[x]=(100//(2*x+1),0,0)
      layer1[npins-x-1]=(0,100//(2*x+1),0)
    layer2.clear()
  elif n==2:
    layer1.clear()
    pstep=0
    for x in range(npins):
      step = x*len(rainbow)/npins
      rx = (rainbow[int(step)][0]+rainbow[int(pstep)][0])//4
      gx = (rainbow[int(step)][1]+rainbow[int(pstep)][1])//4
      bx = (rainbow[int(step)][2]+rainbow[int(pstep)][2])//4
      layer0[x]=(rx,gx,bx)
      pstep=step
  elif n==3:
    layer0.clear()
    layer1.clear()
  anim=n
  lock.release()

def setup_anim_speed(n):
  global anim_speed
  anim_speed=n

def setup_color(r,g,b):
  global color
  #print("Color:",r,g,b)
  color[0]=r
  color[1]=g
  color[2]=b

# Create a function to handle background animation
def animate_background(delay):
  global color
  step=0
  while True:
    if (anim==3 or anim==0) and not stopped:
      lock.acquire()
      layer2.setall(int(color[0]*animation_coefficients[step]/2),int(color[1]*animation_coefficients[step]/2),int(color[2]*animation_coefficients[step]/2))
      lock.release()
      step += 1
      if step >= len(animation_coefficients):
        step=0
    else:
      lock.acquire()
      layer2.clear(); layer2.setall(stopcolor[0],stopcolor[1],stopcolor[2])
      lock.release()
    sleep(delay+500-5*anim_speed)

def animate_foreground(delay):
  while True:
    if not stopped:
      lock.acquire()
      if anim == 0:
        layer0.lshift()
        layer1.rshift()
      elif anim == 1:
        layer0.rshift()
        layer1.rshift()
      elif anim == 2:
        layer0.rshift()
        layer1.rshift()
      elif anim == 3:
        layer0.lshift()
        layer1.lshift()
      lock.release()
    else:
      lock.acquire()
      layer0.clear()
      layer1.clear()
      lock.release()
    sleep(delay+100-anim_speed)

def start(pin,numpins):
  global leds,layer0,layer1,layer2,npins
  npins=numpins
  leds = neo.LedStrip(pin,numpins)
  layer0 = neo.LedStrip(pin,numpins)
  layer1 = neo.LedStrip(pin,numpins)
  layer2 = neo.LedStrip(pin,numpins)
  setup_anim(0)
  setup_anim_speed(50)
  # start the background animation thread
  thread(animate_background,500)
  # start the foreground animation thread
  thread(animate_foreground,50)
  while True:
    # clear leds
    leds.clear()
    # now, acquire the lock
    lock.acquire()
    # merge the first and second layer
    leds.merge(layer0)
    leds.merge(layer1)
    # merge the background layer only where leds is transparent (0,0,0)
    leds.merge(layer2,neo.first_color)
    # release the lock
    lock.release()
    # and light it up!
    leds.on()
    sleep(50)

def stop(r,g,b):
  global stopped
  global stopcolor
  stopcolor[0]=r
  stopcolor[1]=g
  stopcolor[2]=b
  stopped=True

def resume():
  global stopped
  stopped = False
  setup_anim(anim)
Schema's

Productieproces
- Gaslampen: Evolutie, Ontwerp en Moderne Productie
- Laser Pointer: Ontwerp, Productie en Veiligheidsoverzicht
- Zaklamp: van ontstaan tot moderne innovatie
- Halogeenlampen: Technologie, Geschiedenis en Toekomst – Experts Inzicht
- De Kaleidoscoop: Van Brewsters Wetenschap tot Modern Ontwerp
- Verkeerslichten: Techniek, Geschiedenis en Toekomstige Innovaties
- Van Vuur tot Draad: De Evolutie en Productie van de Moderne Glühlampe
- Een Multi-sensor Temperatuur- & Lichtmonitoringssysteem Bouwen met Raspberry Pi & DS18B20
- Slimme Verkeerslicht: Adaptieve Straatverlichting Aangedreven door IoT
- Digitale Lichtsensor – LED Aansturen met Omgevingslicht via Windows 10 IoT Core
- Elektrische signaalvoortplanting bij lightsnelheid: een 300.000-km gedachte-experiment